It's been quite some time since Panagis had the idea to set-up
a decent, recoil-less springer with a bullpup stock… Please note that Panagis doesn't hunt on land since 1994, the year that his faithful greek "gheckas" dog passed away, forcing him to stop four-legged-hunt (he'd quit winged prey years ago, mid-eighties perhaps) so he doesn't care who and why invaded bullpups in the first place…
Obvious and unique selection for such a short stock (forcing the pistol-grip and trigger blade way in front of the block housing) is definitely a
side lever airgun.
Additionally, recent economic depression renders Chinese origin of the "test specimen" as the only feasible choice.
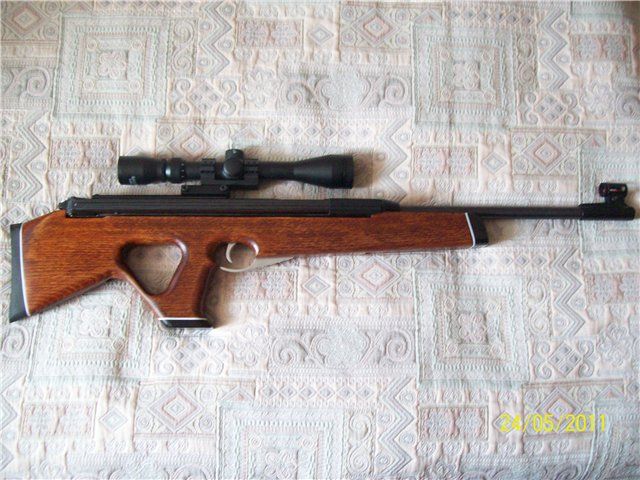
Supposing that someone else must have thought or built something similar, a thorough web research revealed two bullpup stocks for the BAM 30-1 of the same person (a Russian) simply confirming feasibility of the project. Bullpup stocks have also been crafted for the original (not recoil-less) DIANA side-levers although not in production by now (ginb.it) or of Iranian origin custom ones, not quite accessible to us…
Back on the subject: A new
BAM 30-1 was bought, after only two pellets (
2, counted and only) dismantled in bits and pieces, turned to a
bullpul and recoil-less improved in every possible way, spending the minimum possible money, given the financial situation (damned earthquakes and taxes)
The summary of interventions:
•
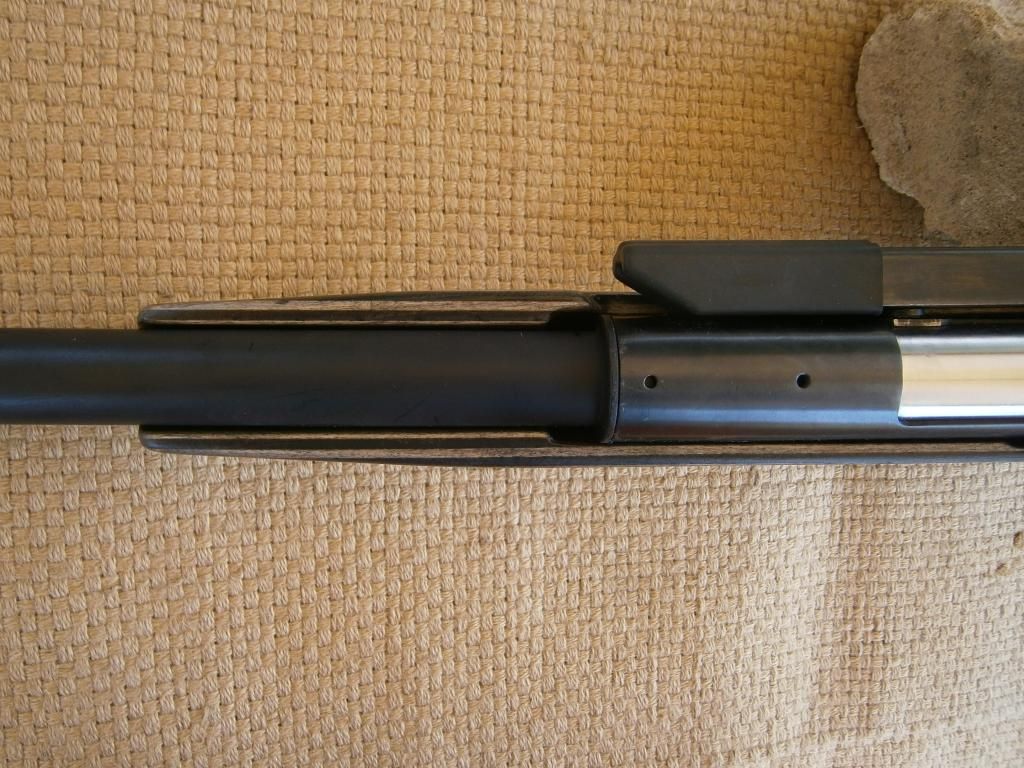
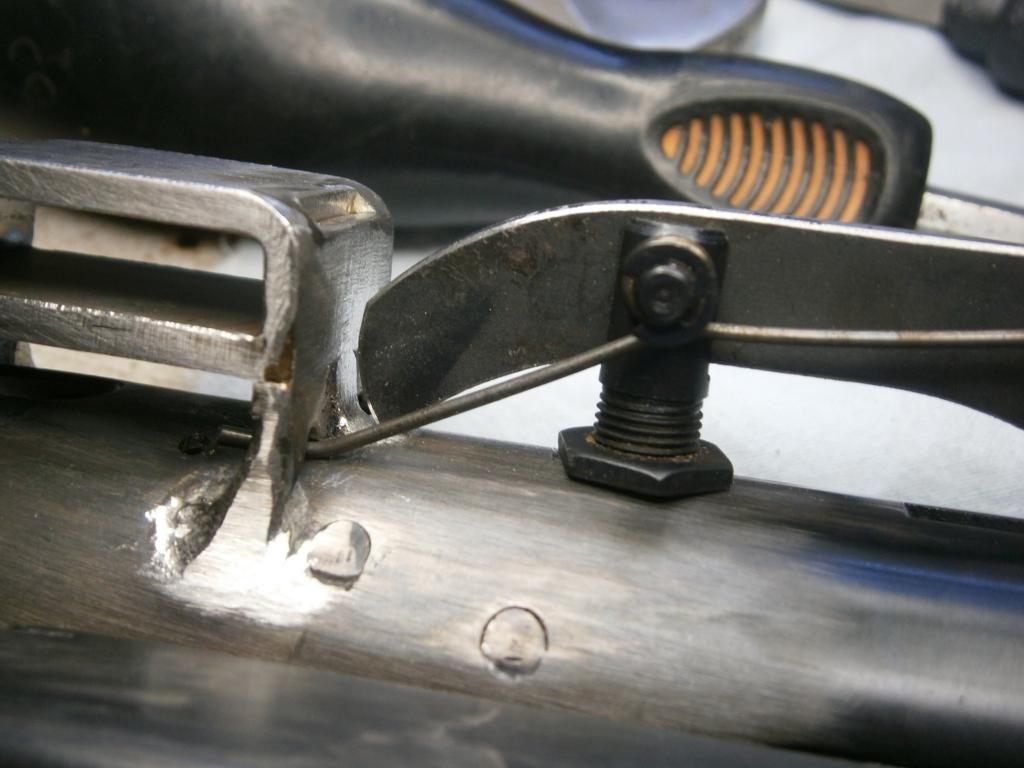
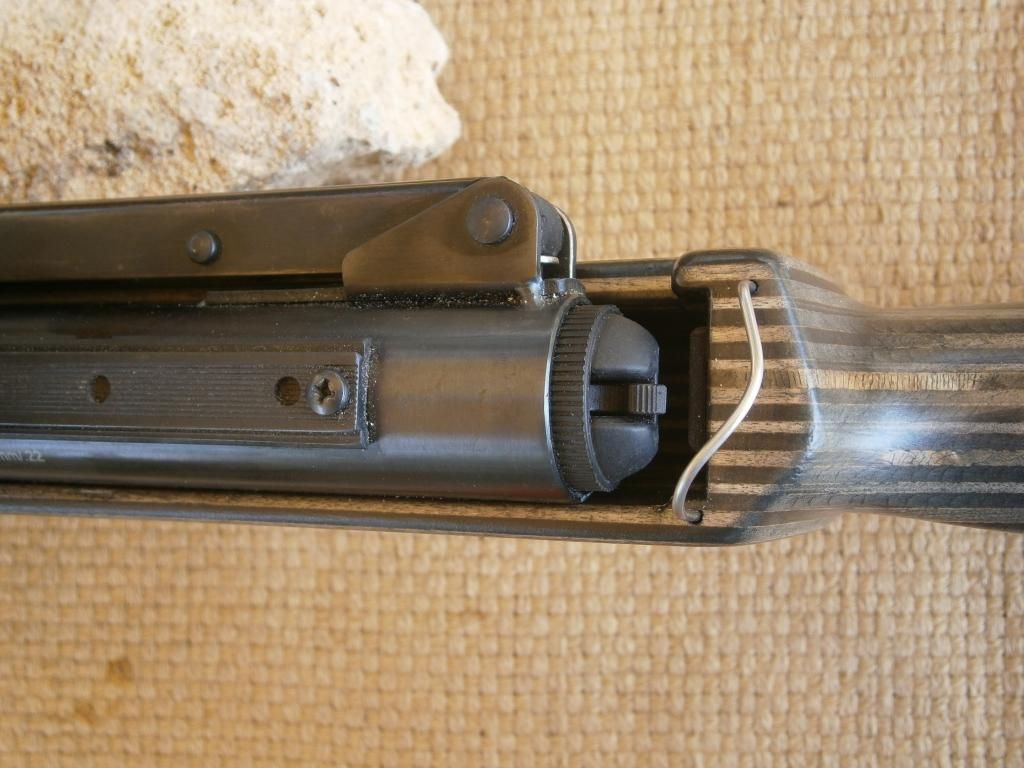
An anti-bear trap blade mod was performed by cutting the rear last dent/step, substituted by a 2mm stainless pin as a stop to the blade in the exact needed position, thus extending length-wise the available space for the trigger.
• Rounded and polished
barrel breech-end and crown-end, using a hand-dremel and grinding paste on string unfortunately twice, before and after it's been cut.
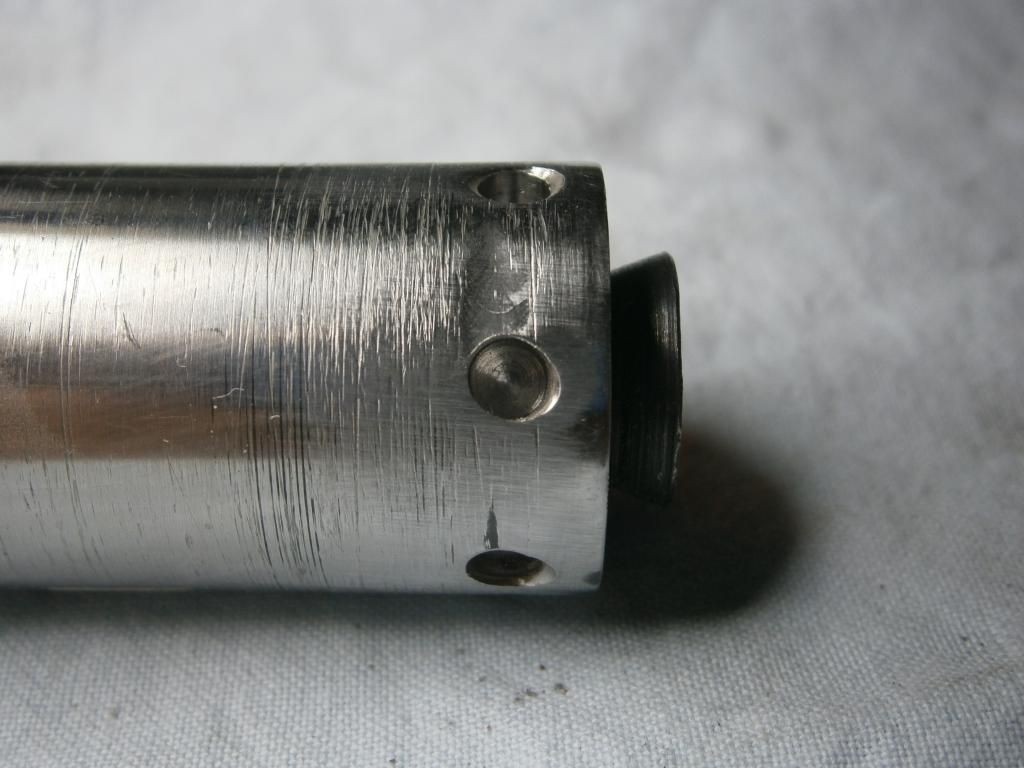
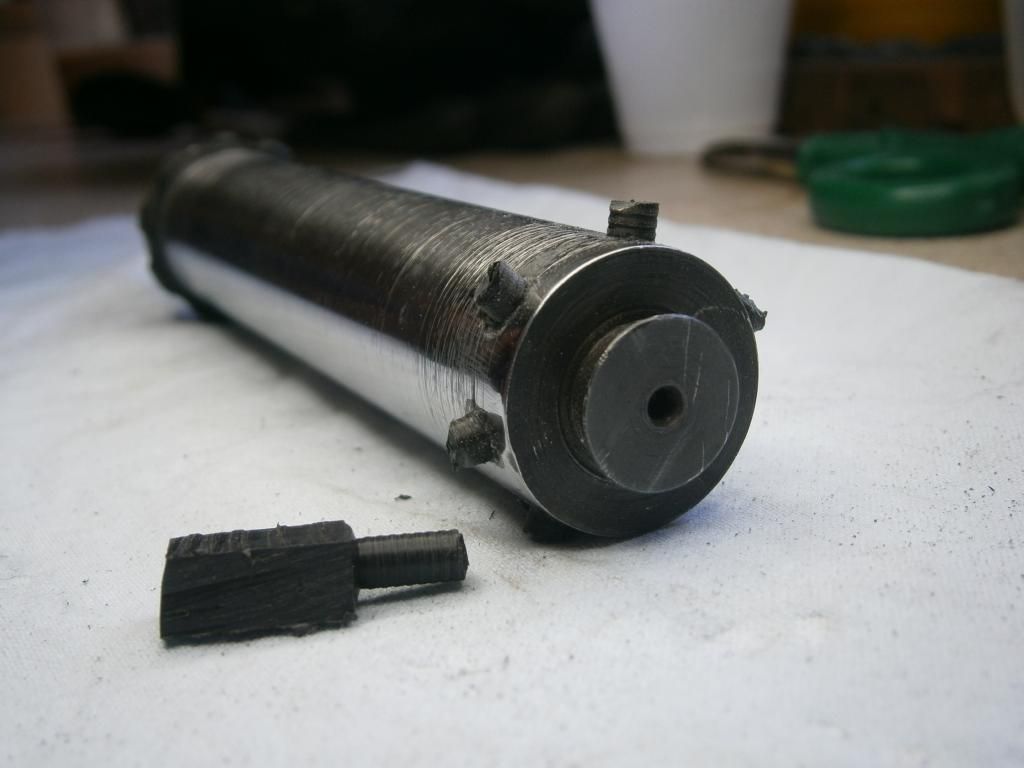
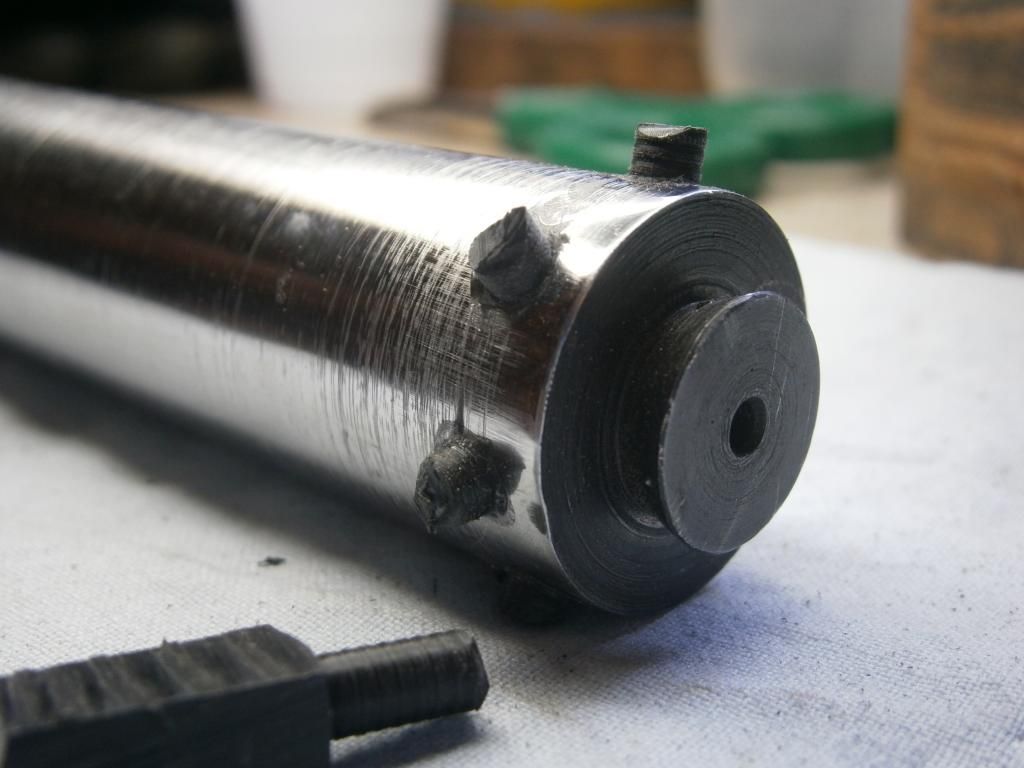
• Using a good friend's lathe instead of his own, which is small, they turned the gun barrel, reducing the OD all the way from breech to crown, down to 15 mm from 18mm (15mm was the front part only) thus reducing it's weight. For the aesthetic of the finished result, they cut the front part in front of the shoe contact, leaving a total 375mm of barrel length. Our friend Piperman said "no" but his word was late to avoid the cut...
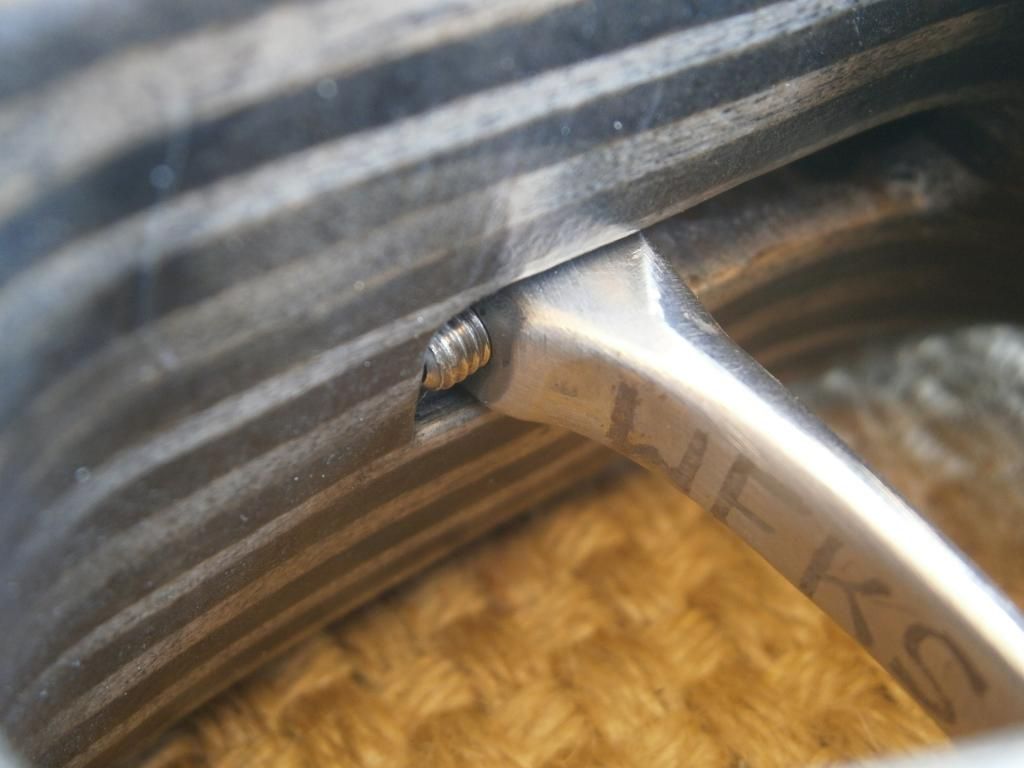
• Decided to add another M3 grub-screw, in front of the
trigger housing for the adjustment. This addition turned to be significant, regulating exactly the extent of the engagement of the two shears. By turning properly the existing screw (which has been replaced by a Μ4 grub-screw, rendering the front one useless and thus can be removed) trigger mechanism achieved a zero-length first stage (read below for this option, where the trigger transition rod is explained) and a light and precise second stage. Note that all contact areas were polished by hand up to a 2000-grit sandpaper. Every trigger part was thermally treated, hardened by cooling in thin oil while red-hot, then were polished until silver shine and finally annealed to relieve internal strain and regain elasticity.
• Rounded and polished carefully the head of the rear
additional safe activated while extending the side-lever because it was roughly machined from factory, scoring badly the plastic end of lever.
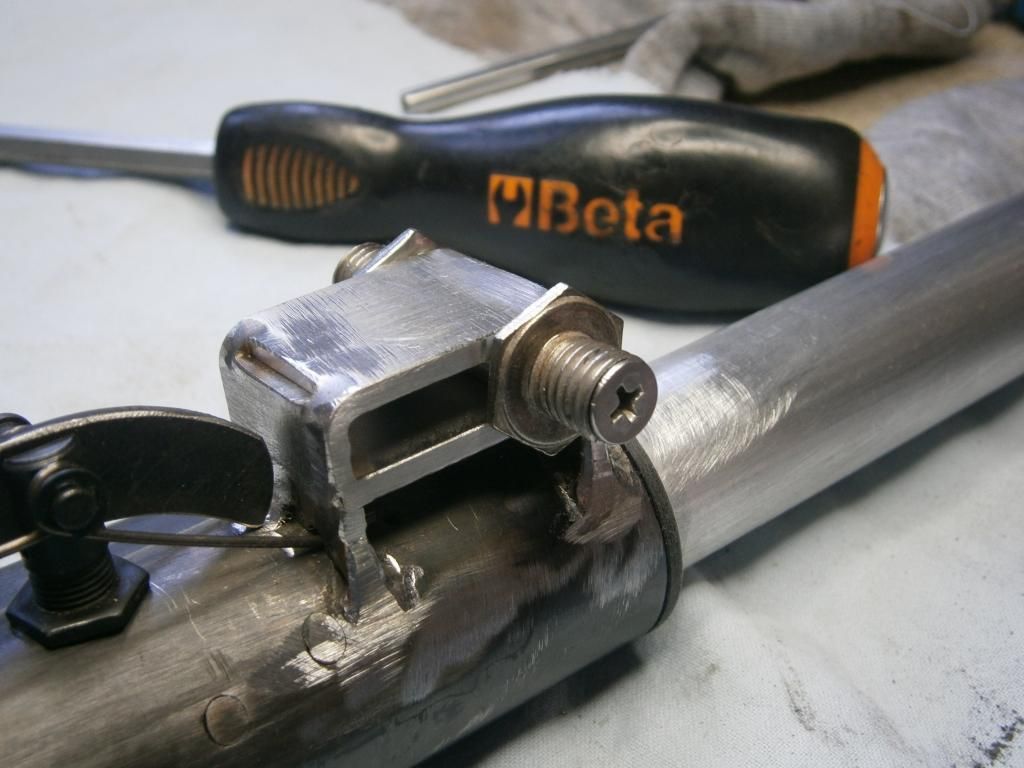
• Using a laser-cut 3mm stainless steel sheet, (Lazarou 's shop in Volos, just send him the drawing and he cuts the shape on any desirable metal), bent and welded properly, a pair of identical boxes/sliders have been constructed, providing a total 18mm of travel to the gun block. Boxes were welded (not so neatly but sturdily, I have to admit) using stainless electrode on the outer gun tube, completely parallel to it, optically aided by the semi-round end-of-travel design. Later, It was realized that both boxes/slides should have been ordered in four different parts for each one because bending those parts proved a quite difficult thing to do...
• Slider construction was integrated by the addition of
four hexagonal buttons made from M10 stainless screws, a 7mm stainless steel blade which slides over the buttons and two stainless M5 screws each.
• A modification of the
anti-bear trap spring was needed because the front slider covered the two tiny holes anchoring each end of it. Now, they are attached on the slider, on two properly carved holes. Necessary was also a slight grinding of the anti-bear trap blade, because of the slider too.
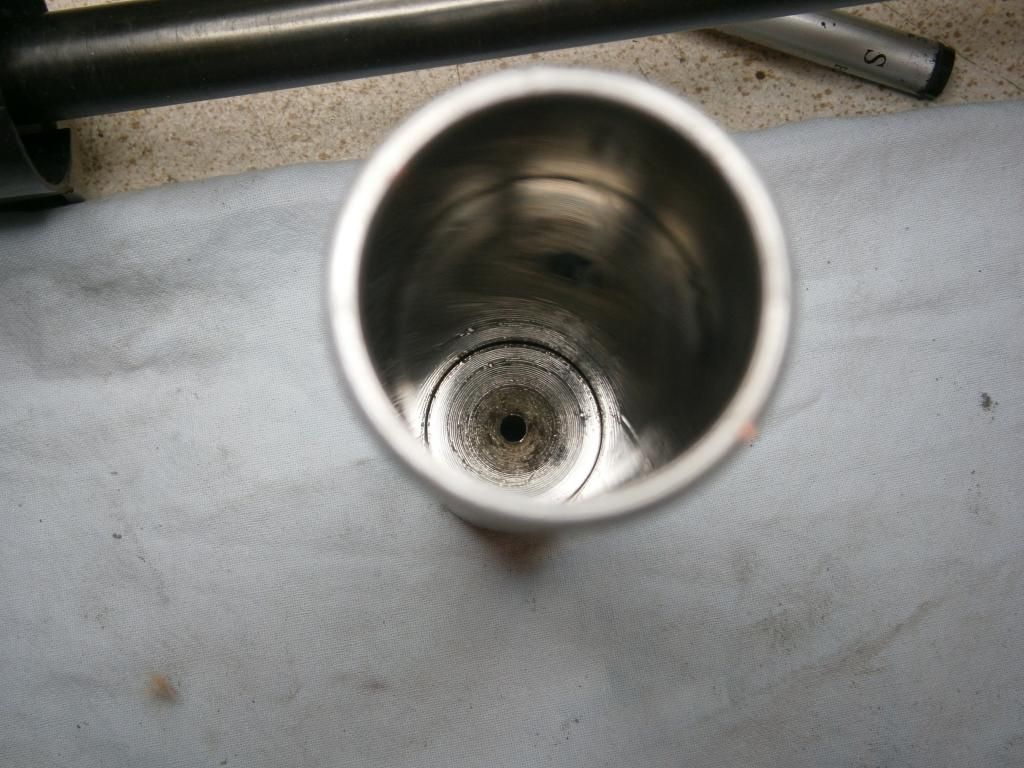
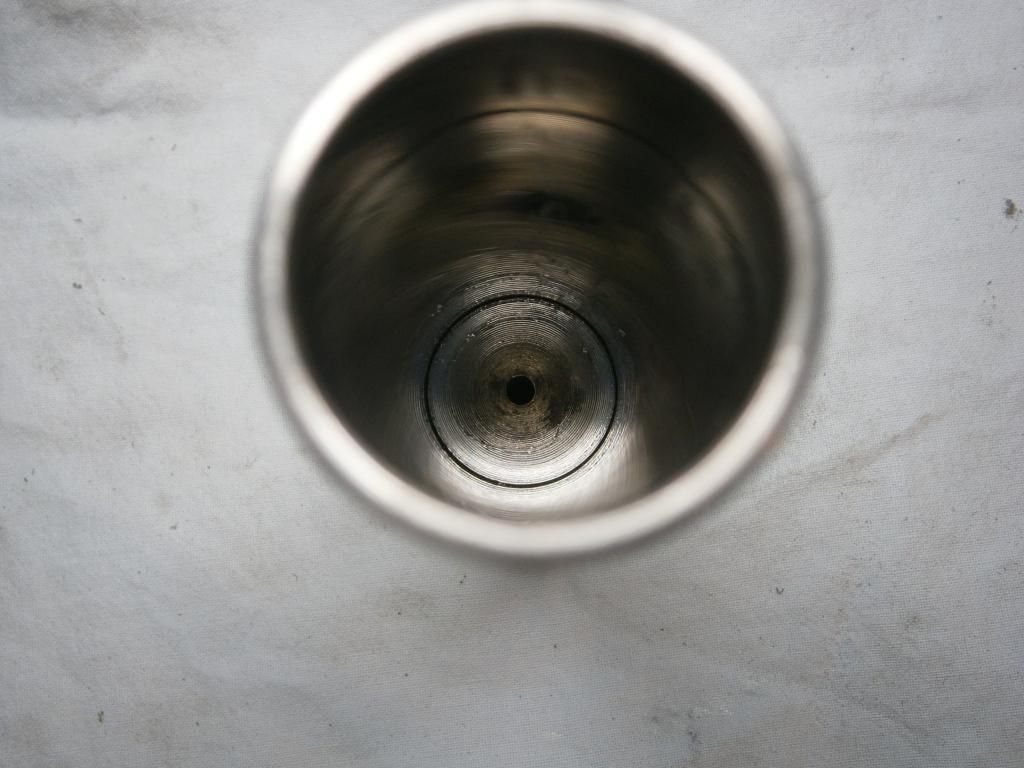
•
Polished very carefully the
piston chamber (15 mins on the lathe were adequate to mirror-shine) up to 2000-grit damp sand paper and light paste on fabric because it has arrived from China almost as rough as a corn field… A quick polishing was also applied on the outer surface as it only slides over the outer gun tube.
• Aiming towards a longer piston stroke, the
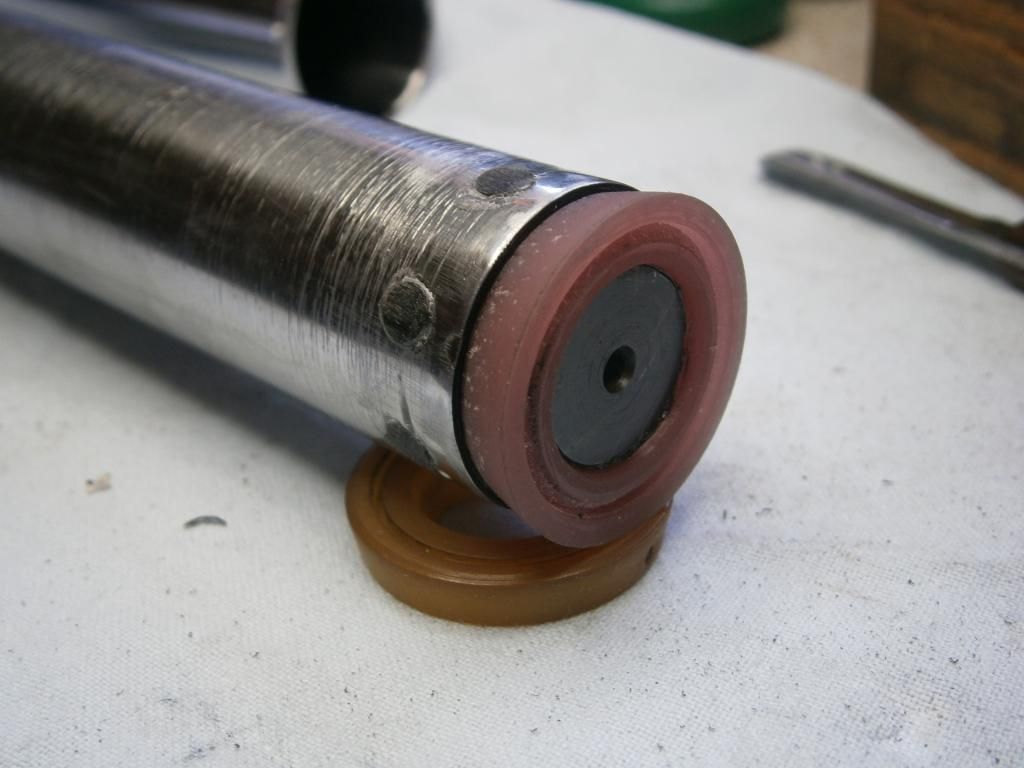
compression cylinder has been shortened on the lathe by scraping 2.5 mm of the inner face thus equally increasing stroke by the same amount. For those 2.5 mm to be useful, a washer had to be removed, the one between the cylinder and the breech seal which had to be carefully trimmed with a sharp blade.
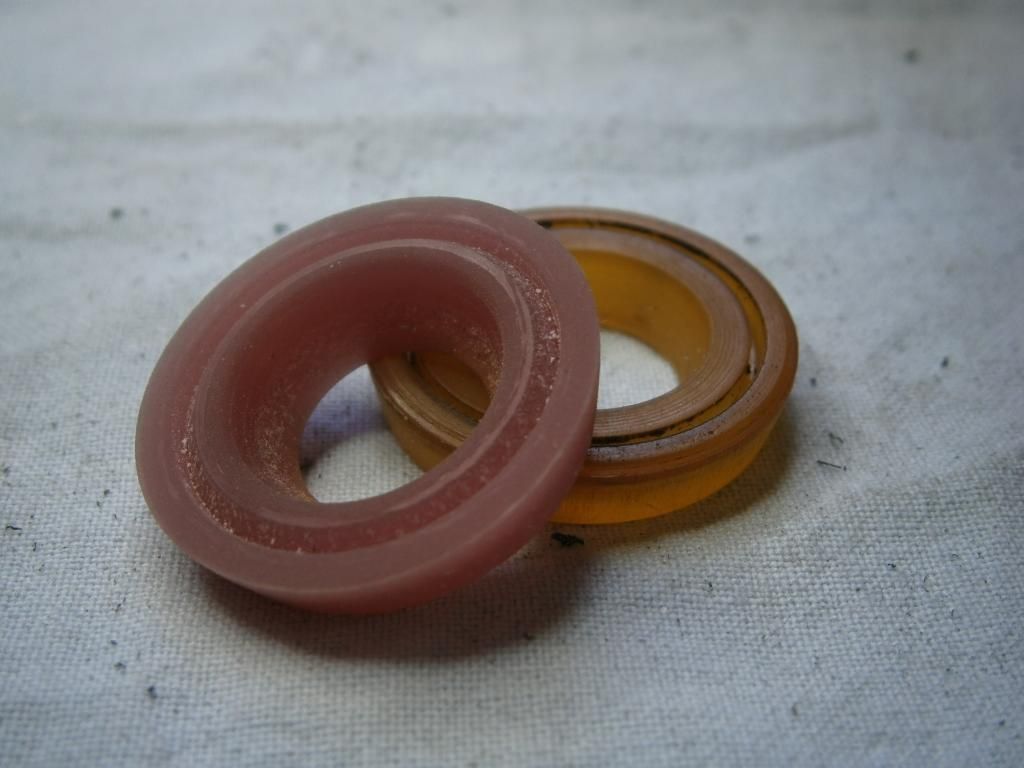
•
Changed the piston seal with a reddish PET seal made on the lathe, rather easily, high rpm and well sharpened cutting tool. Simmilar is the way to make a substitute for the previously mentioned breech seal. STEMPLAST in Piraeus provided the needed 1/2 meter-long, 30mm OD, PET rod for 23 euros. Plenty of seals to make of it...
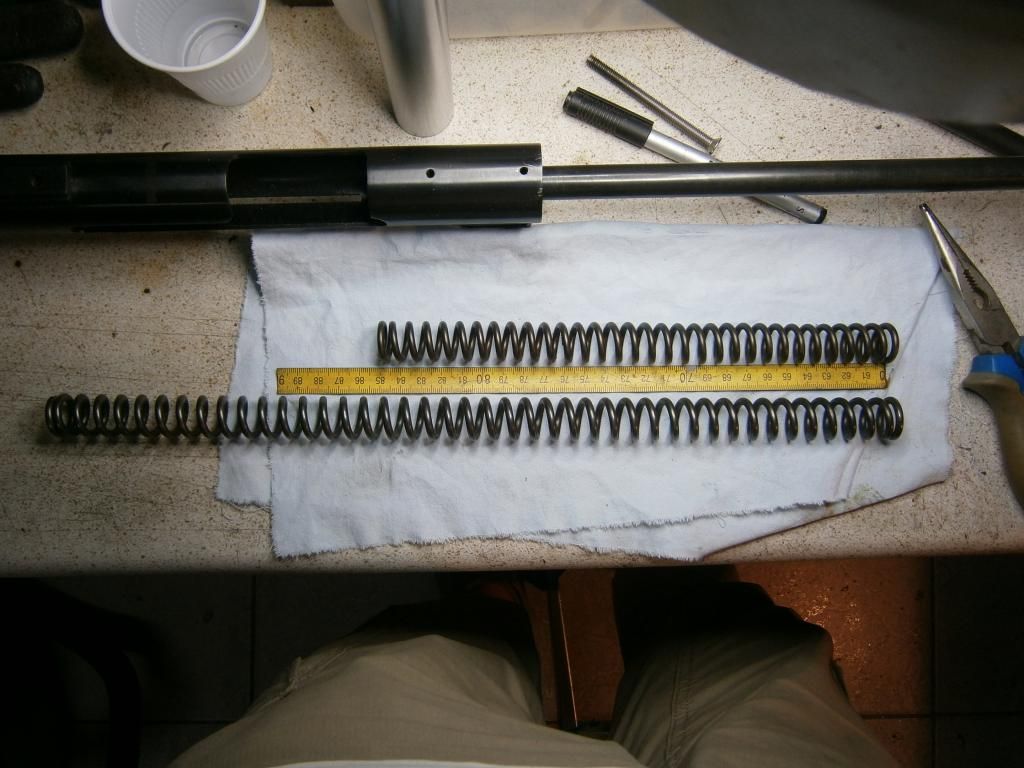
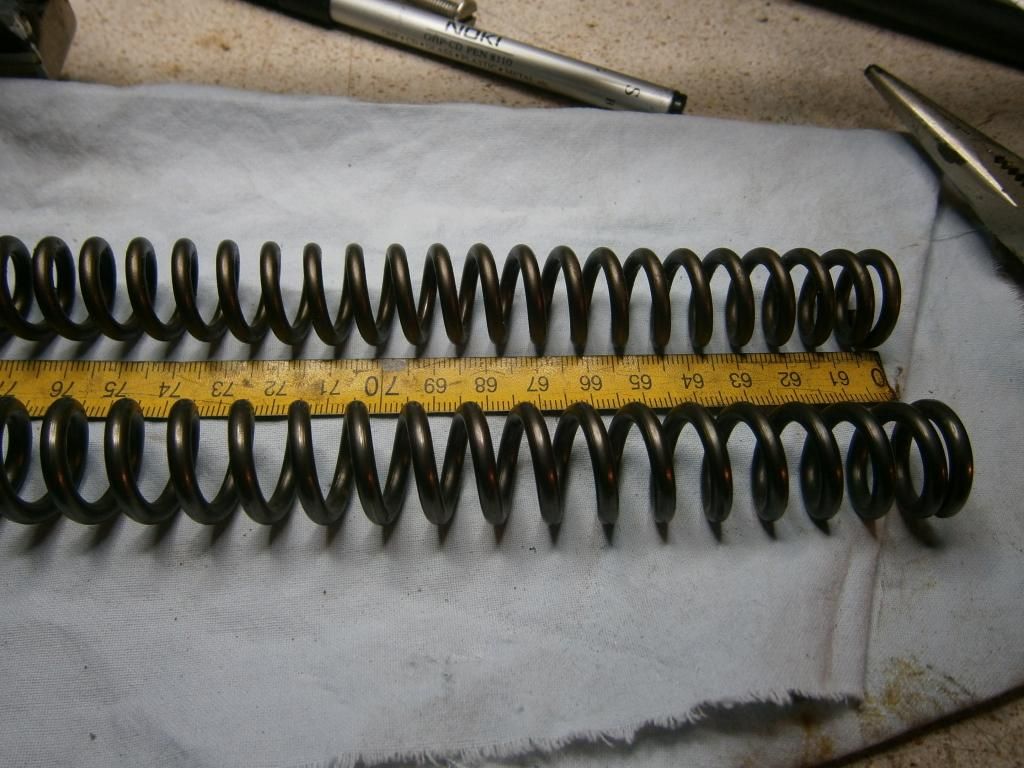
•
Changed the main spring with a shortened one from a HATSAN mod125, our friend Piperman donated this, (thanks, Kostas) enough for two rifles if it was bit longer.
•
Piston accepted a
buttoning on the rear end by a star-shaped tight acetal ring, glued with super-glue, after smoothing on the lathe the factory-made bulge in front. Note that the factory made a similar attempt with a black plastiplex ring, decorative more or less because there was a 3mm gap between the ring and the cylinder. Front end of piston received buttoning also, using 6 small lateral mini buttons made from 4mm black acetal glued with super-glue into 4mm-deep holes. A lot of patience and attention needed to drill those holes with a carbide drill-bit, because the metal surface of the piston on this area was the only part hardened and quite difficult to drill through.
•
A nippled grub-screw supporting the front seat of the trigger bar in it's hollow point, made from scratch by turning on the lathe a stainless M6 screw. The pull-bar was treated by hand with a round-shaped file because the factory screw and fit were poor, although not a functional impediment but somehow noisy and annoying.
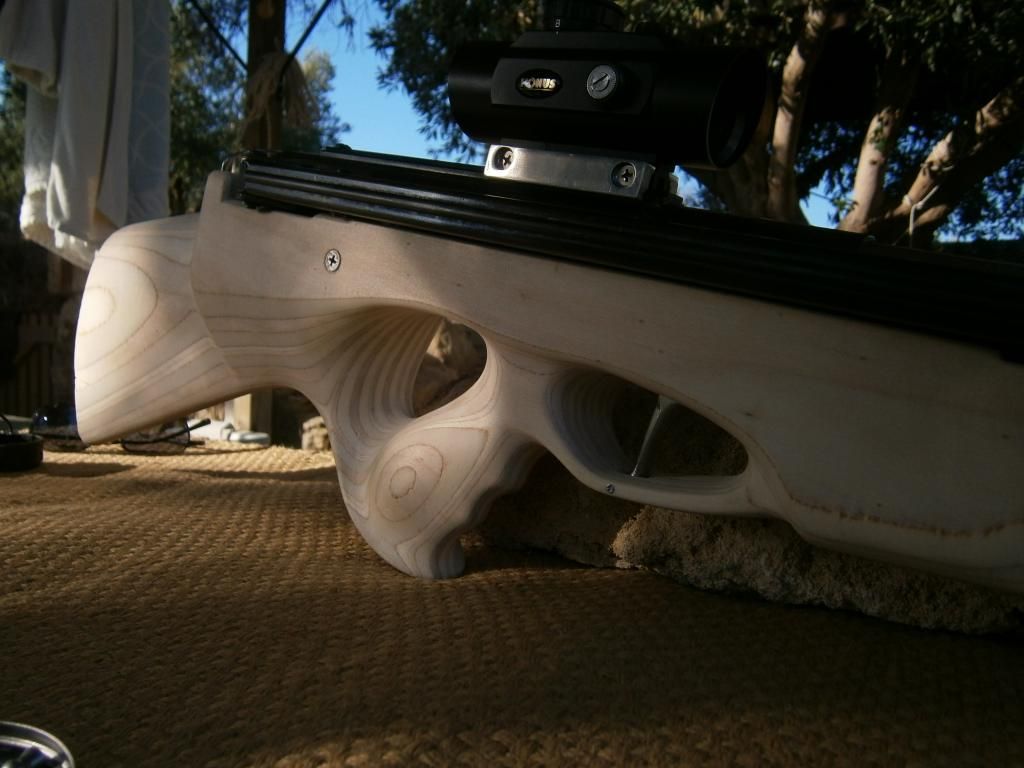
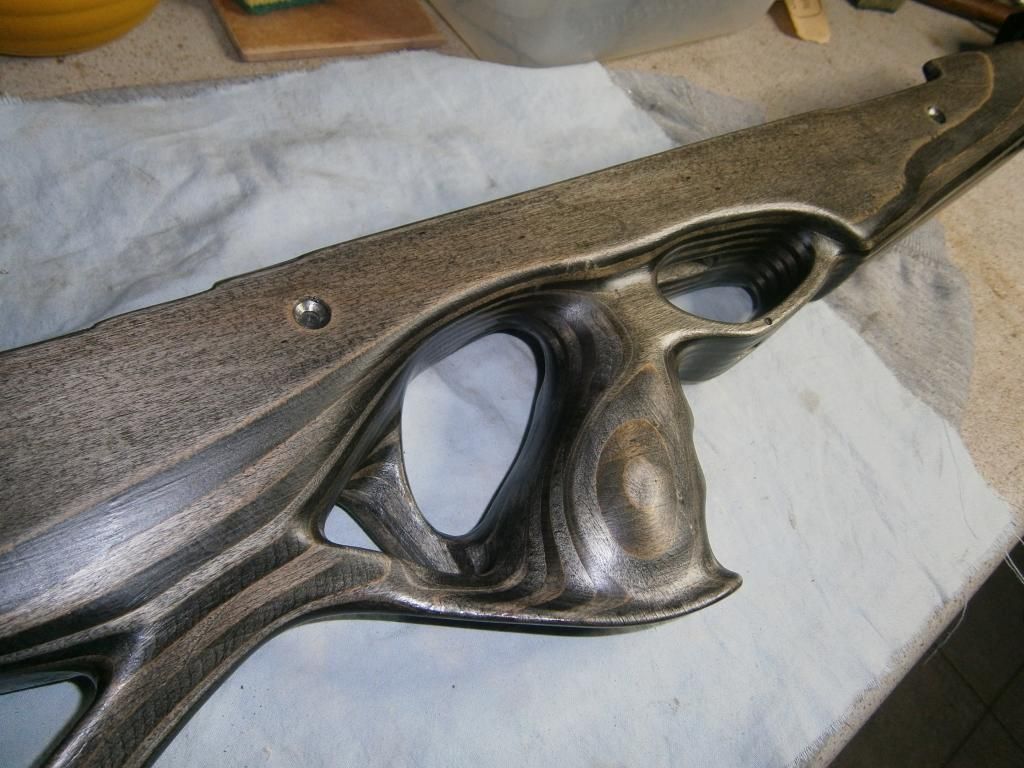
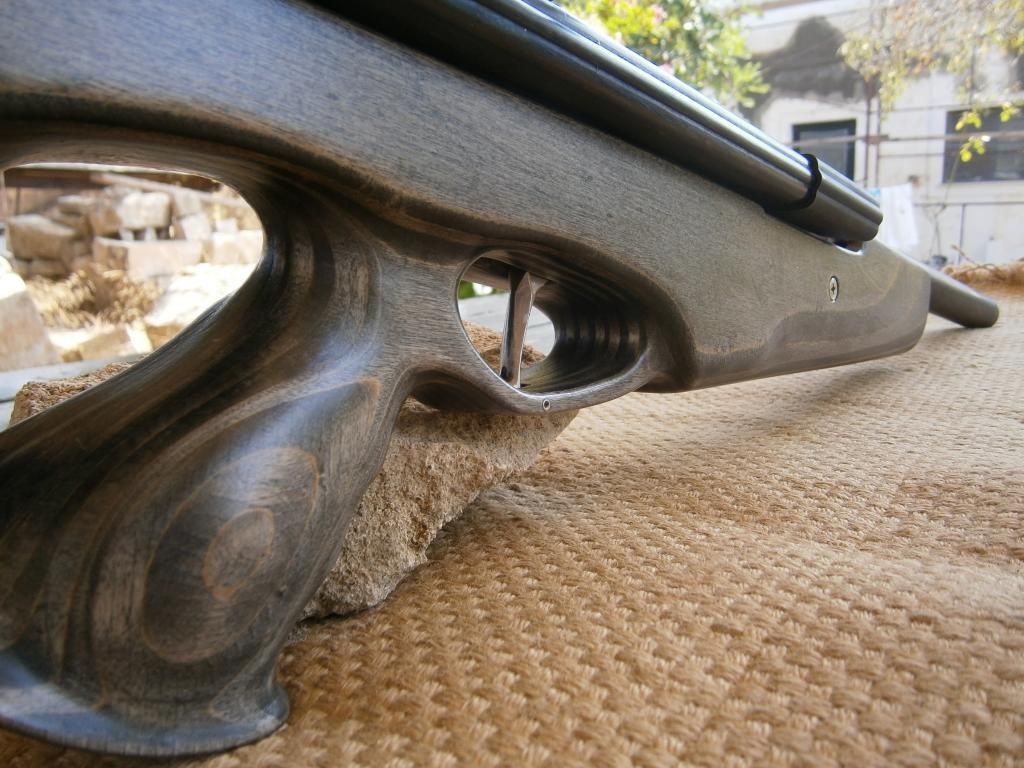
•
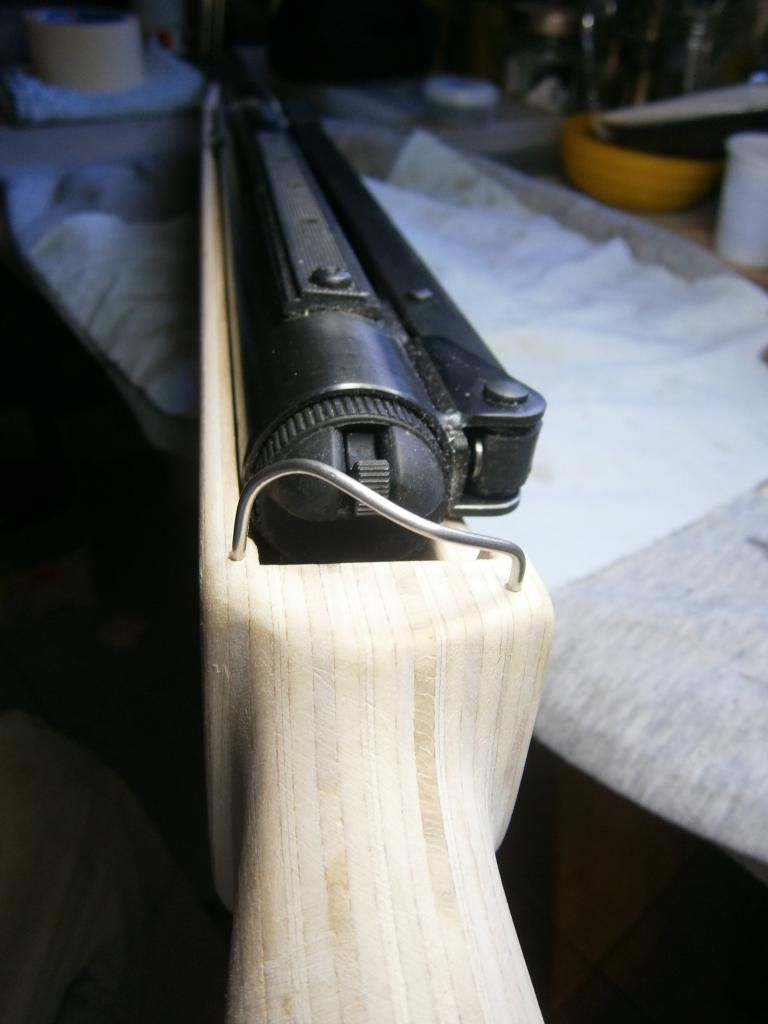
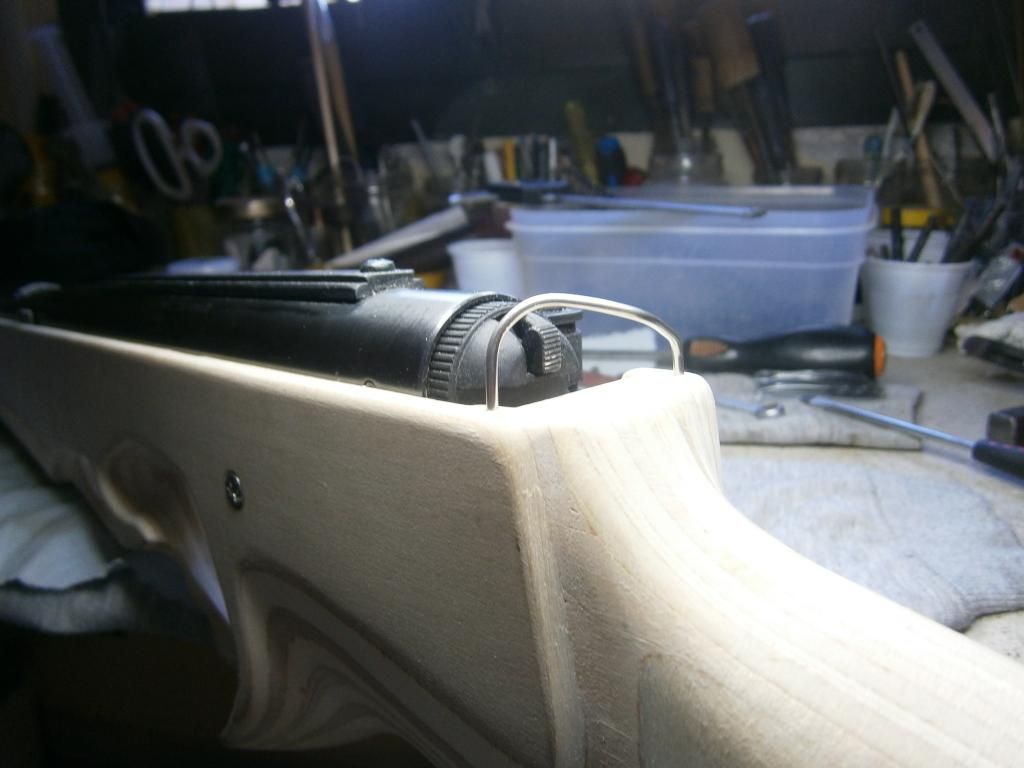
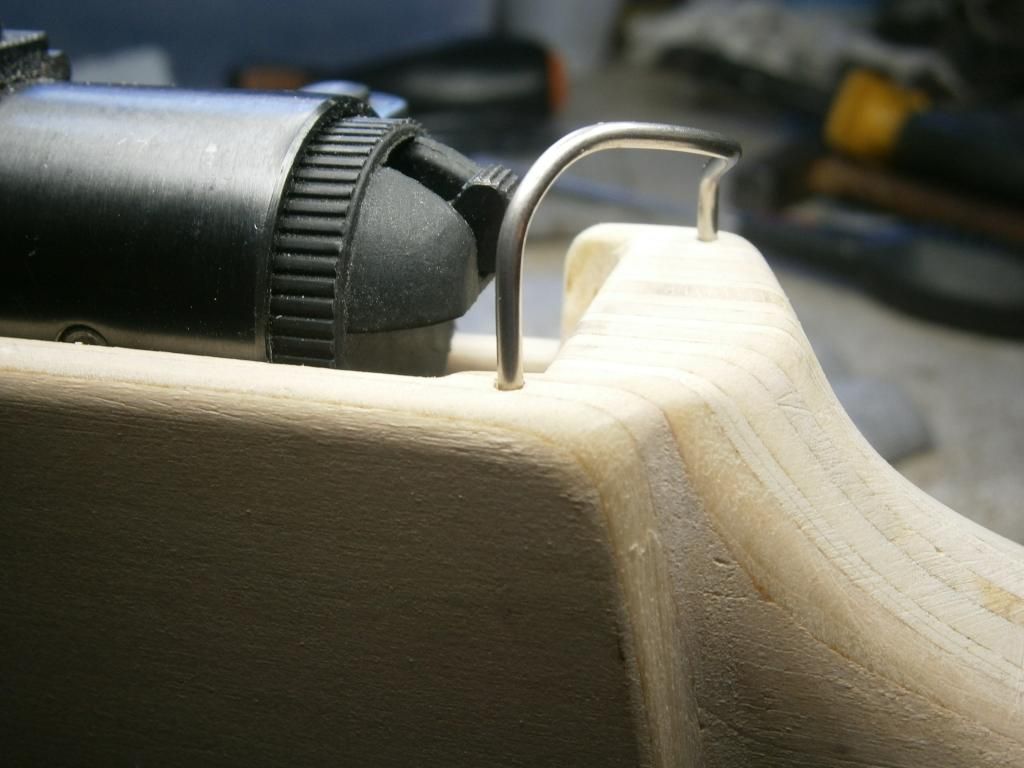
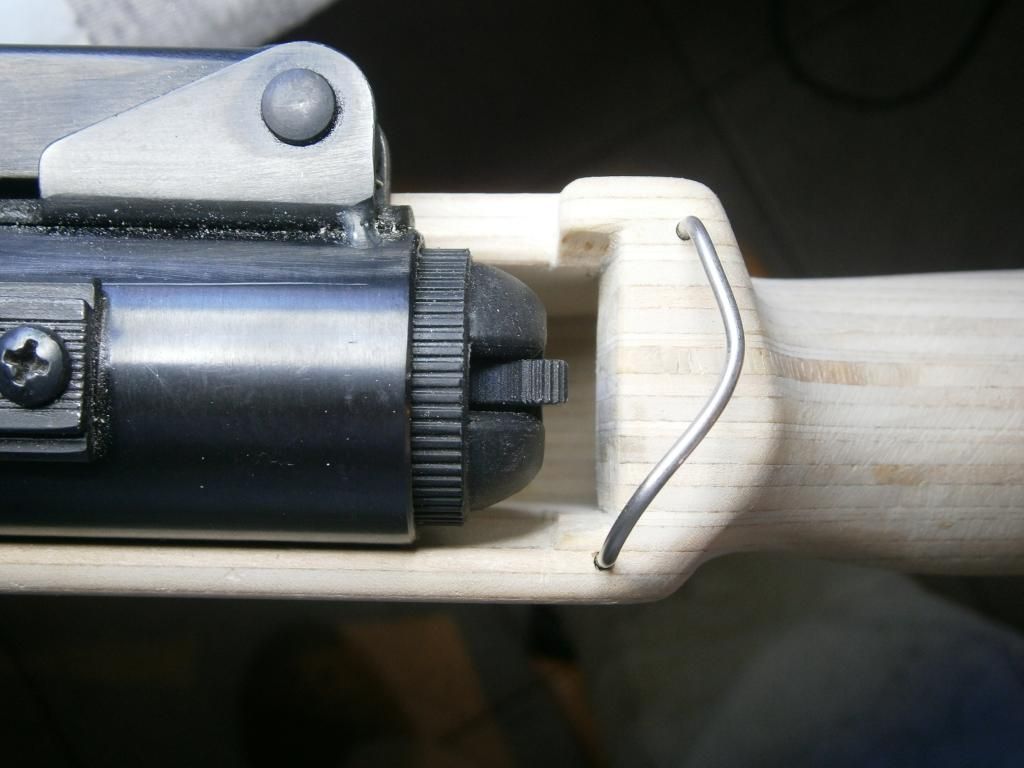
The trigger blade made from stainless steel, is 8 mm wide, fit into a suitable recess of the wooden stock. Note that the blade is not a "sliding type", a commodity for most other bullpups, but rotates on a 3mm pin through the lower end of it, for a smoother operation with less friction.
•
The trigger bar made of a suitably bent 4mm steel bar threaded on both ends, which interlock both triggers with the help of two home-made, 6mm stainless adjustable rods. The adjustable trigger bar comprises of two separate sections connected via a intermediate 6mm bar which is threaded on one end and hollow on the other.
• To improve trigger release feeling and functionality overall, the
first stage of the trigger has been eliminated and doesn't function on the gun block anymore, it has been by-passed by properly adjusting the previously mentioned grub-screws. From now-on this function resides on the two parts of the trigger bar. The stainless steel trigger blade is kept in place (front position) with a small self-made spring, anchored in trigger's lower end.
• The trigger bar is moving through a
groove which has been carved in the stock's laminate with a dremel mill on hand, coated with epoxy resin and slightly polished to ensure the lowest possible friction.
• Note that the stainless blade and the trigger blade back on the gun block
are not constantly interconnected between each other via the trigger bar. The idea is that while shooting, the recoiling gun block doesn't drag with it the stainless blade, which stays in place dragged by a tiny hidden spring. This spring serves also for the first stage feeling of this setup.
• With the help of a carbide milling head on the dremel
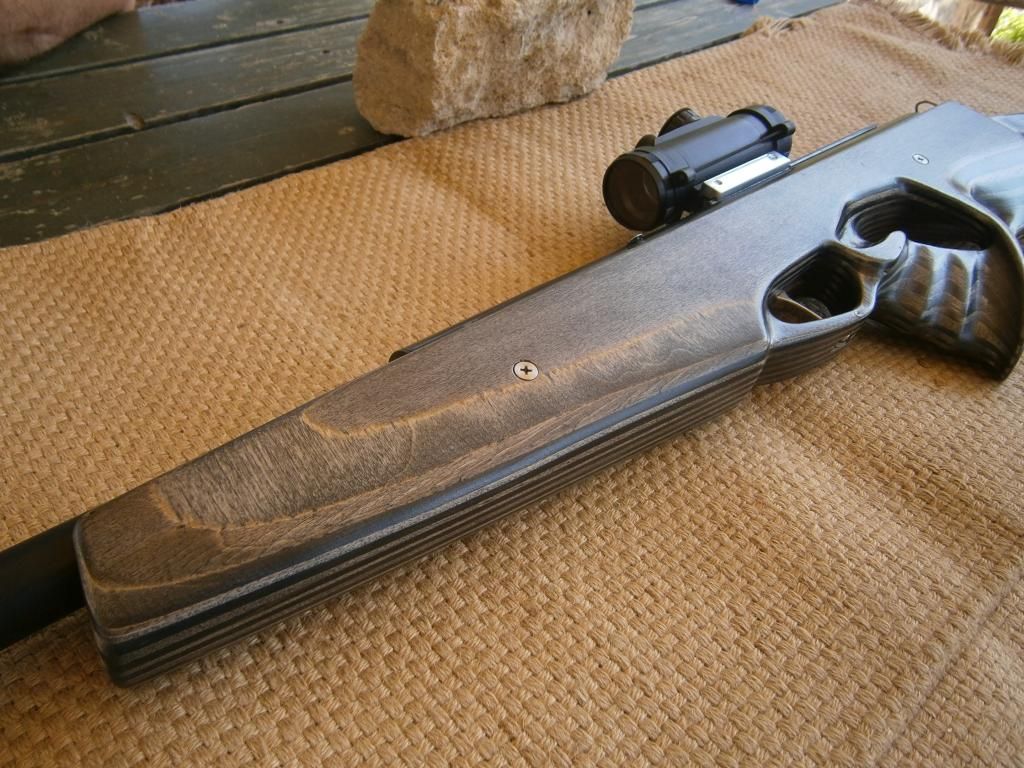
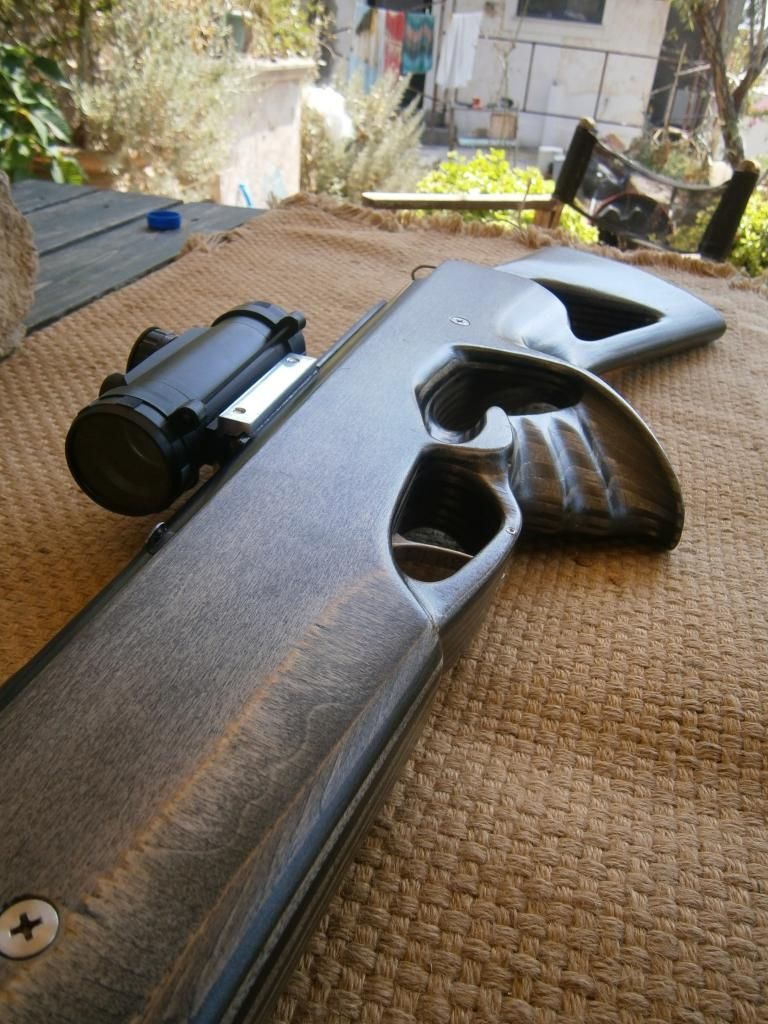
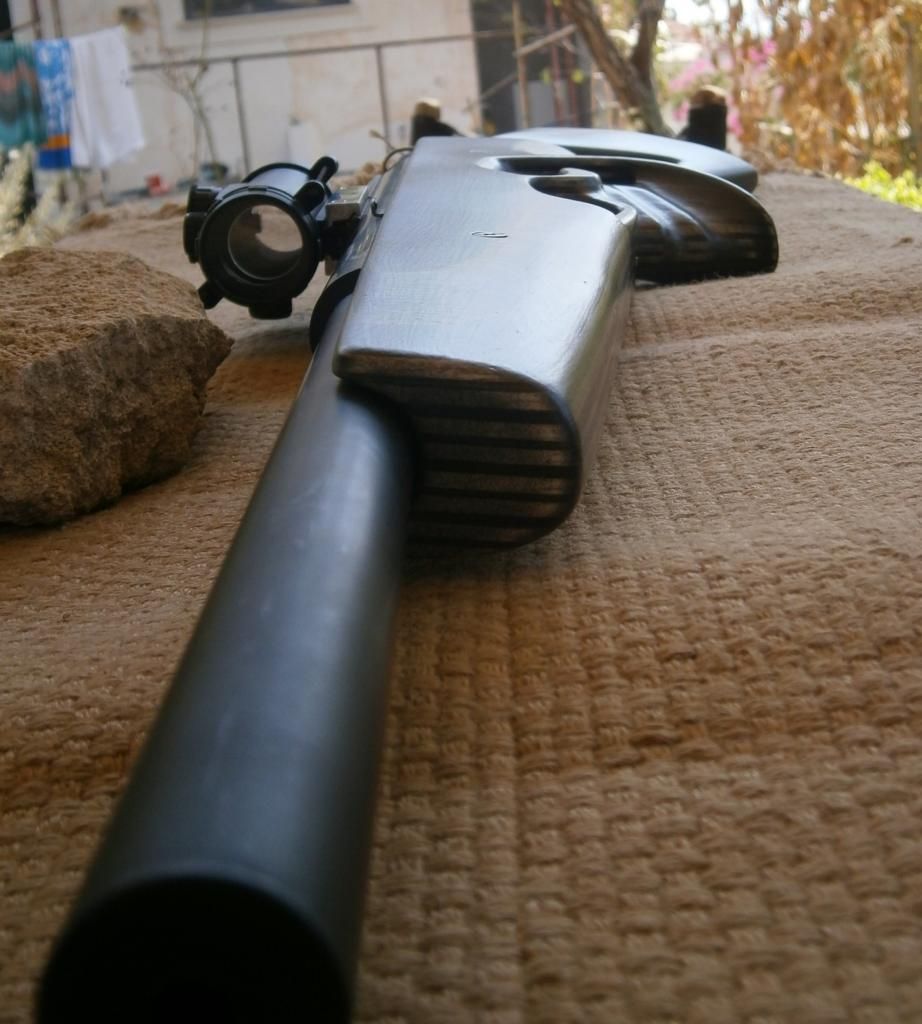
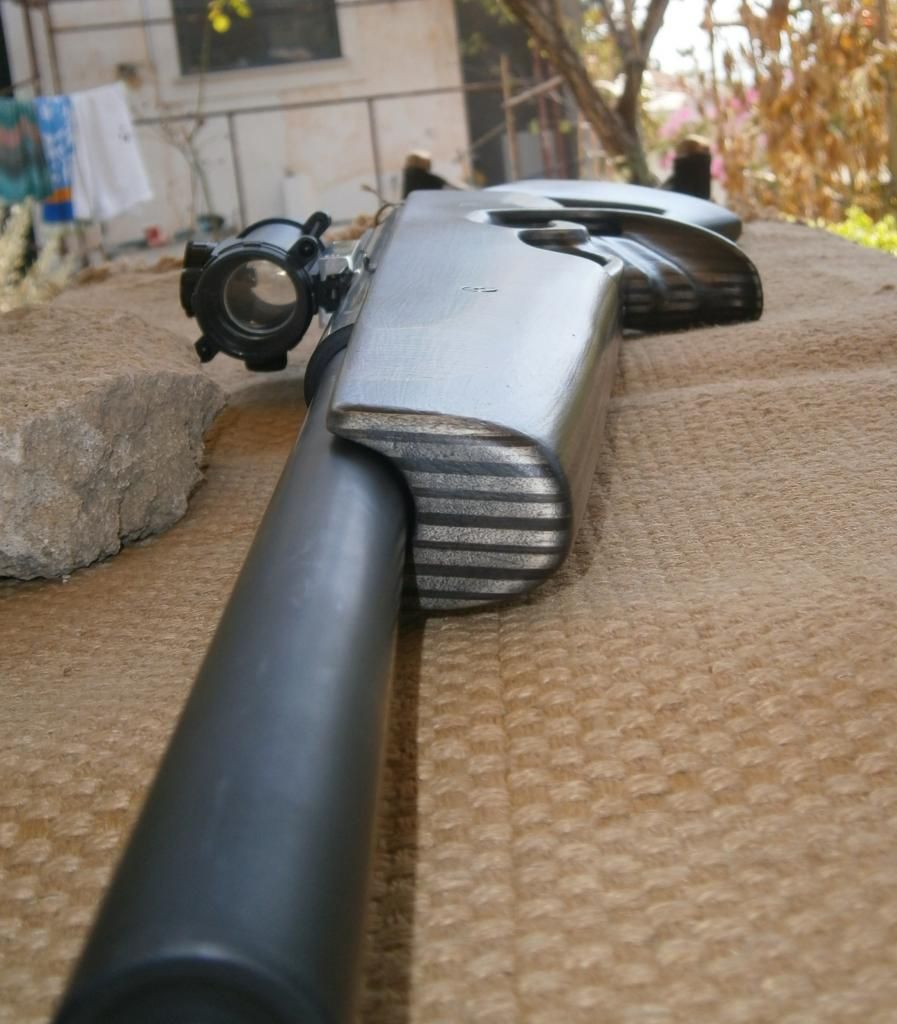
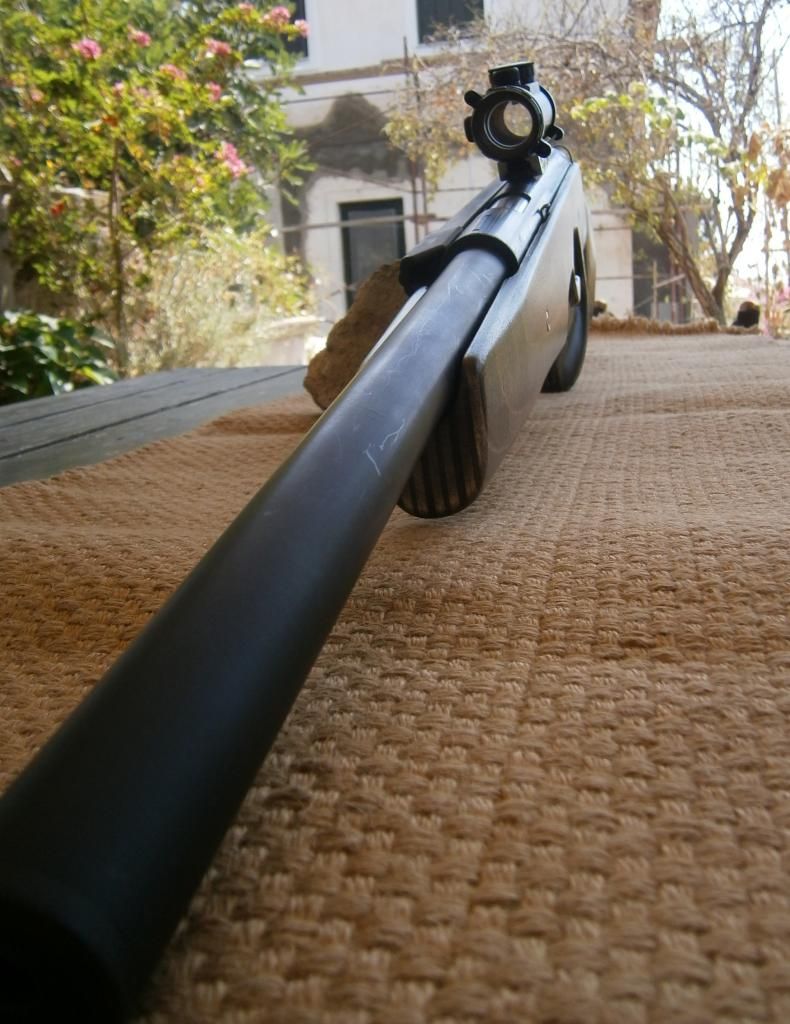
two oblique shoulders have been carved into the front part of the factory scope rail (~75 mm long) forming a somehow narrow weaver rail, it's only 18.8 mm wide, because the 30-1 doesn't come with a weaver rail from factory. I had a red dot sight available for this project, with a little mod of it's base, it has fitted perfectly on the rail.
•
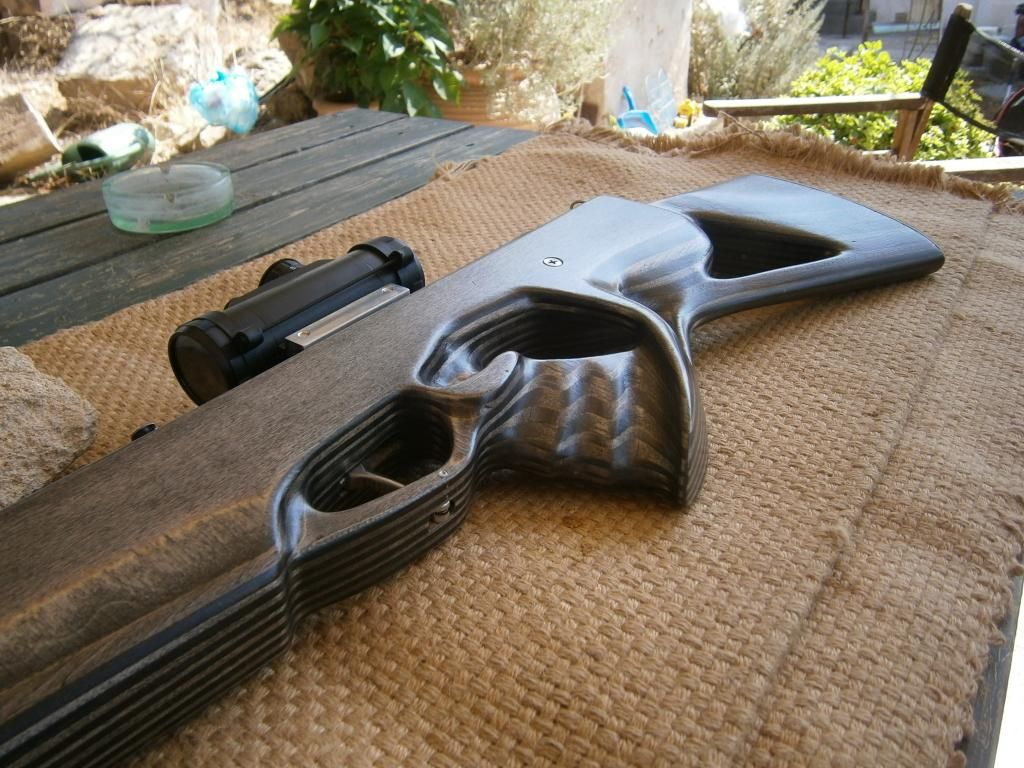
The stock made from a cheap, white, soft 10mm laminate sheet. The three layers in the middle section were marked and cut carefully with a jigsaw, forming the recess for the gun block and the two slides, the external ones just hide the "guts" of the mechanism... It's been a fine job although it could be a bit shorter overall but the anti-bear trap blade forced the trigger to be way back, anyway we are big and tall enough to compensate for this. After all the gun is recoil-less so the gun block moves sharply backwards, a punch on your nose won't be so nice thing...
• To make sure that this won't happen,
a stainless rail has been wedged near the back left edge of the laminate stock, protecting the face and nose of the shooter from the recoiling block.
•
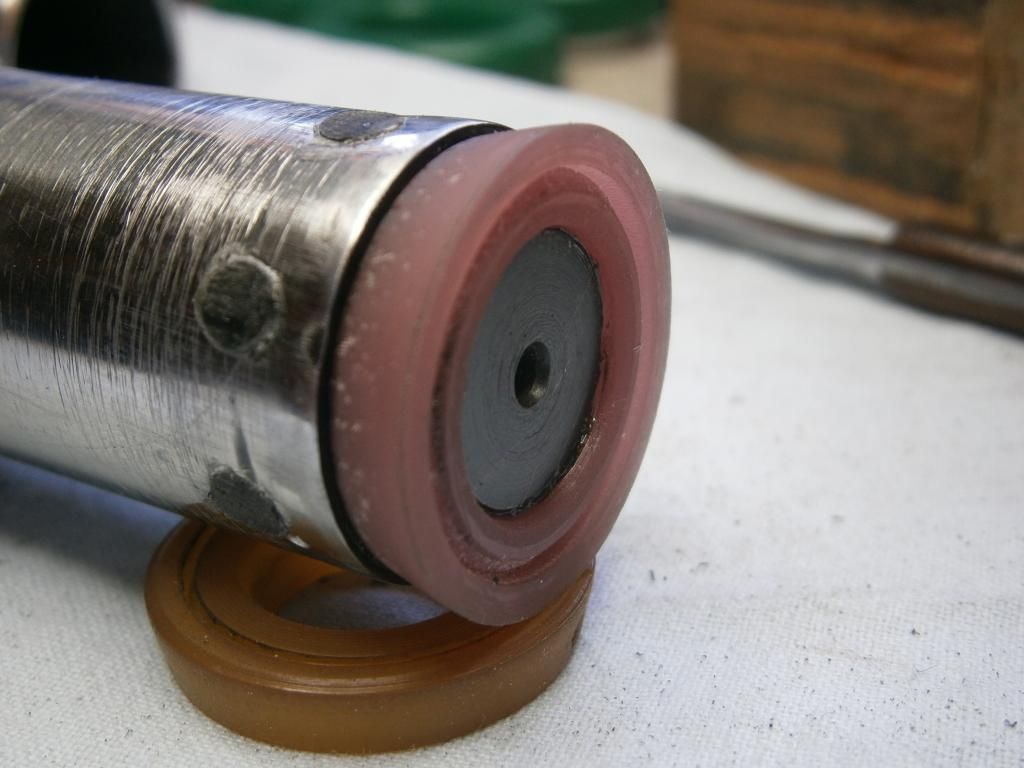
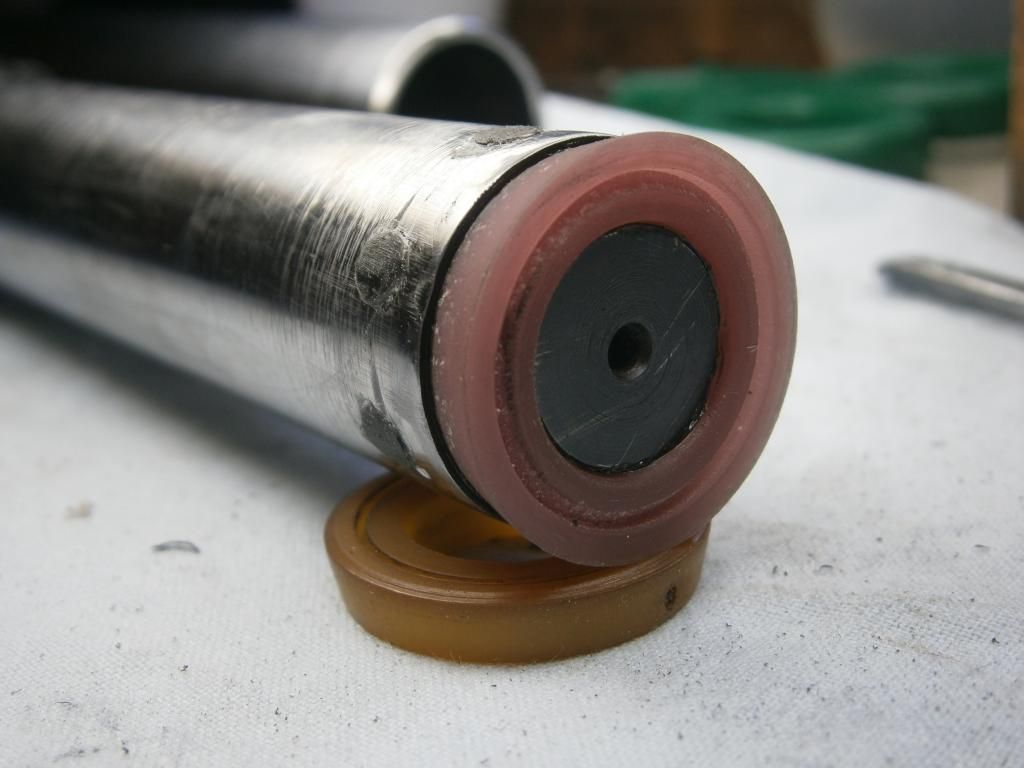
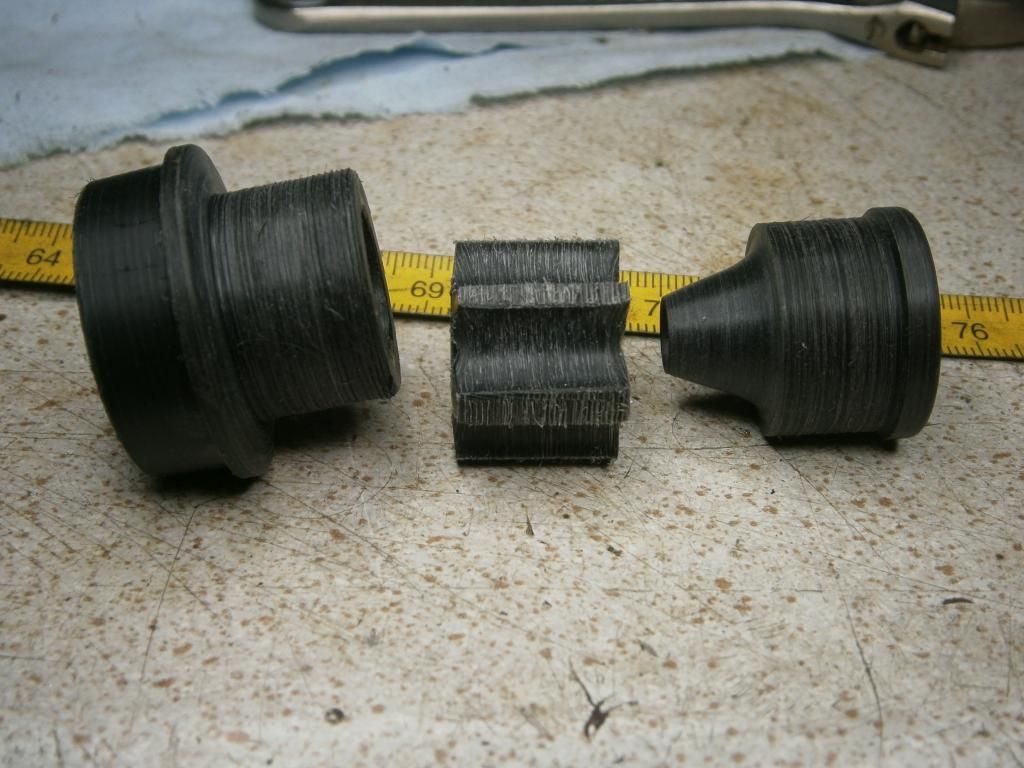
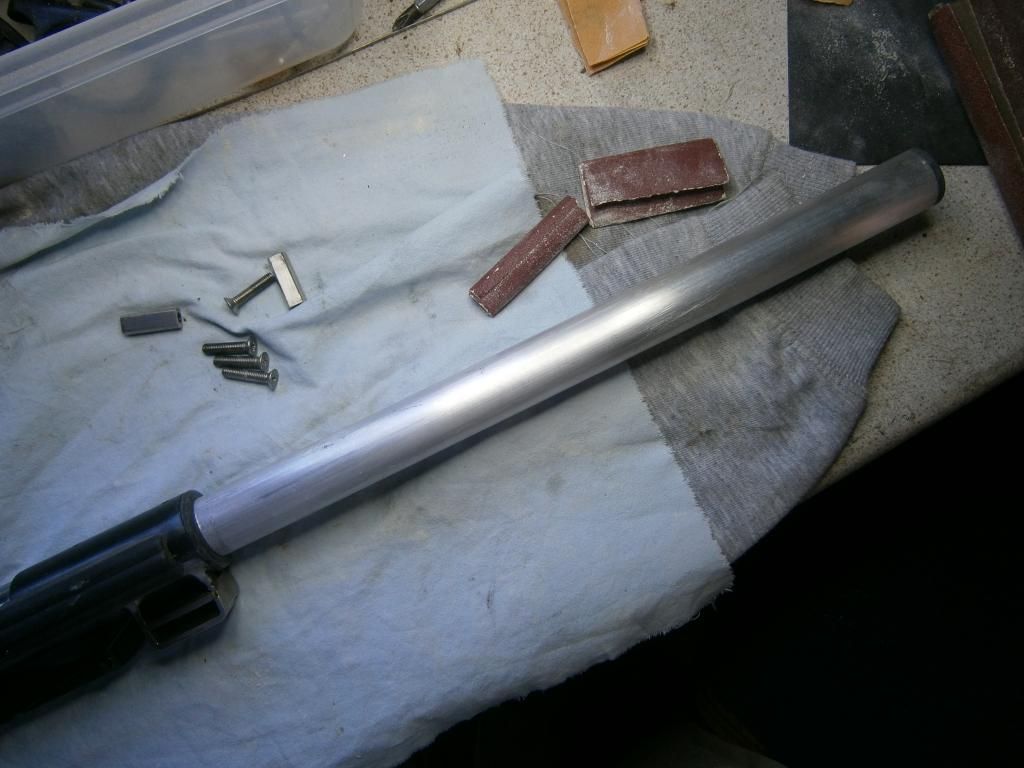
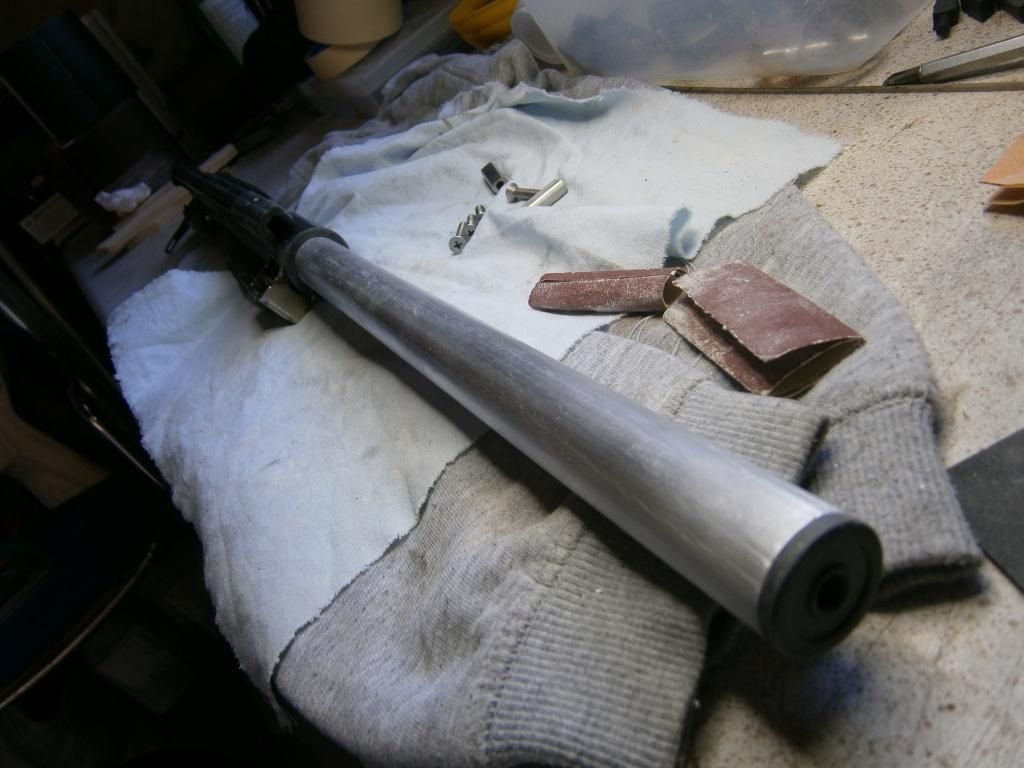
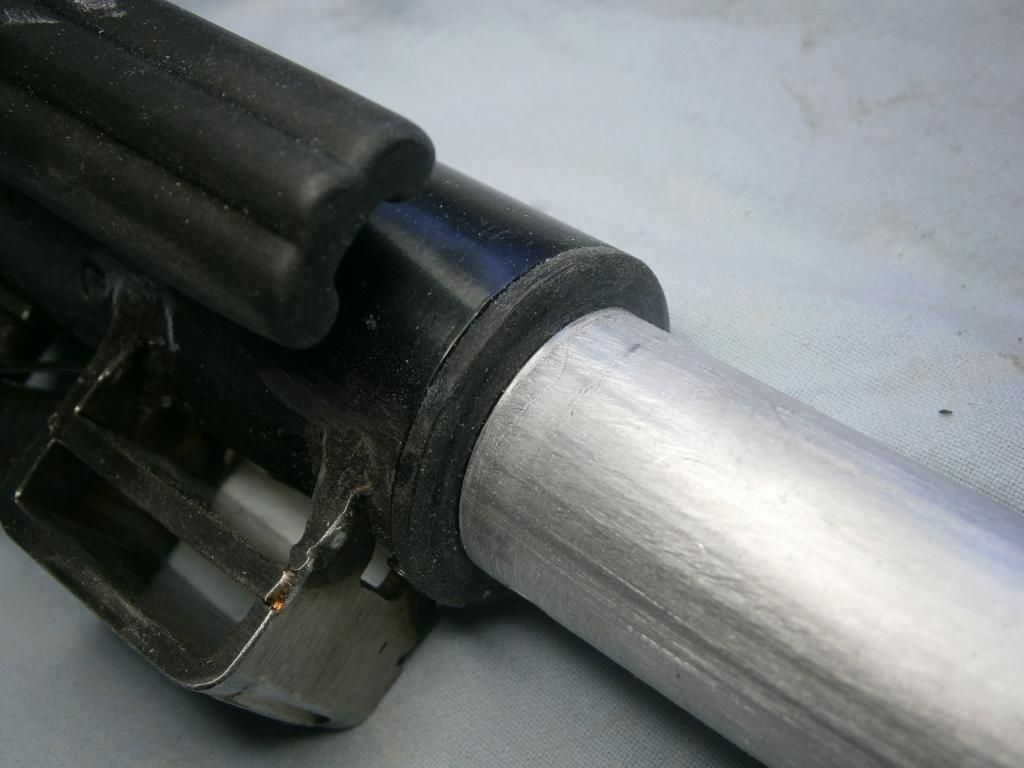
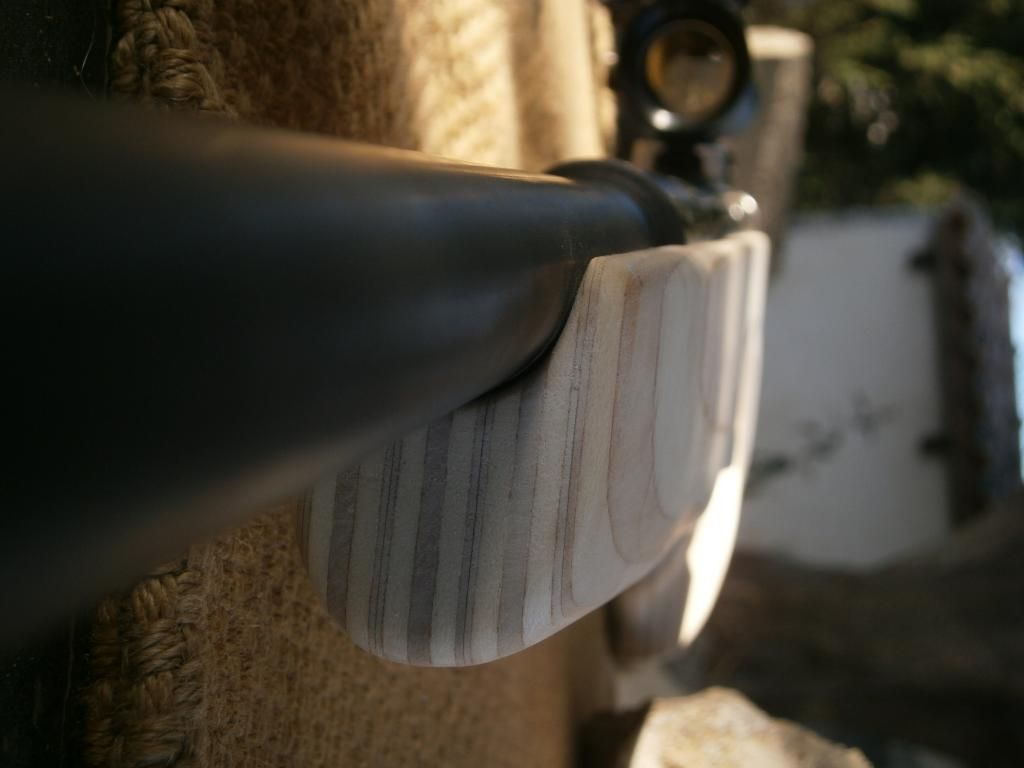
The shroud made from aluminum in one piece to fit the whole barrel, has ID 24mm and OD 26mm capped on both ends with black acetal caps. It supports the barrel by an internal hollow diaphragm glued midway into the shroud and is breathing through four 5mm hidden holes in the back. Painted matte black after it was primed with a layer of aluminum primer. Aluminum tube wasn't anodized and is quite cheap, it costs 4.8 euros for the 2.6m (ARENAL shop in Piraeus).
• All metal surfaces (barrel, outer cylinder, anti-bear blade etc) were hastily treated with
gun-blue and finished with gun oil, hidden parts were covered with
CRC SP 400 wax which really protects metals from rust for a long time.
Panagis said that this project consumed a lot of time and a lot of brainstorming, you see, some aspects turned to be a very interesting mental exercise.
Although he tried a web search extensively, he didn't find any other bull-pup, recoil-less springer and admitted that he's very proud of itHe paid 187 euros for the new gun, 20 for the red dot (thanks to diana350magnum for the smooth transaction) a mere 20 euros for the stainless steel sliders from laser-cutting shop (he made quite a few more for future use, if he will be able to find some free time) 13 euros for the laminate sheet for the stock and 30 euros for various other things, almost 250 euros for all…
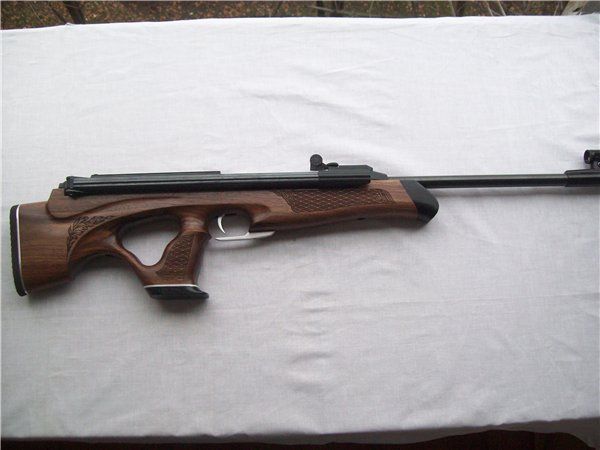
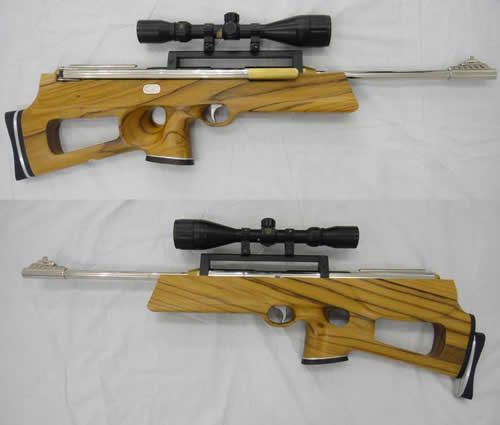
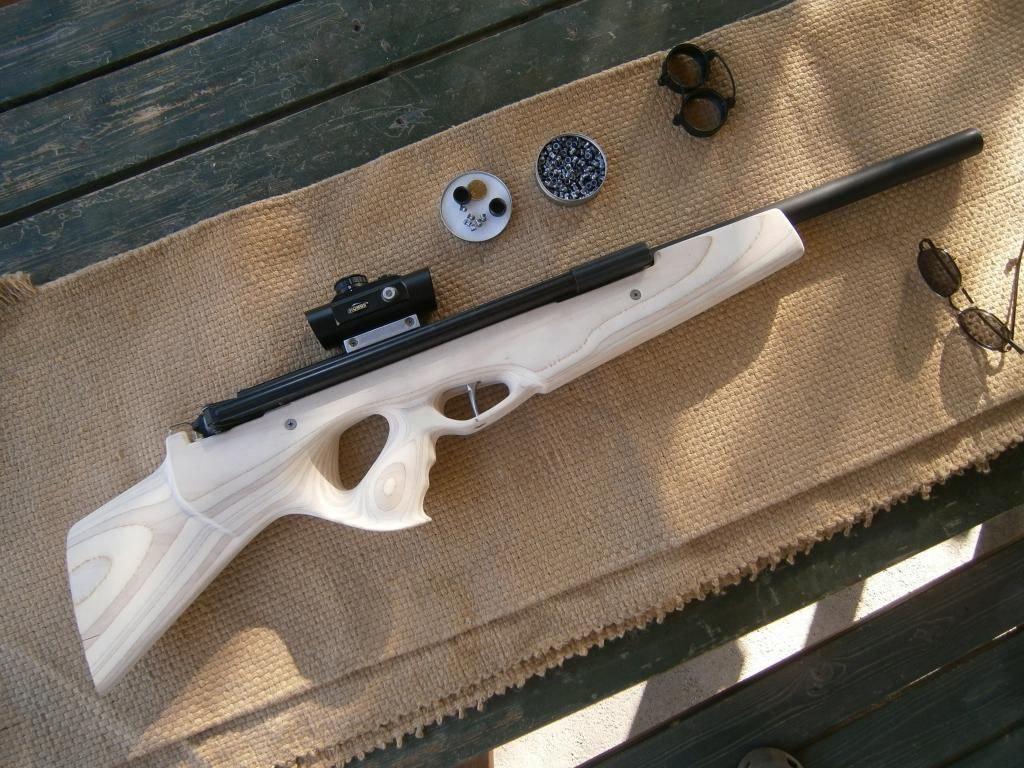
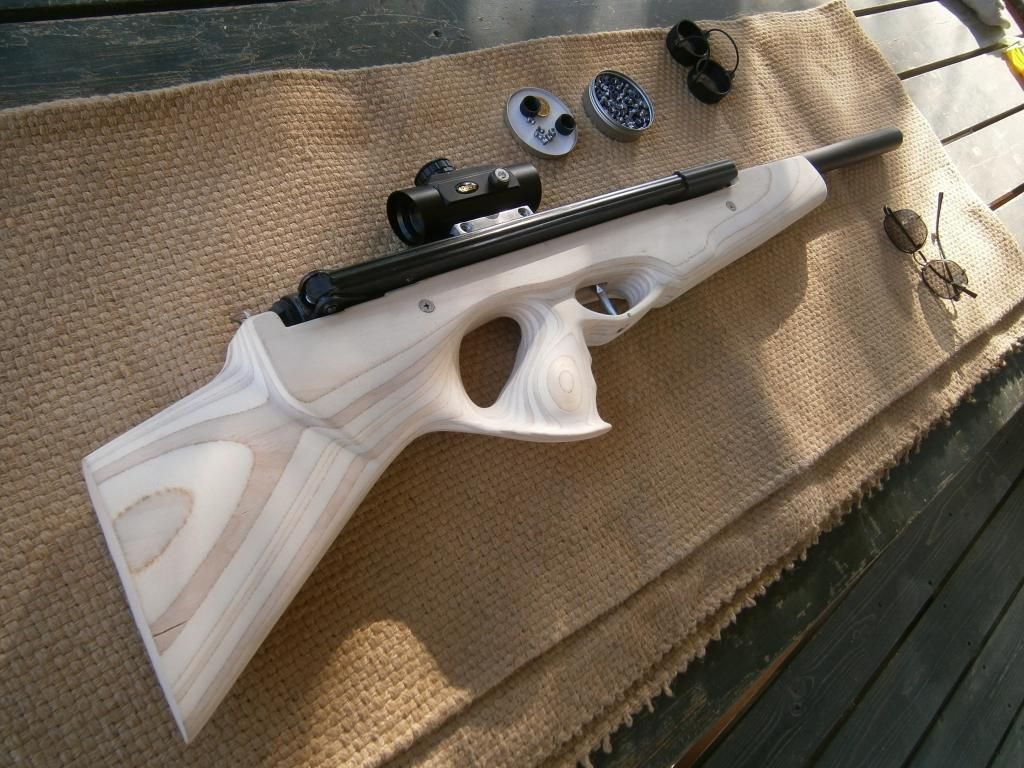
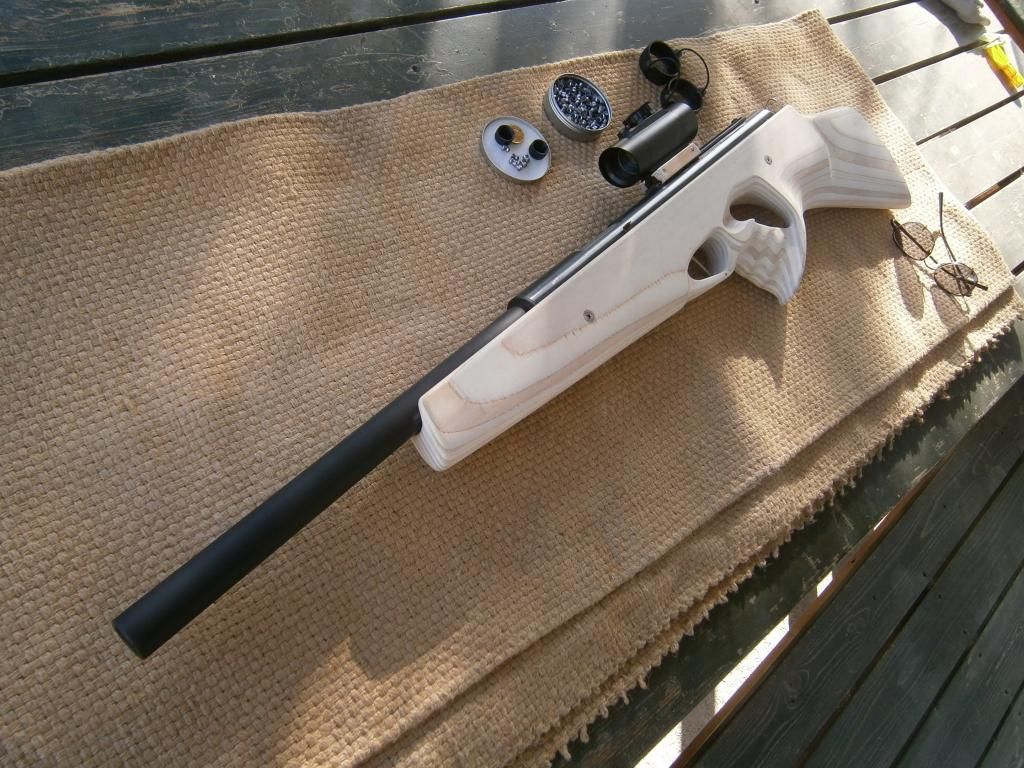
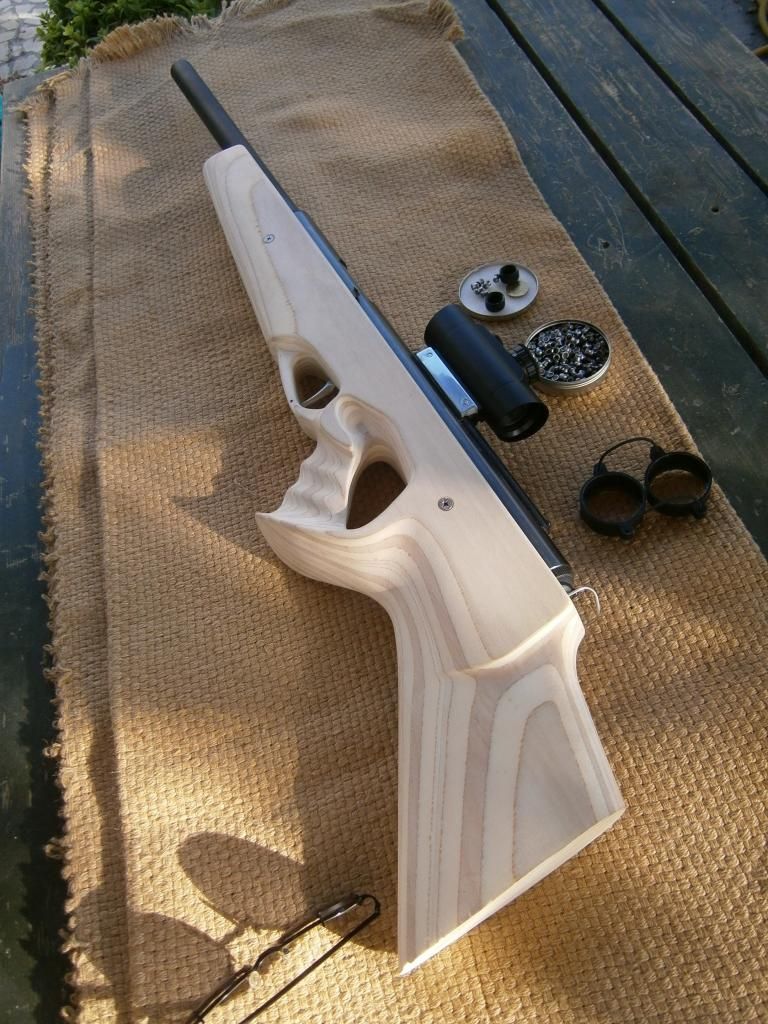
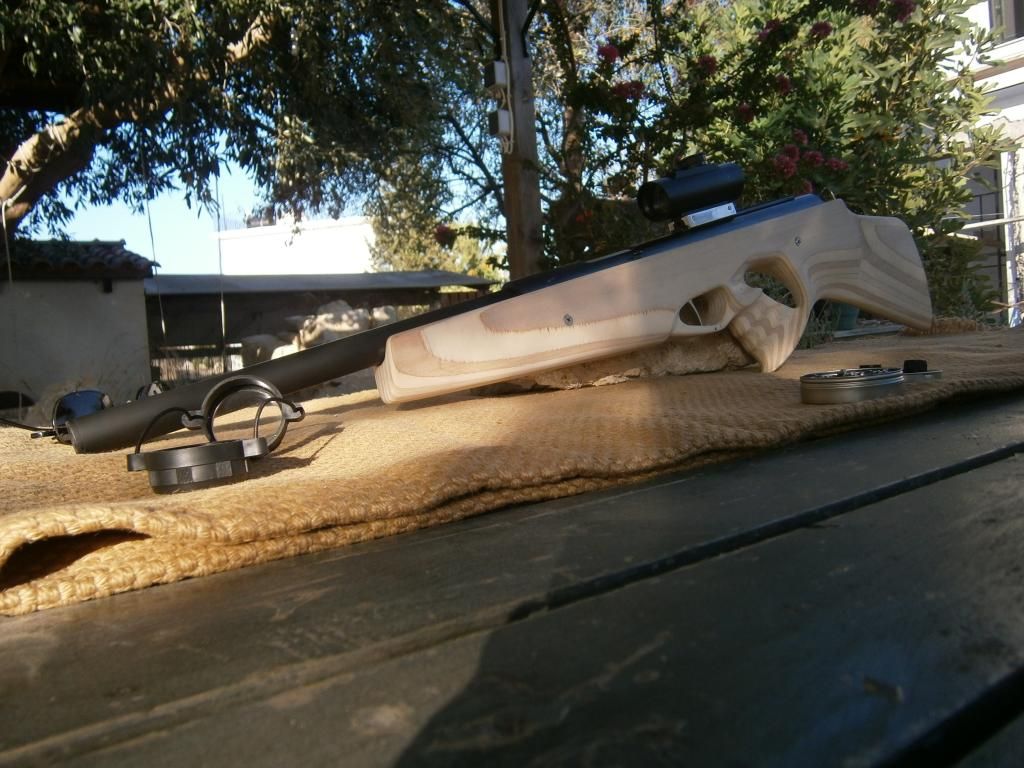
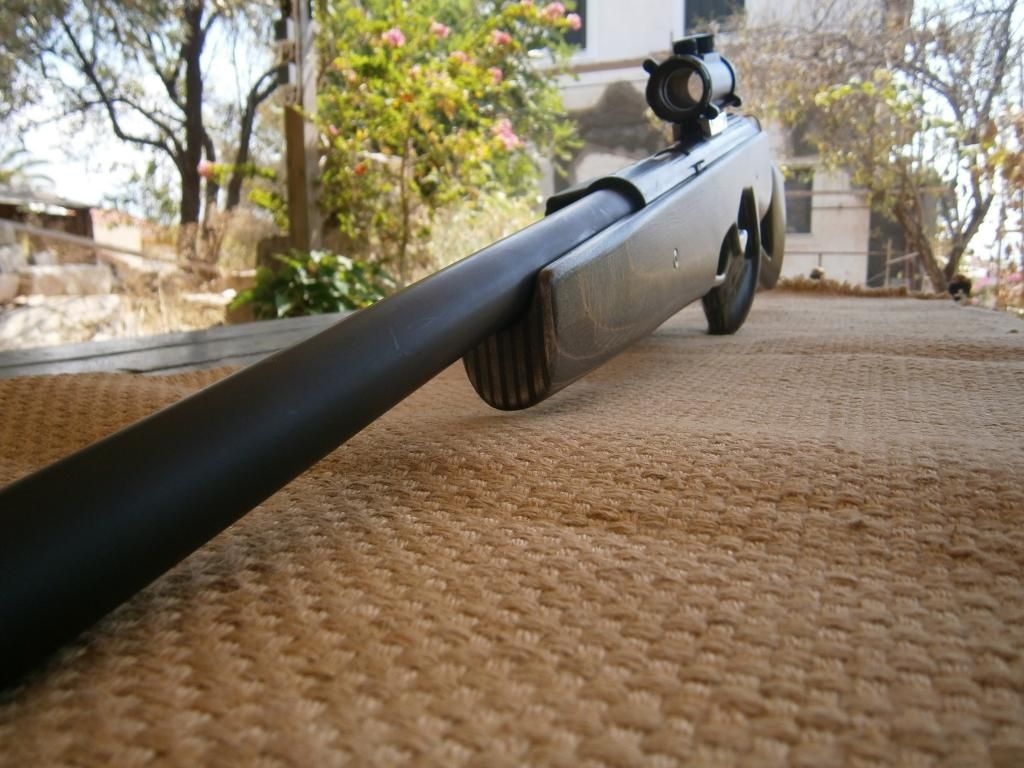
Gents, follow Panagis for a tour through the project "BAM 30-1 bullpup-recoilless", take a look and tell us if it was worth of it  The pair of "Russian" (suppose so) bullpup stocks
, which popped after a web search seen below, not so exiting projects although our friend seems that has craftsmanship in woodworking:
Reason to dislike the proposed solution is the coarse finish of the blade and the trigger bar:

The stock of this chromed DIANA from Iran is much more impressive setup, if you try a web search you'll also find a video clip for this:
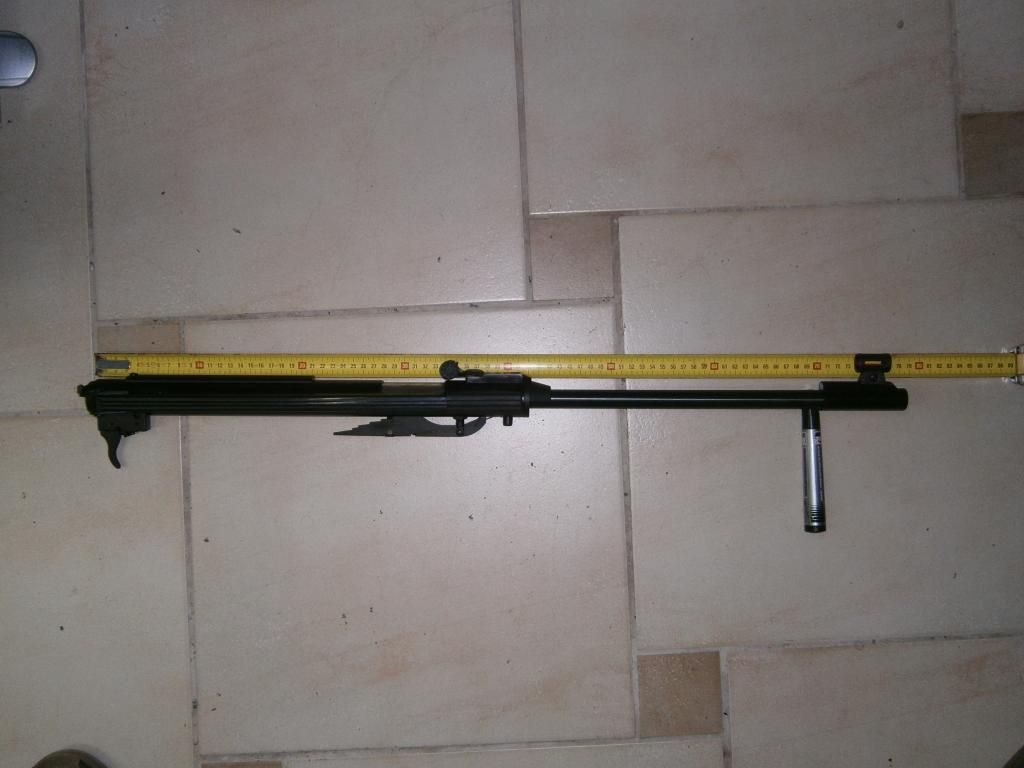
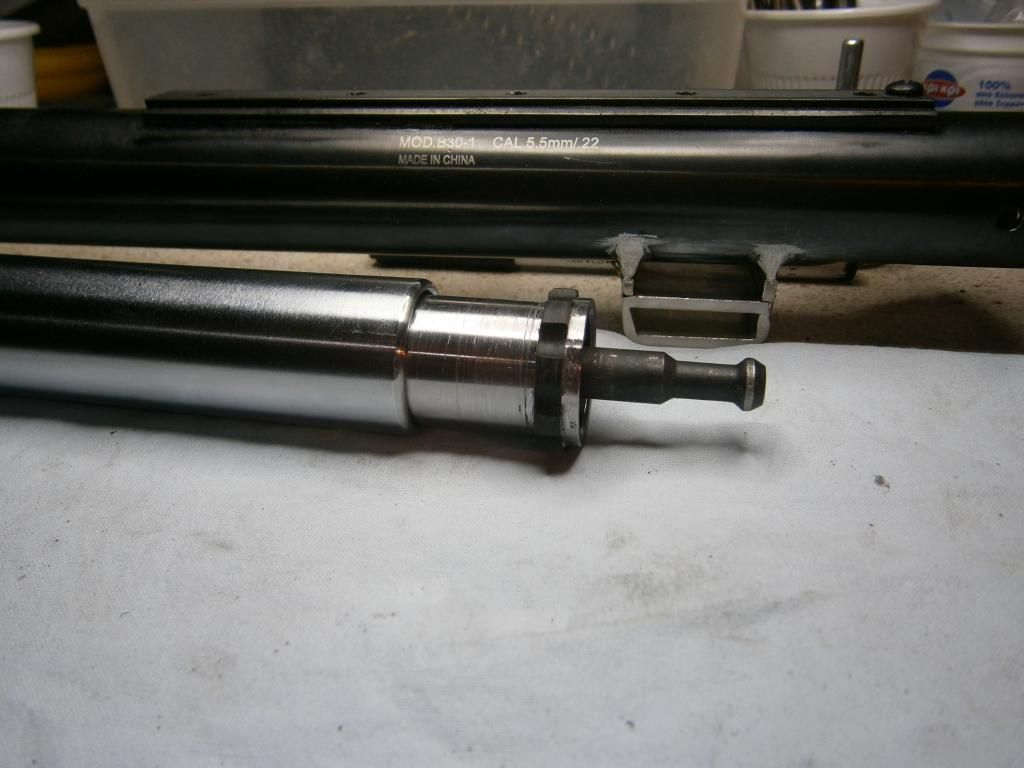
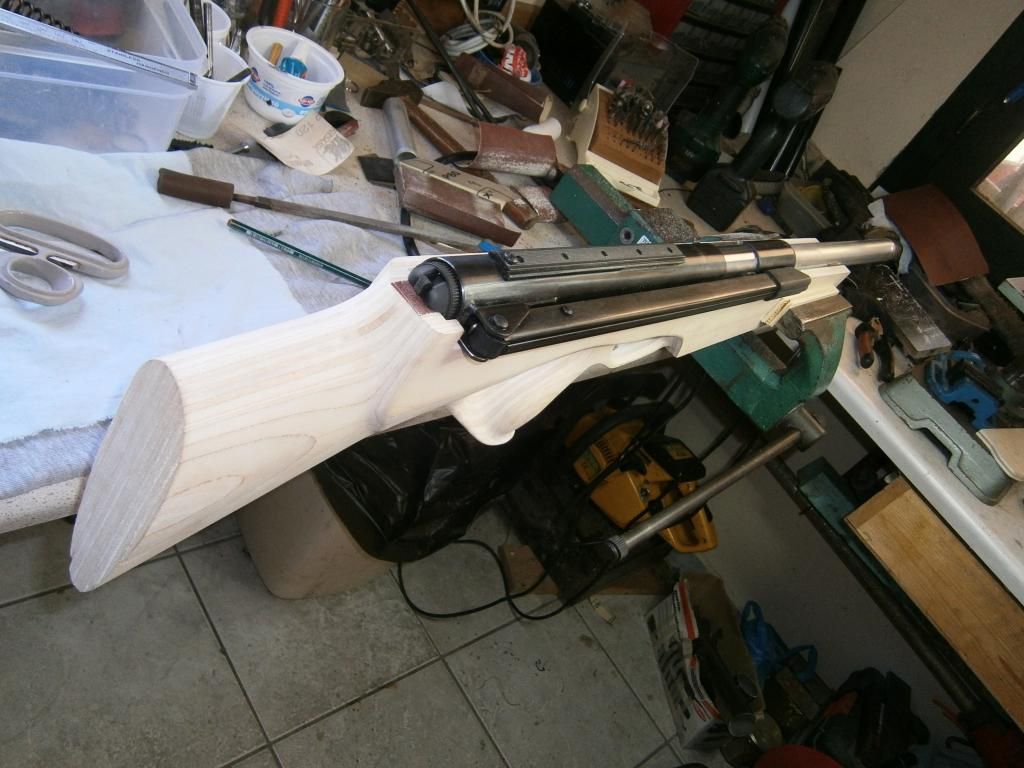
 Let's get started on our own
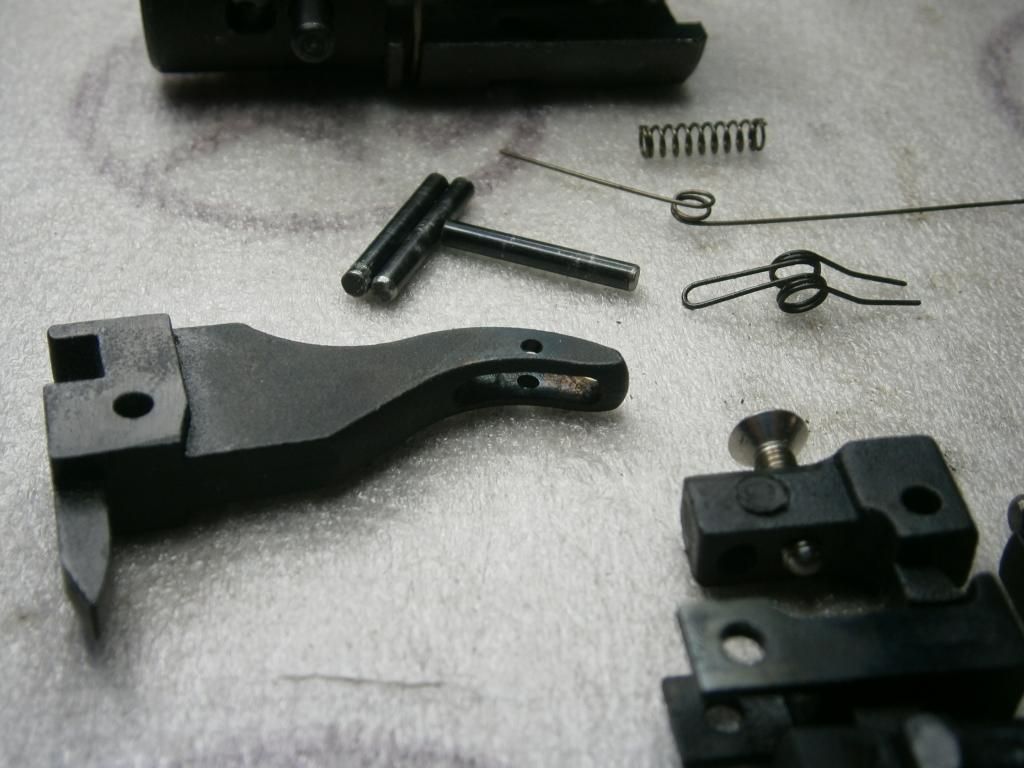
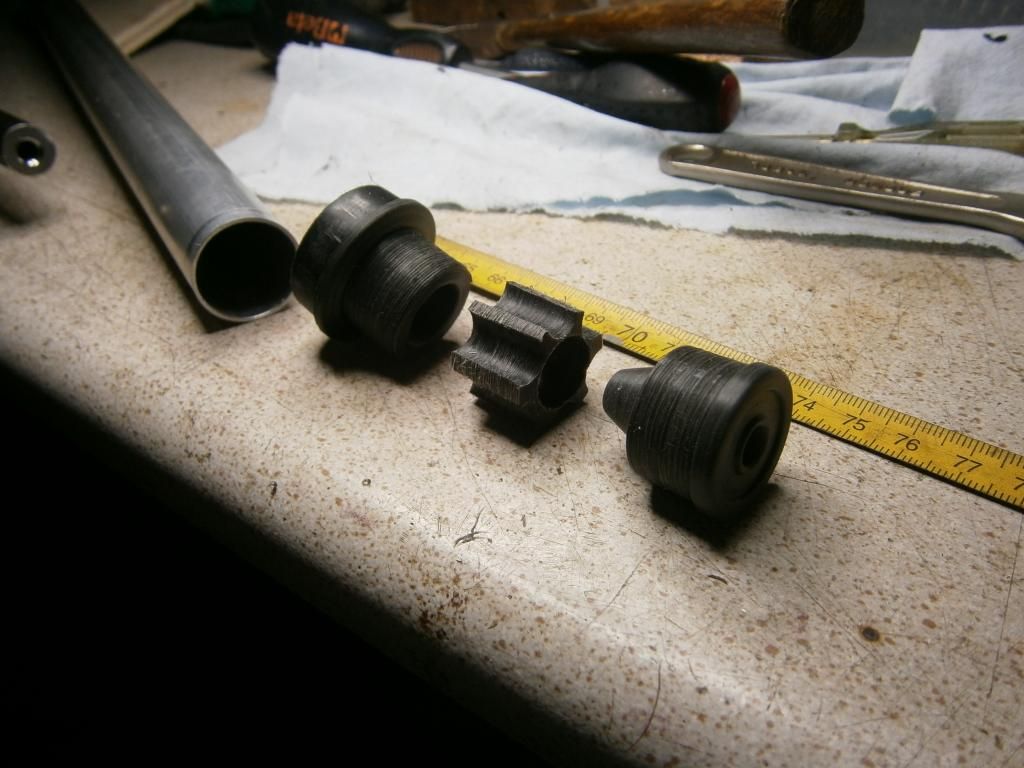
 now, the intact factory gun, naked without factory stock and even before the only two shots counted as "factory new shots" in it's log, seen below:
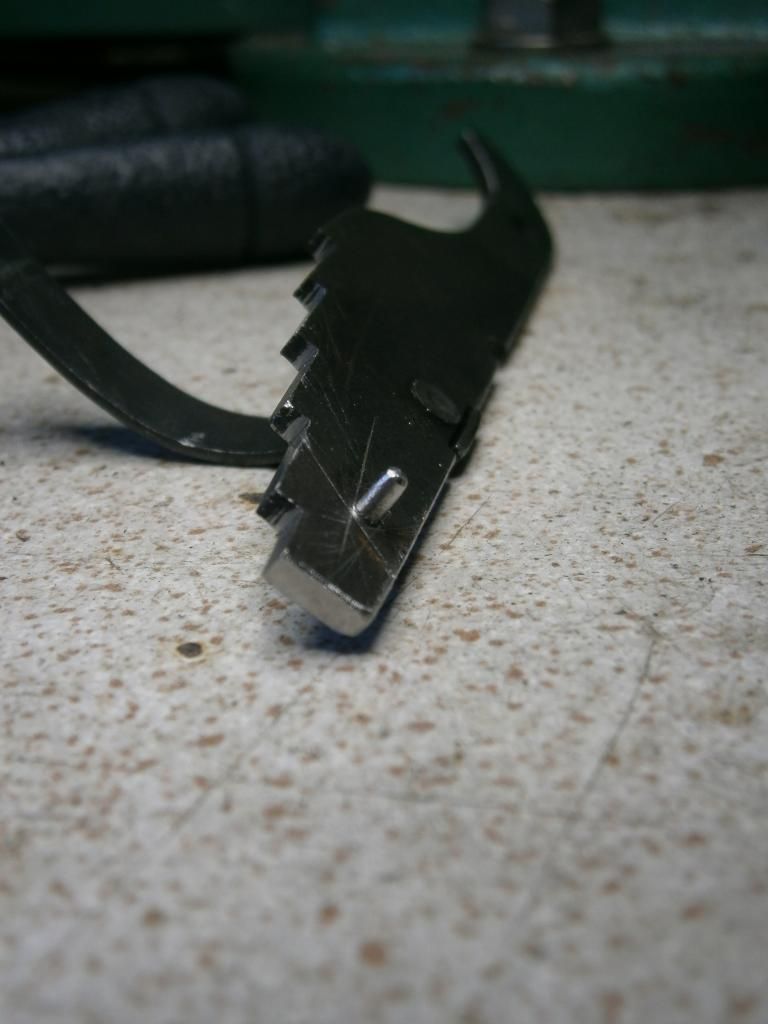
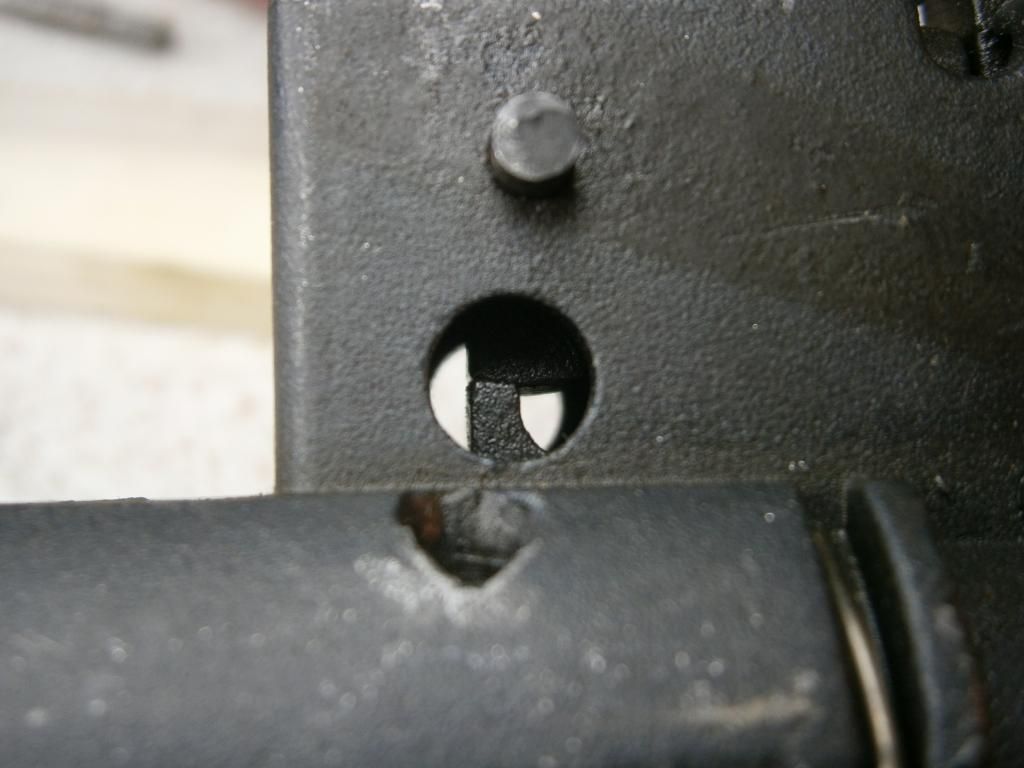
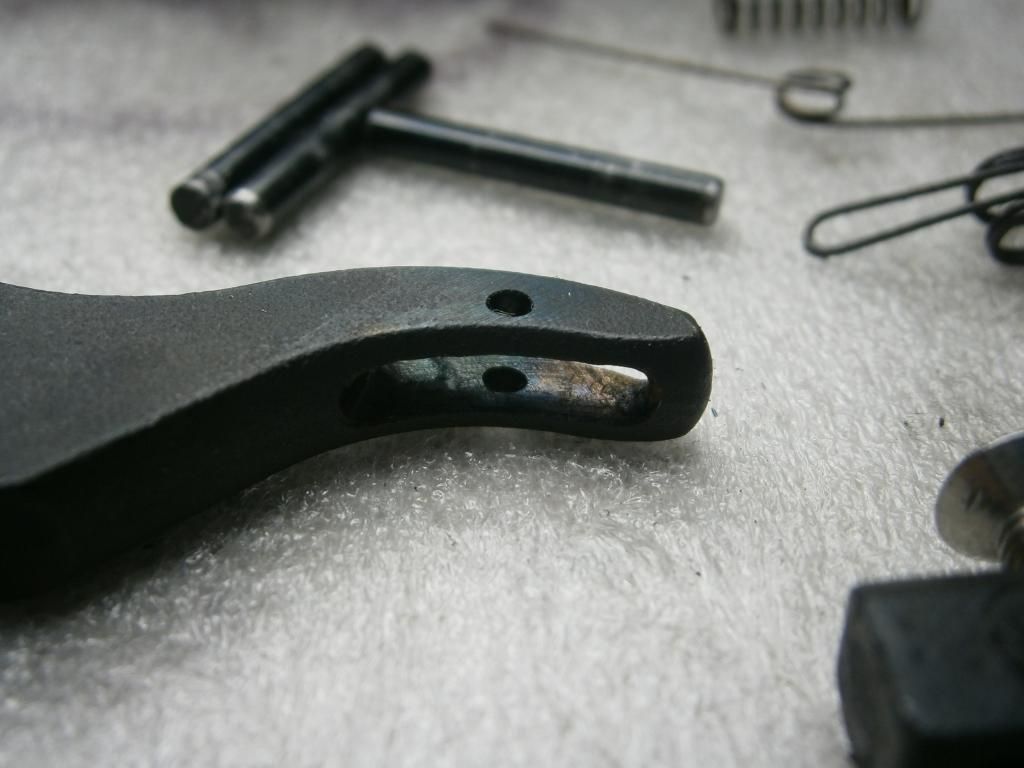
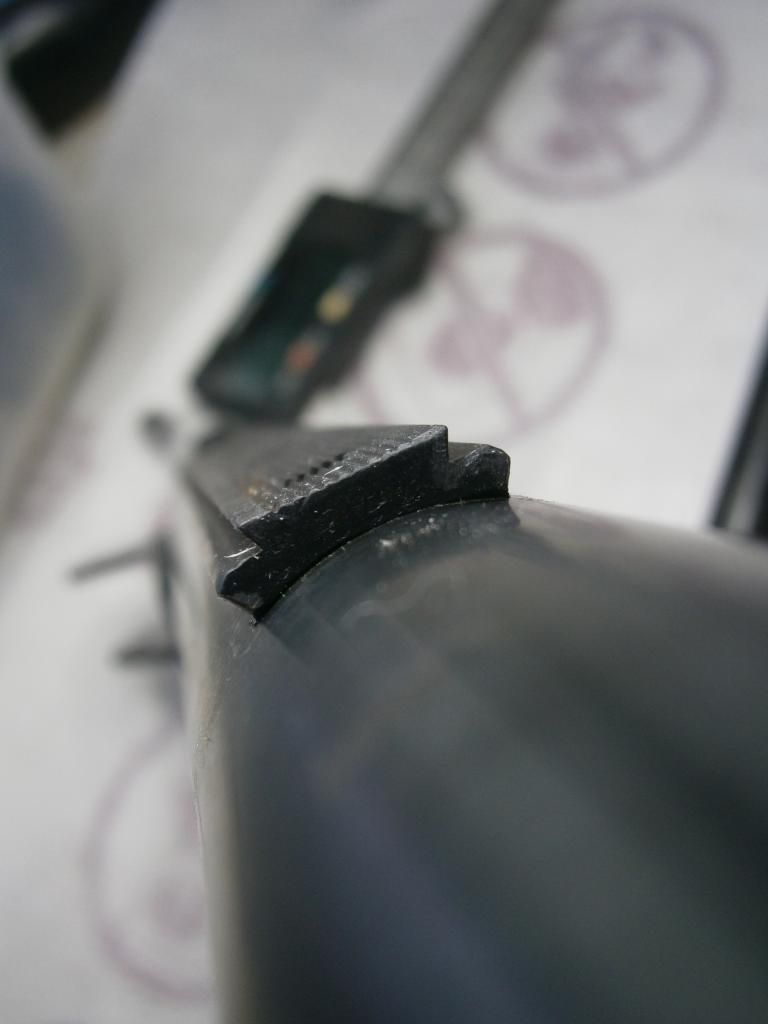
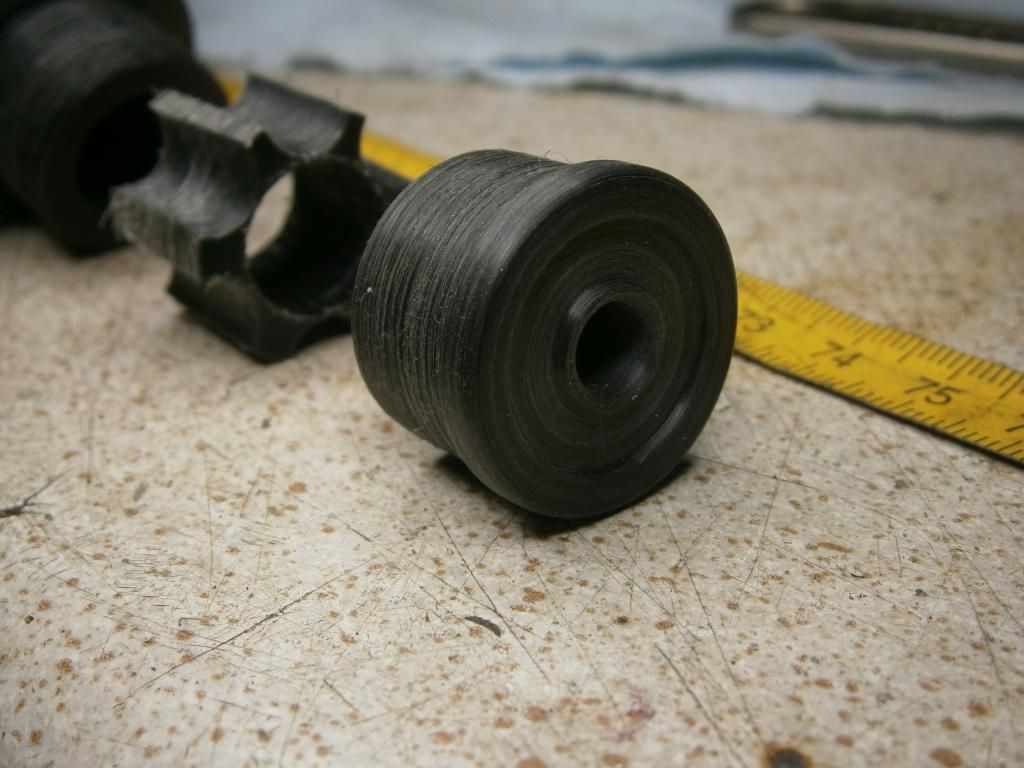
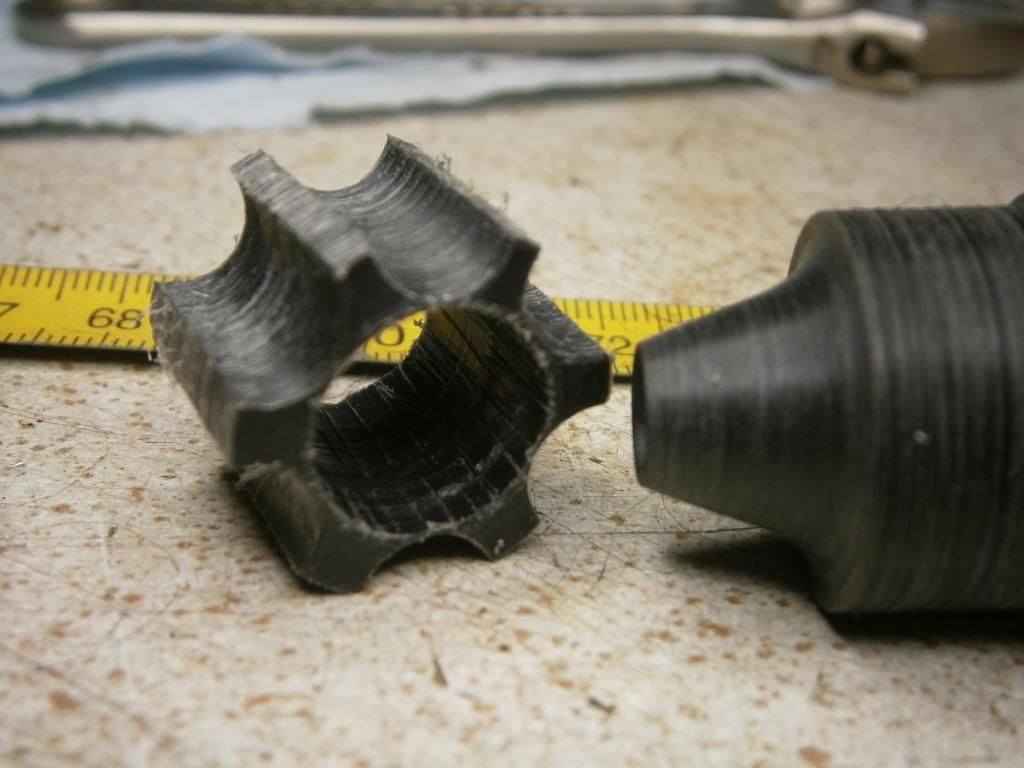
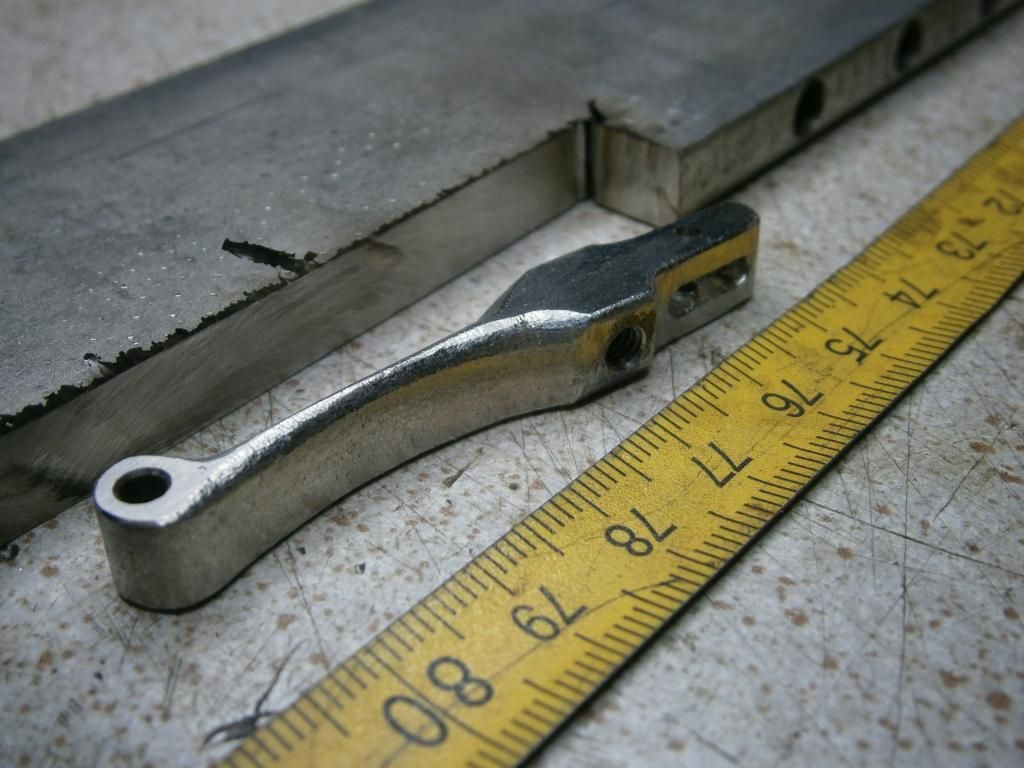
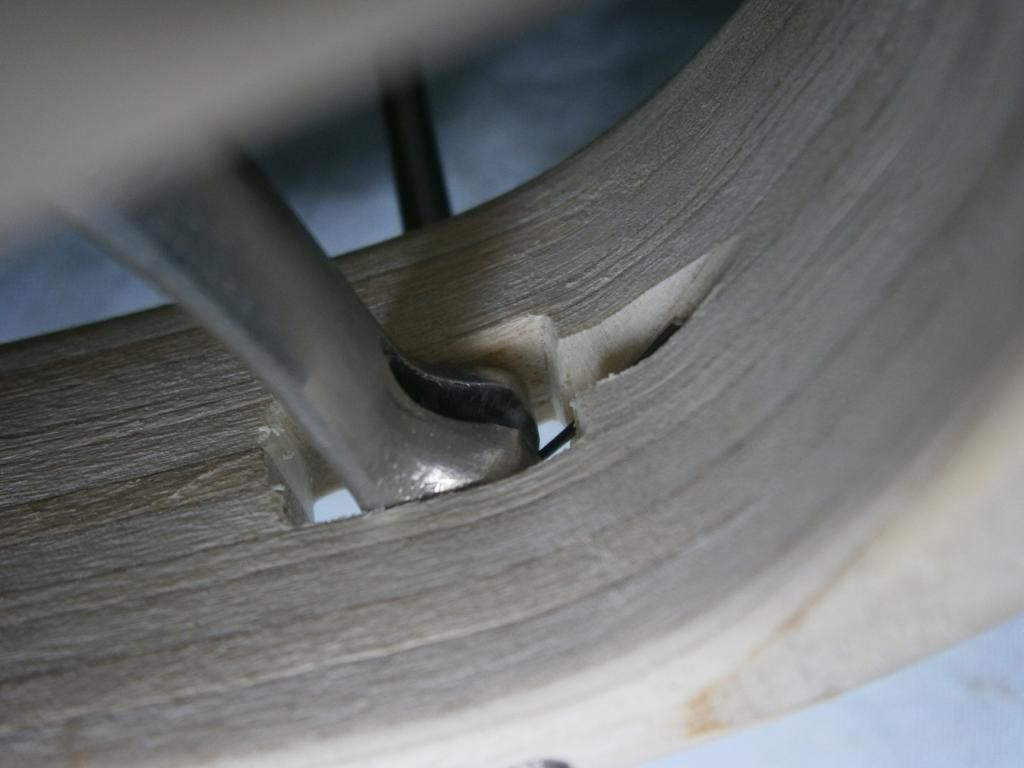
 Stepped anti-bear-trap blade modification is necessary
 to shorten the stock length because blade's rear edge defines the position of the trigger blade pivot hole. Here is the factory blade :
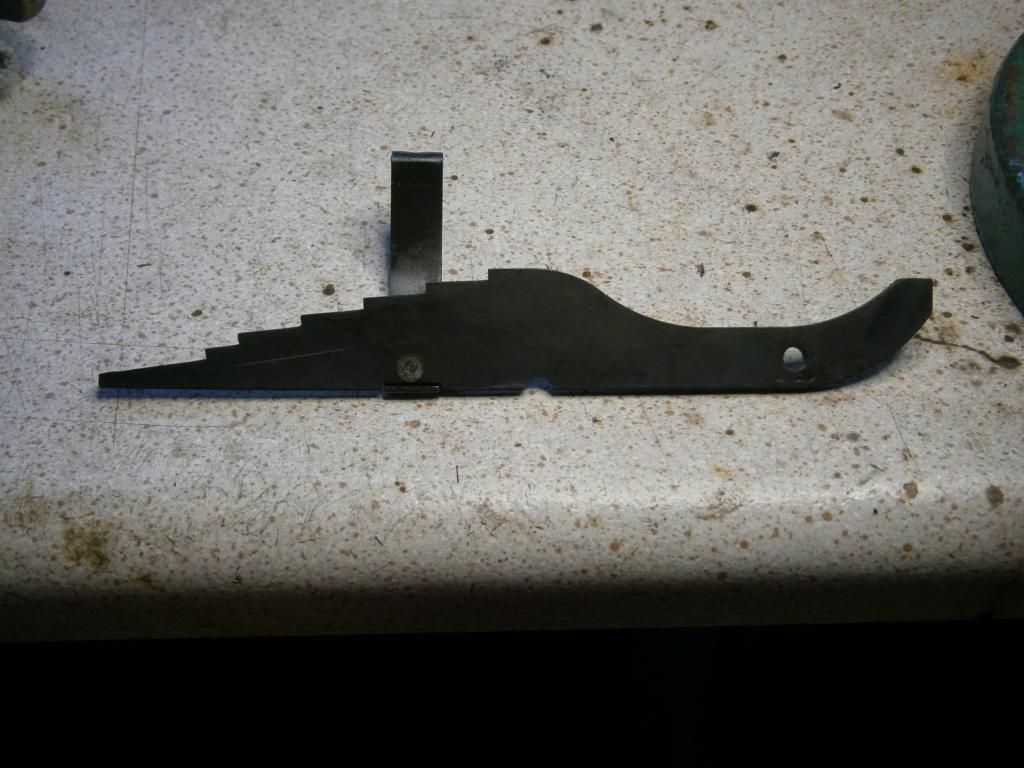
The "stepped" blade mod consists of
cutting the last dent/step drilling a 2mm hole into which a
small cross-pin is inserted, serving as a stopper. This mod gives a bonus of almost 20mm of length, significant for such a short gun design:
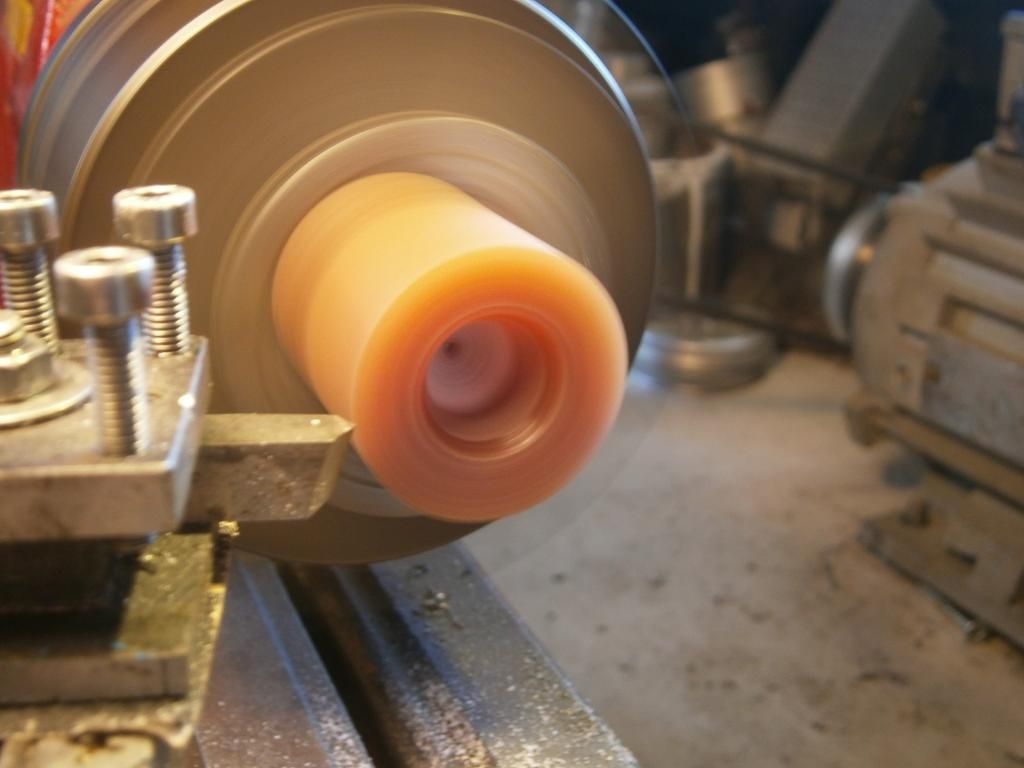
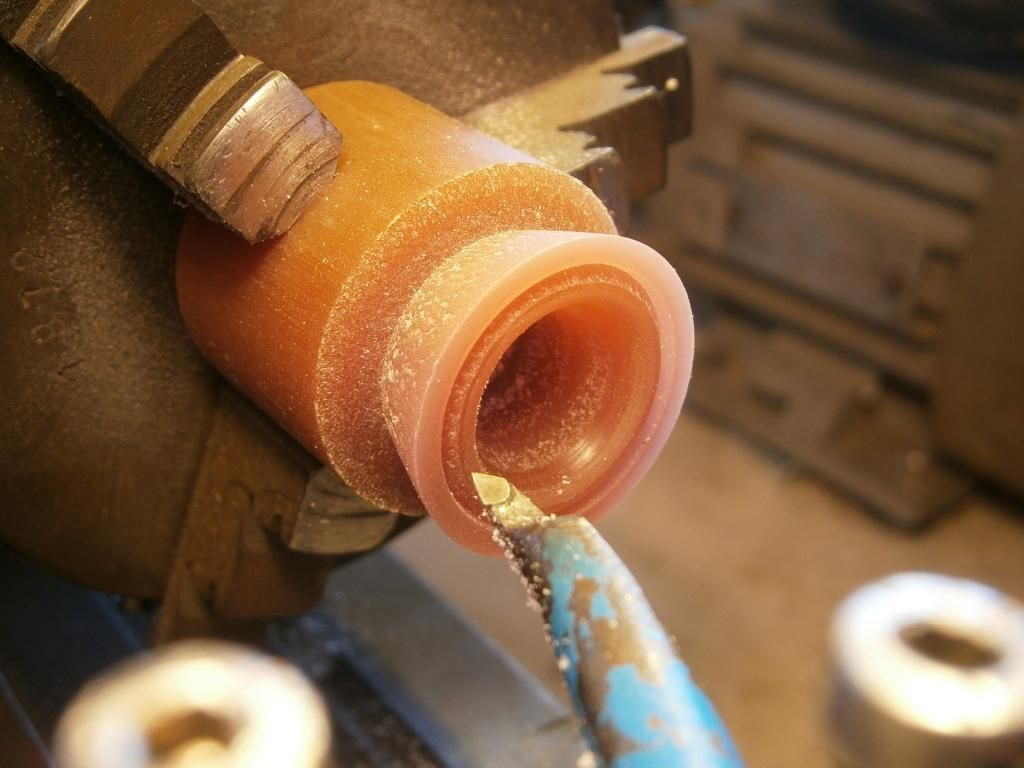
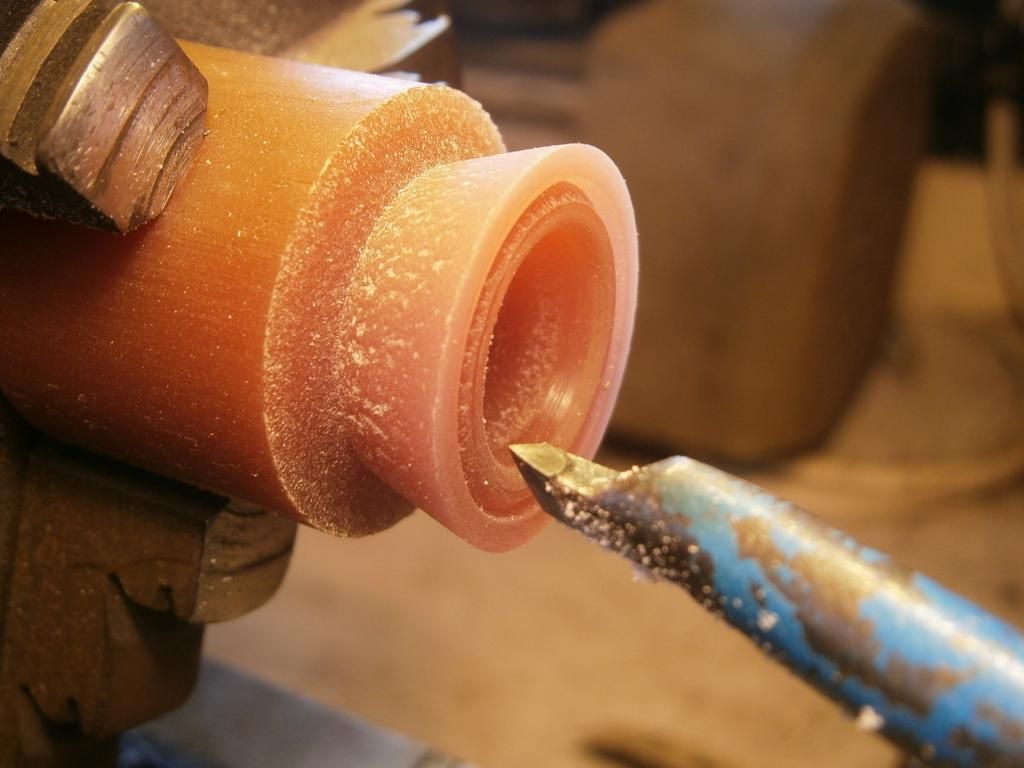
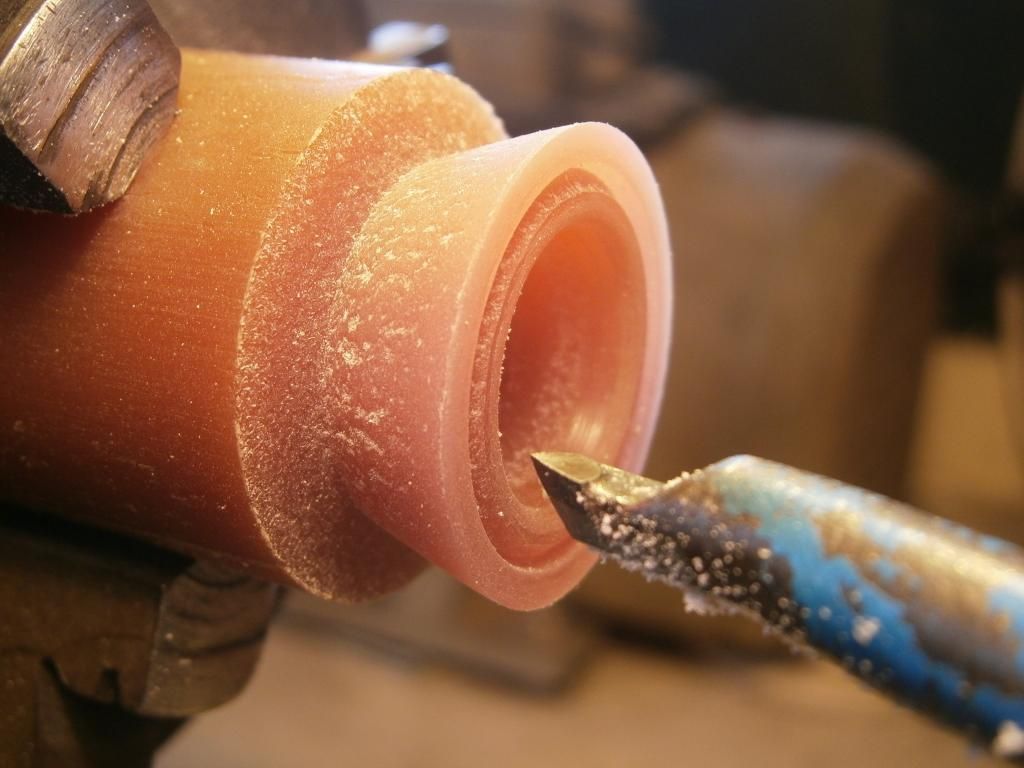
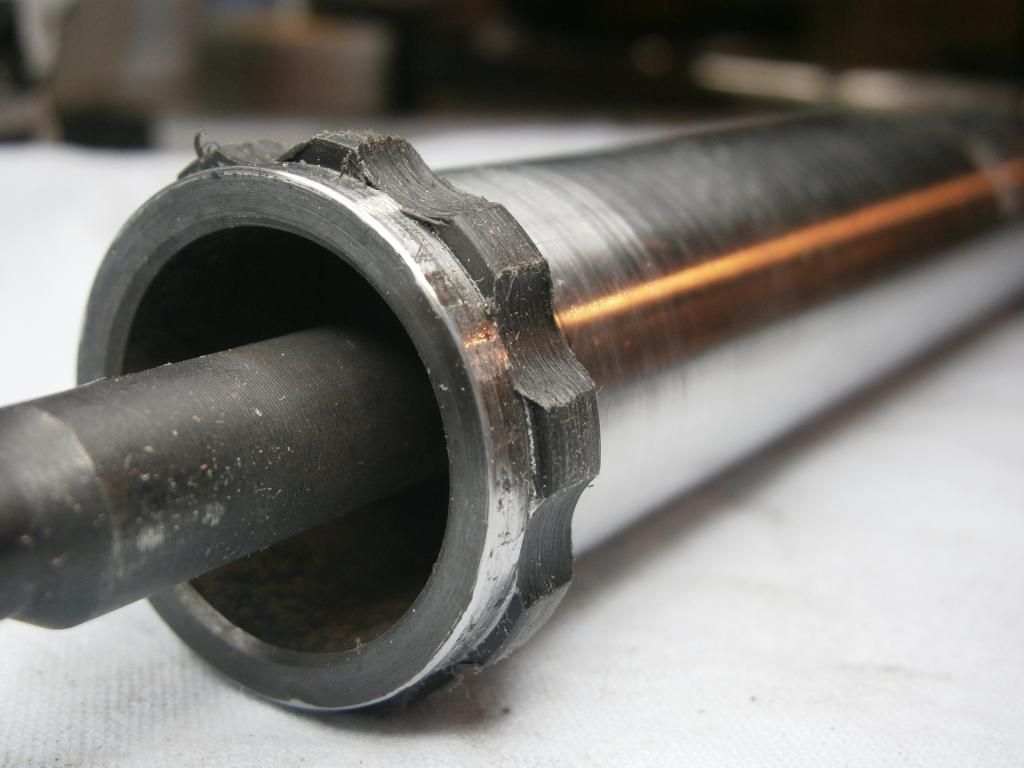
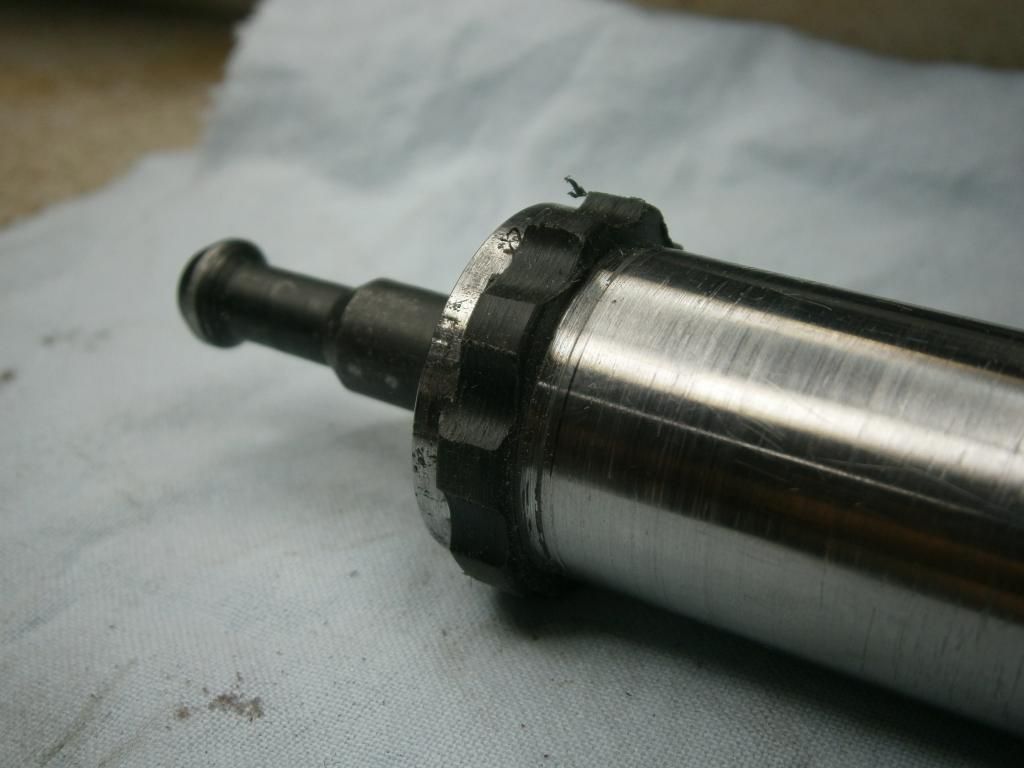
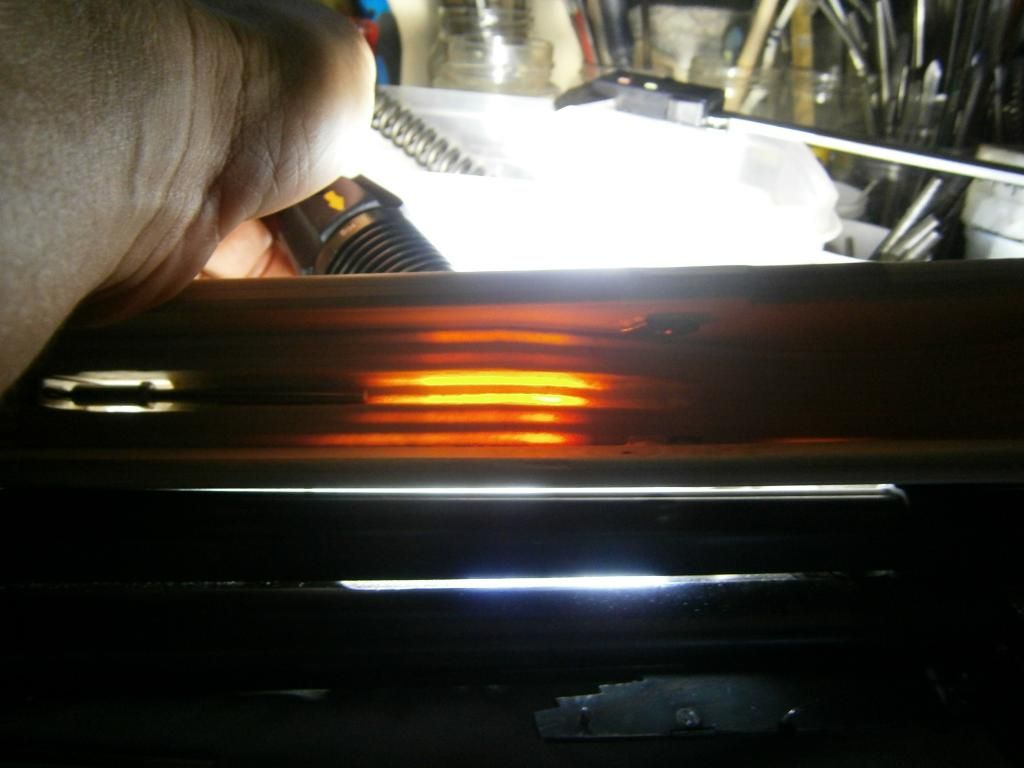
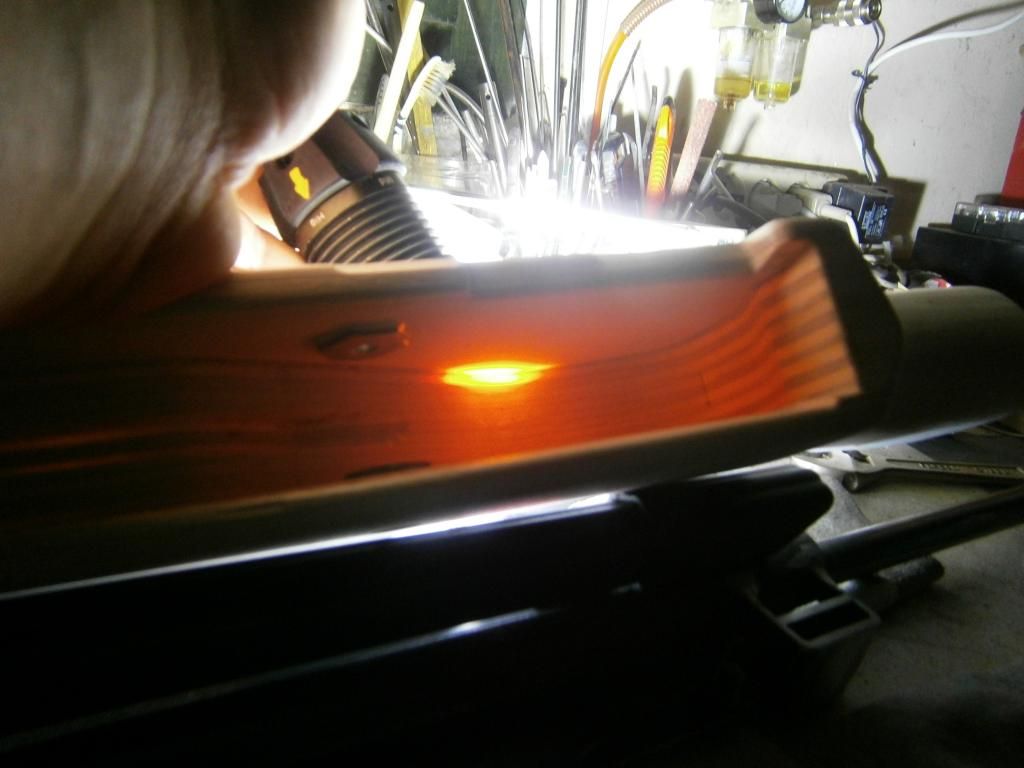
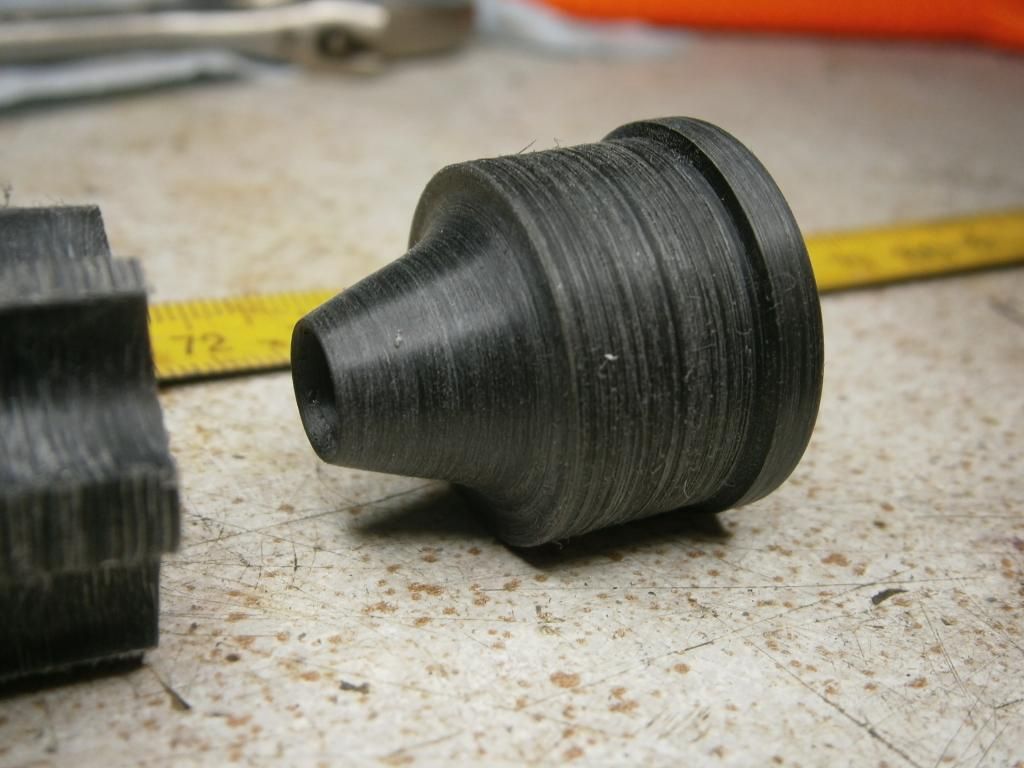
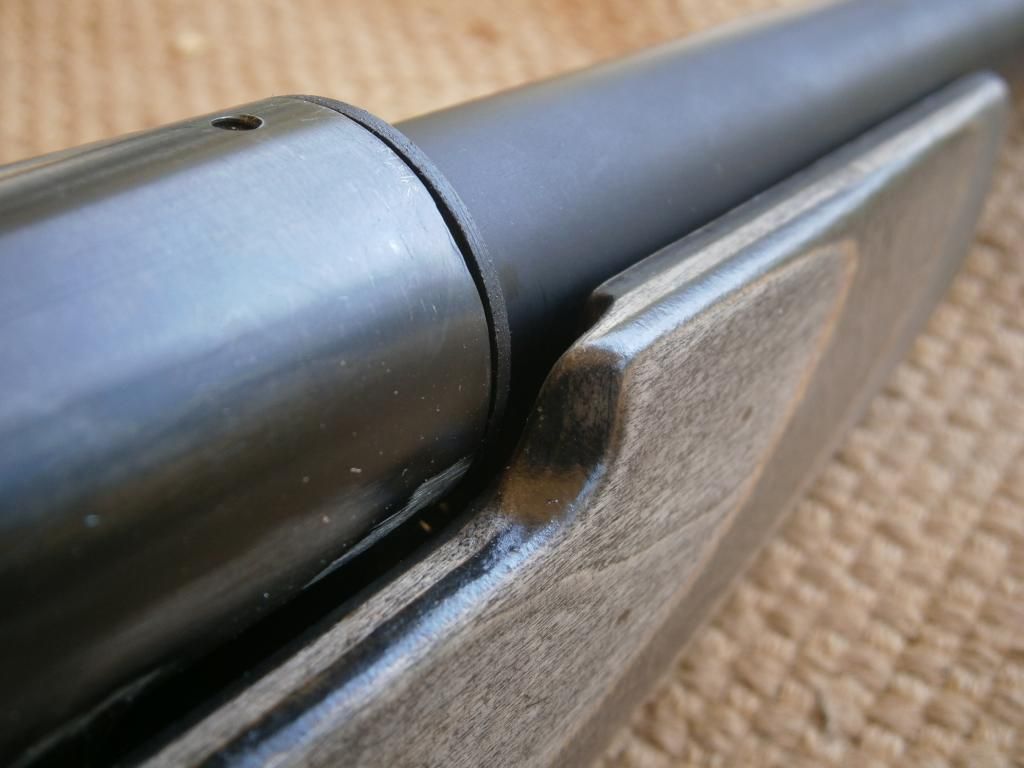
Rounded and polished
barrel breech-end and crown-end, using a hand-dremel and grinding paste on cord unfortunately for Panagis, crown-end received this job twice, before and after his idea to cut 70mm off the barrel.
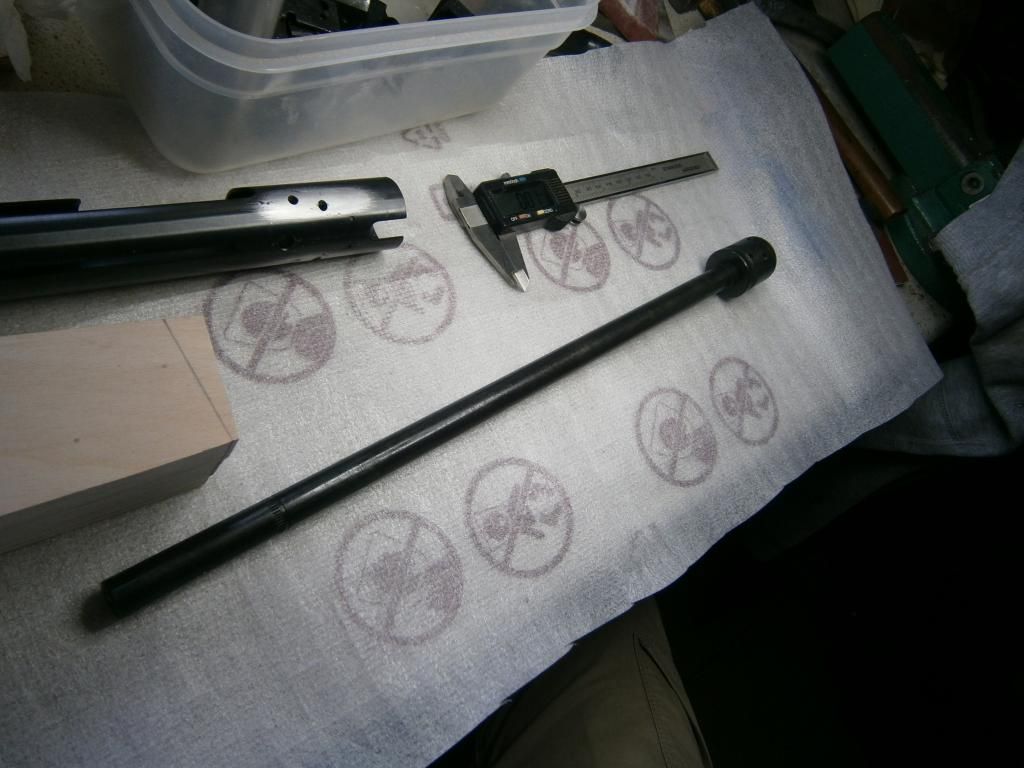
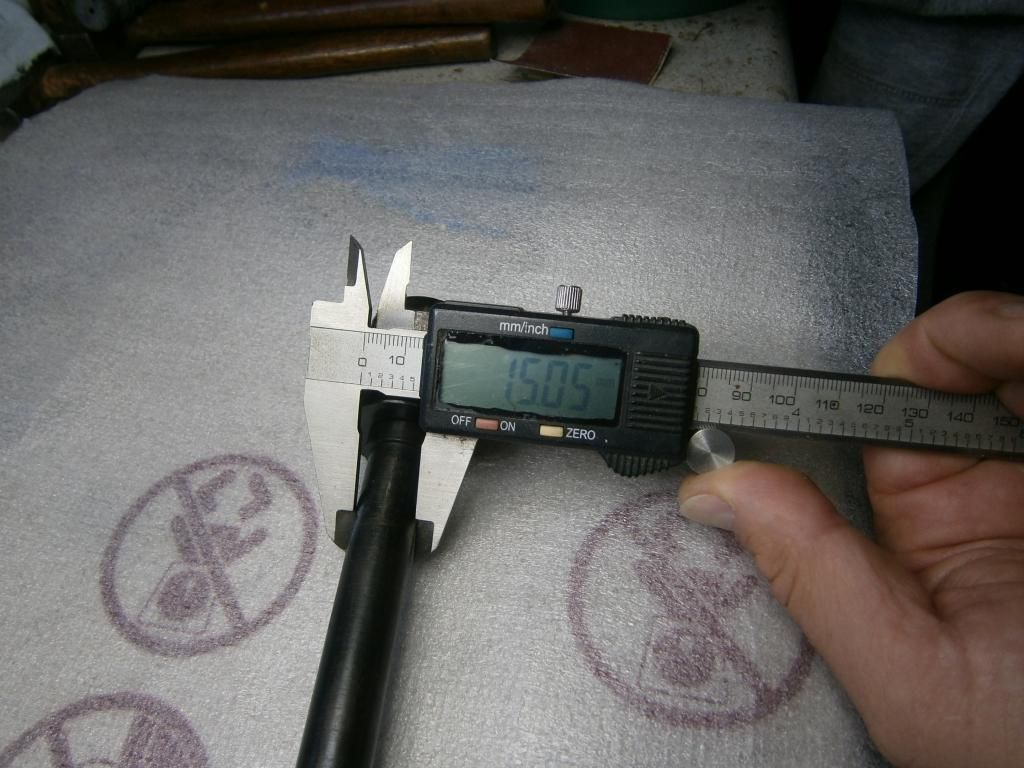
 The barrel has been slimmed-down to 15 mm from tip to tip
, this Chinese little girl was quite chubby as she came out from the factory, was 18 mm thick except the front 15 cm. Briefly (by means of an angle grinder) 70 mm of the barrel were cut and a new crown has been formed. We must note that there wasn't any choke present because for every pellet Panagis pushed through the barrel didn't show any restriction anywhere. Furthermore, because he wasn't quite sure on the subject, asked for assistance from Piperman but he was on vacations and replied late so if there's a crime involved, it's on him...
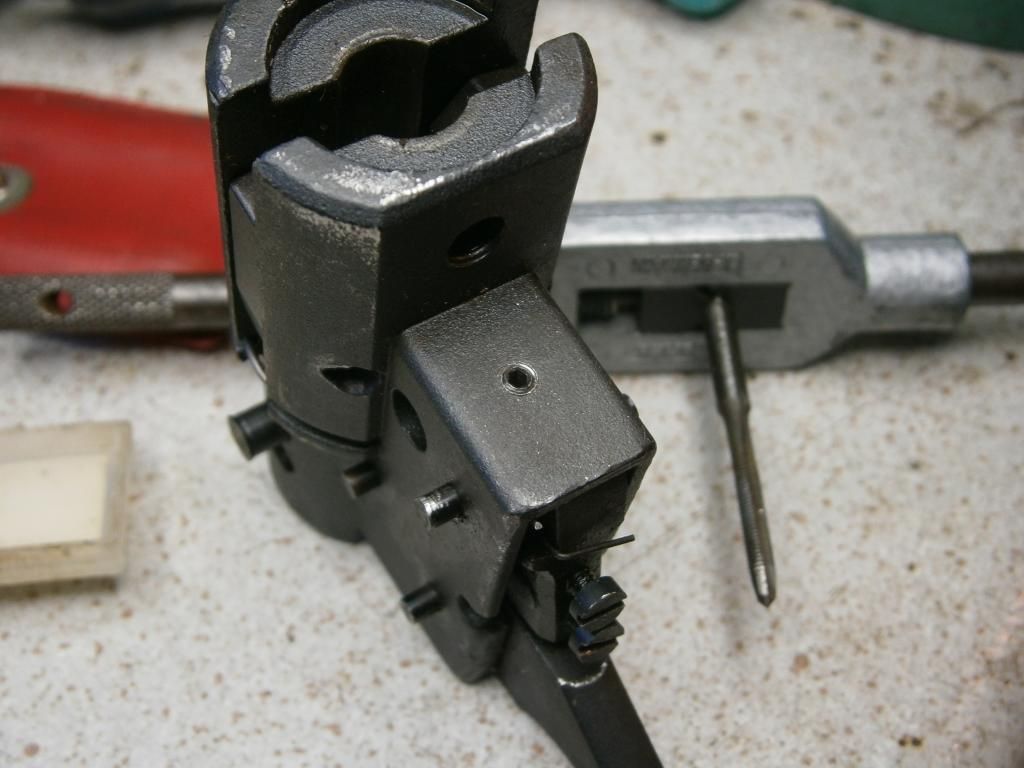
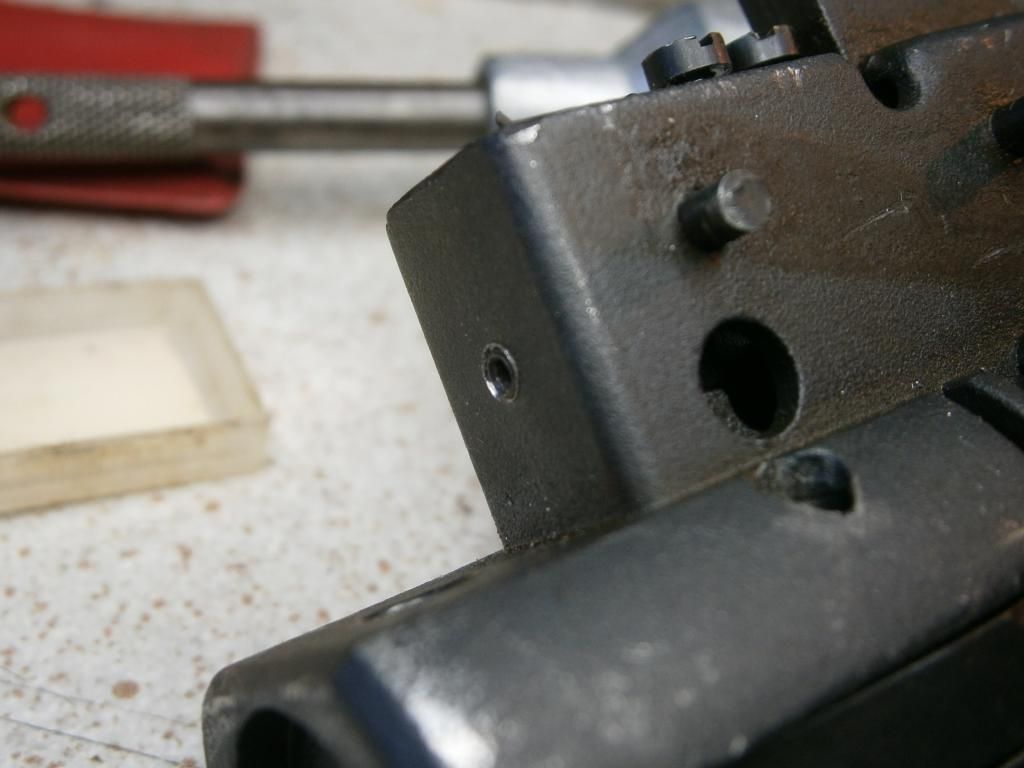
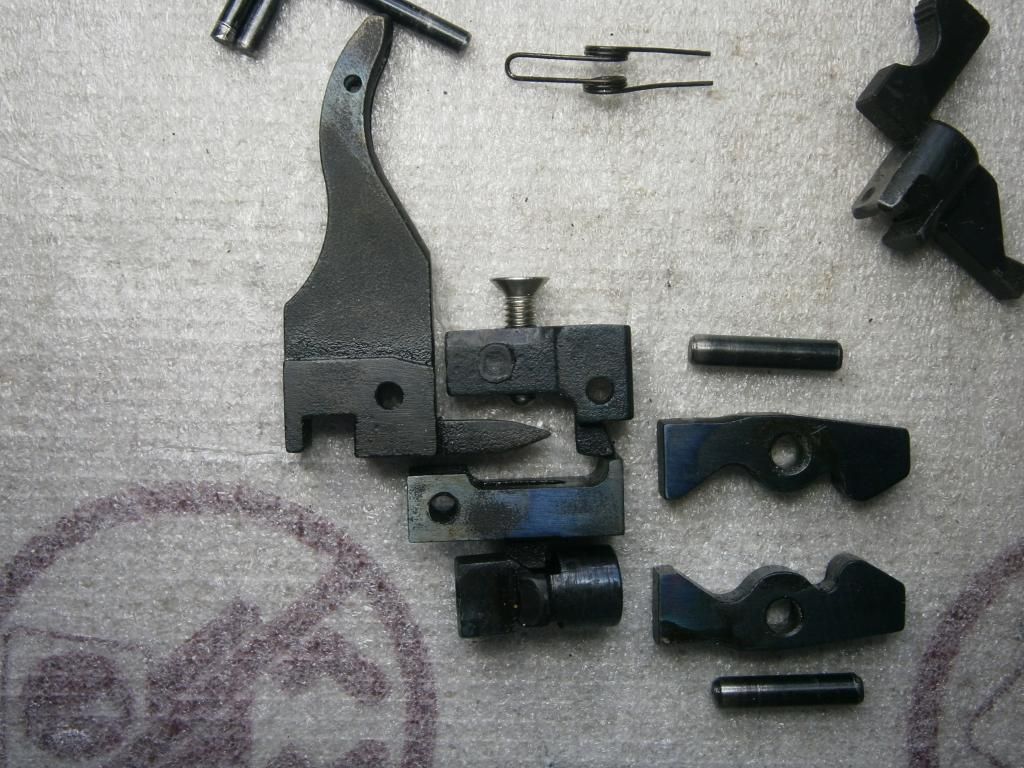
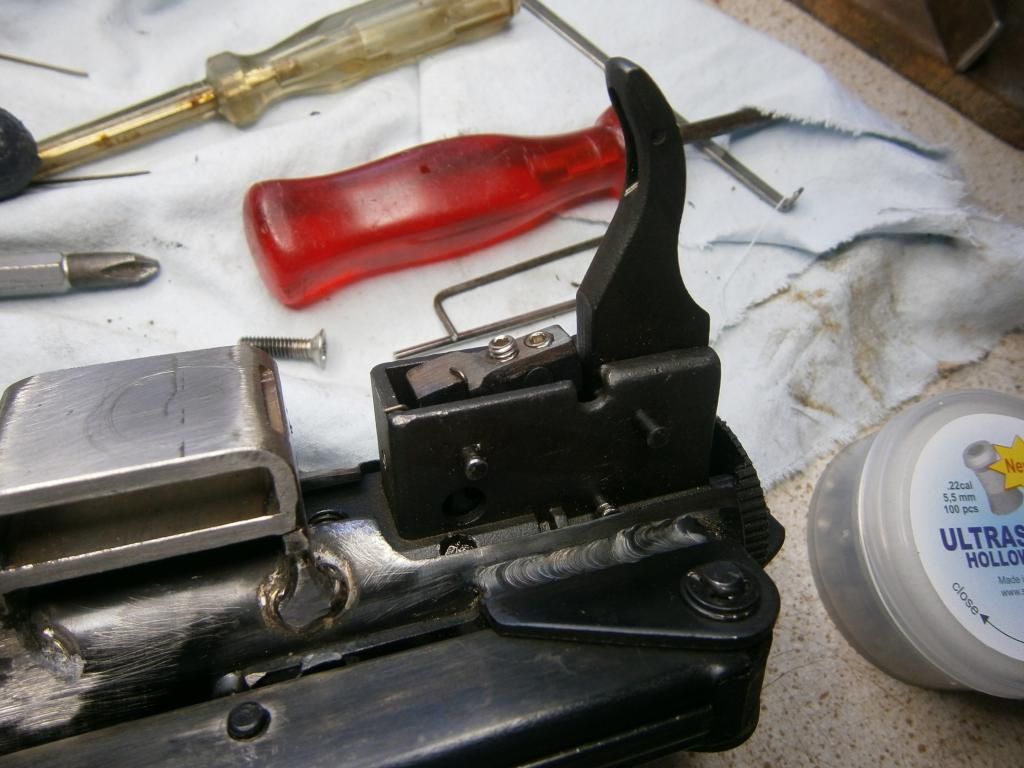
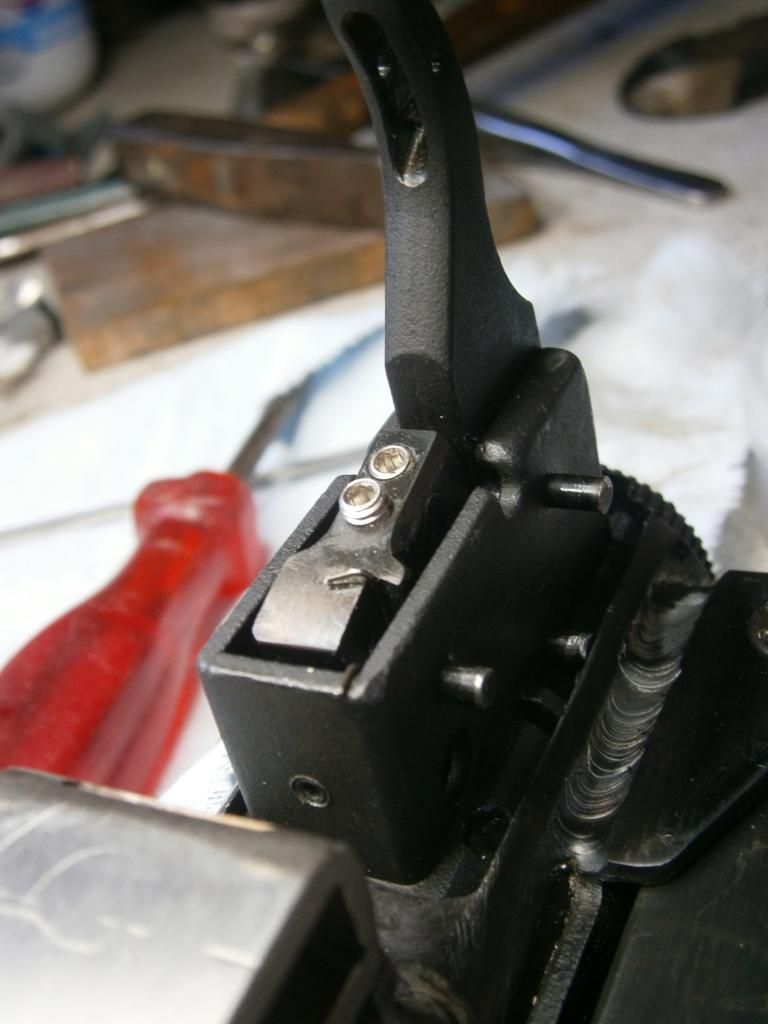
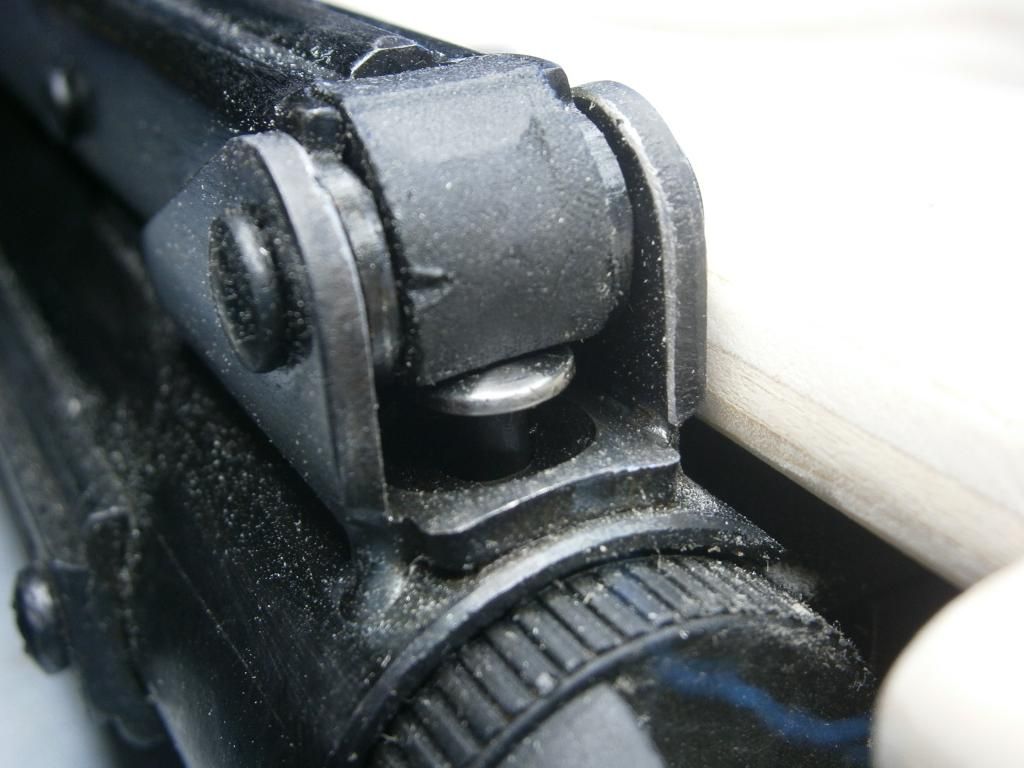
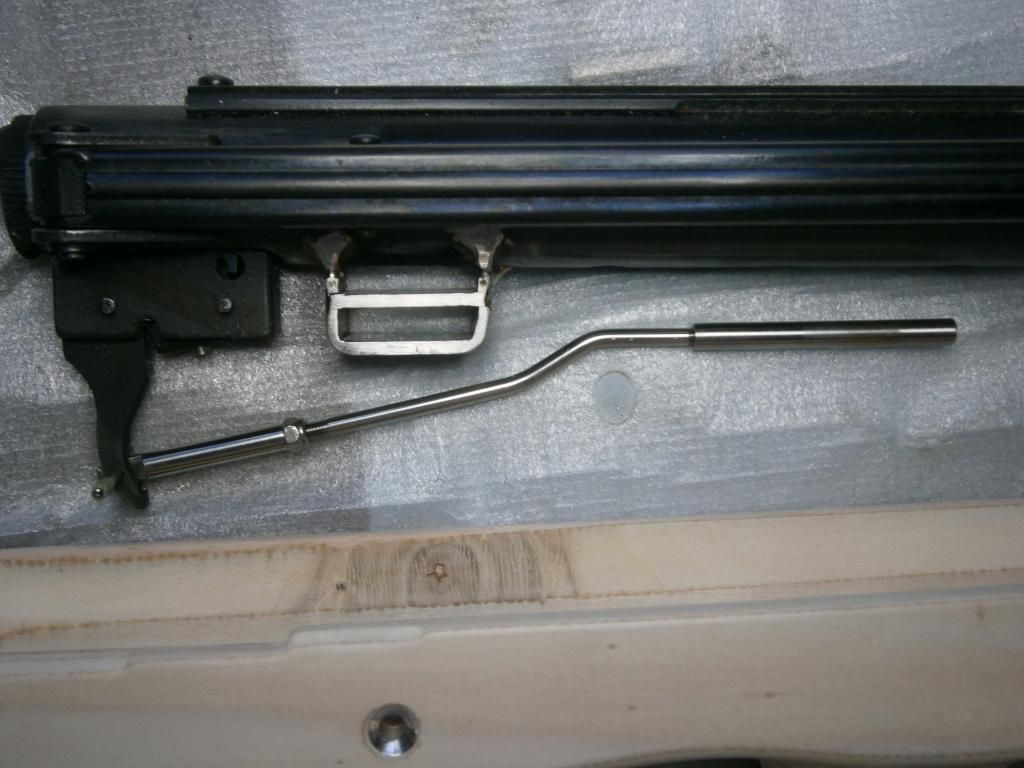
 The trigger block and mechanism
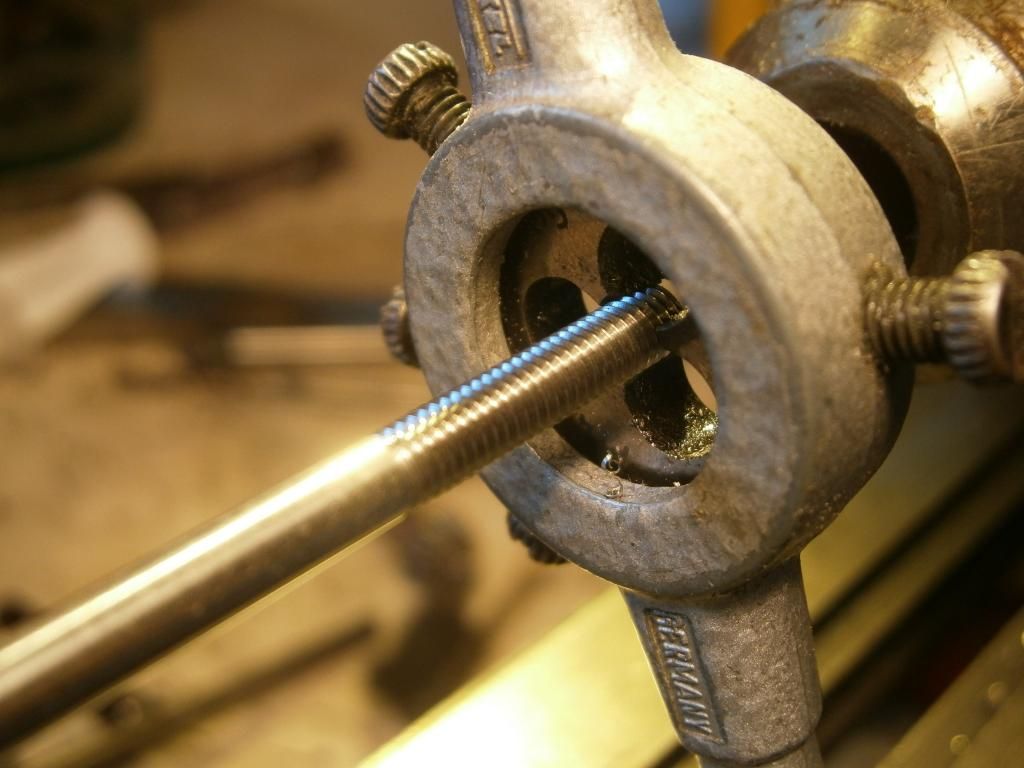
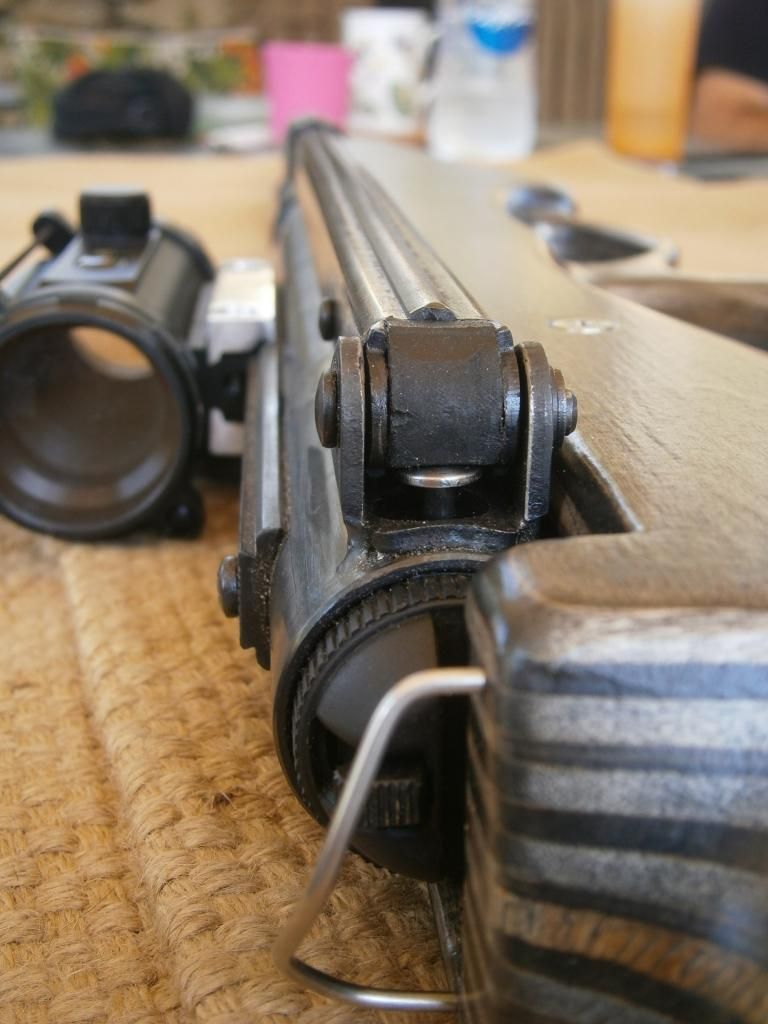
 consumed a lot of time and effort, Panagis had been warned by our friend Asrael on this. After a thorough observation of the trigger mechanism he decided that the best way to control the engagement percentage is the addition of a grub-screw in the front part of the trigger housing. This grub-screw precisely controls how much the two shears engage each other, greatly appreciated function. Just take a look on this tiny controling screw to realize the way it works:
Necessary also was to
fine tune trigger sears and levers first by grinding and then polishing up to 2000-grit sand paper (wet) thermal hardening ( heat to red-hot followed by immersion to thin oil, handy there was a bit of 10-grade fork oil from a recent oil change on the ΤΤ) and finally annealing (a little polishing until shine, slow heating-up until blue and slow cooling to room temp). In the following photos notice the change of the two factory M3 flat-head adjusting screws to a single stainless countersunk M4 screw just for testing purposes:
 The tiny hard retaining spring of the front shear changed with a stainless
 made of a dent-proof fishing leader wire, availlable in a variety of thickness.
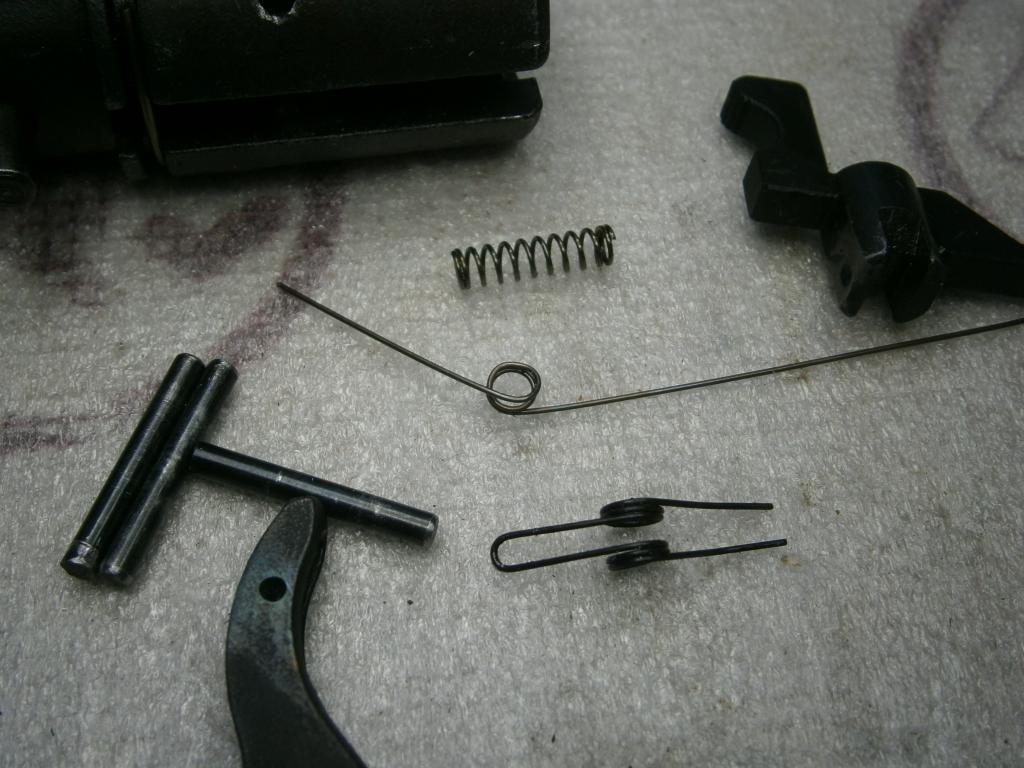
A bit of work
with hand-file and polishing was enough for the steel
safety catch to co-operate smoothly with the interlocking parts:
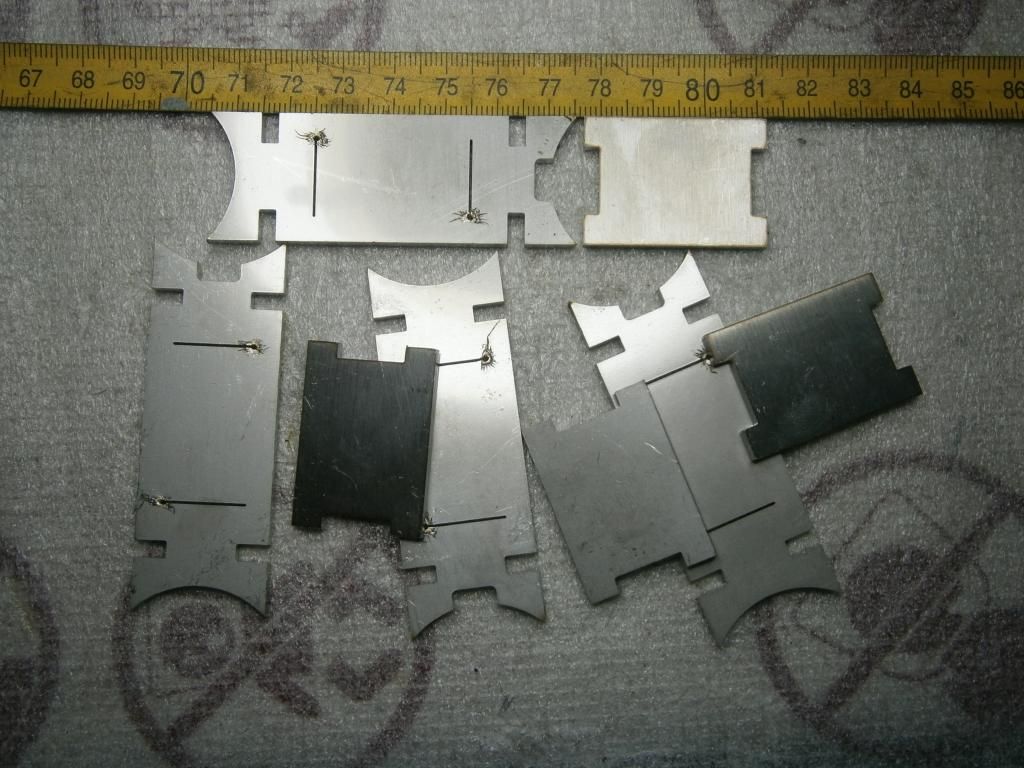
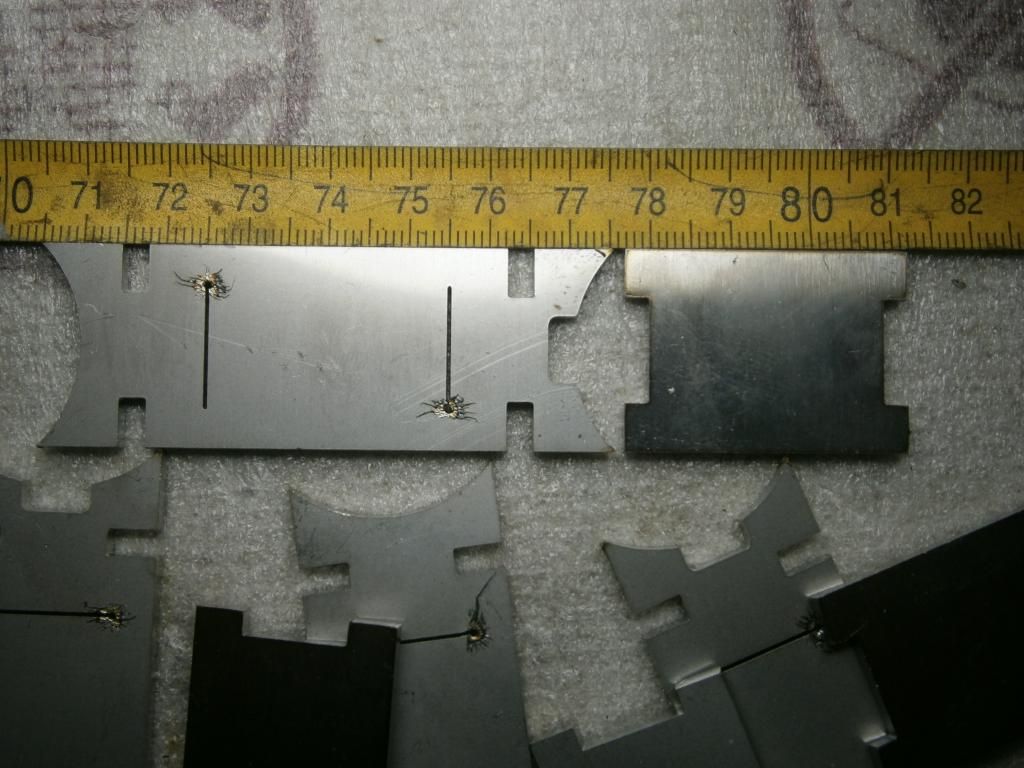
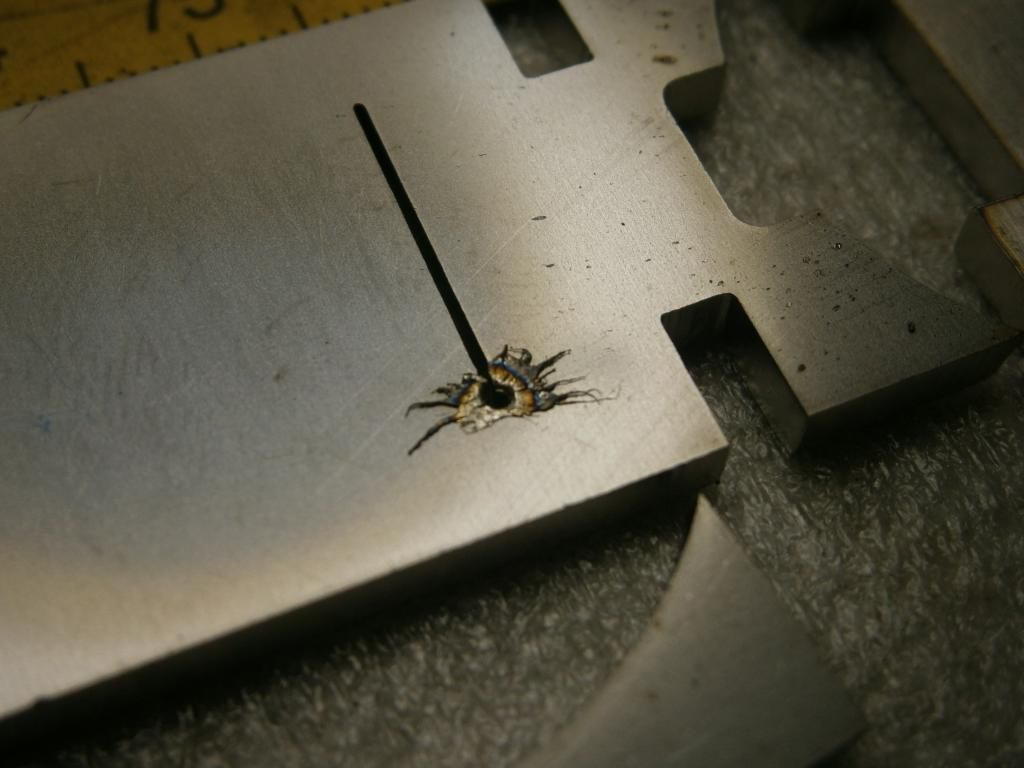
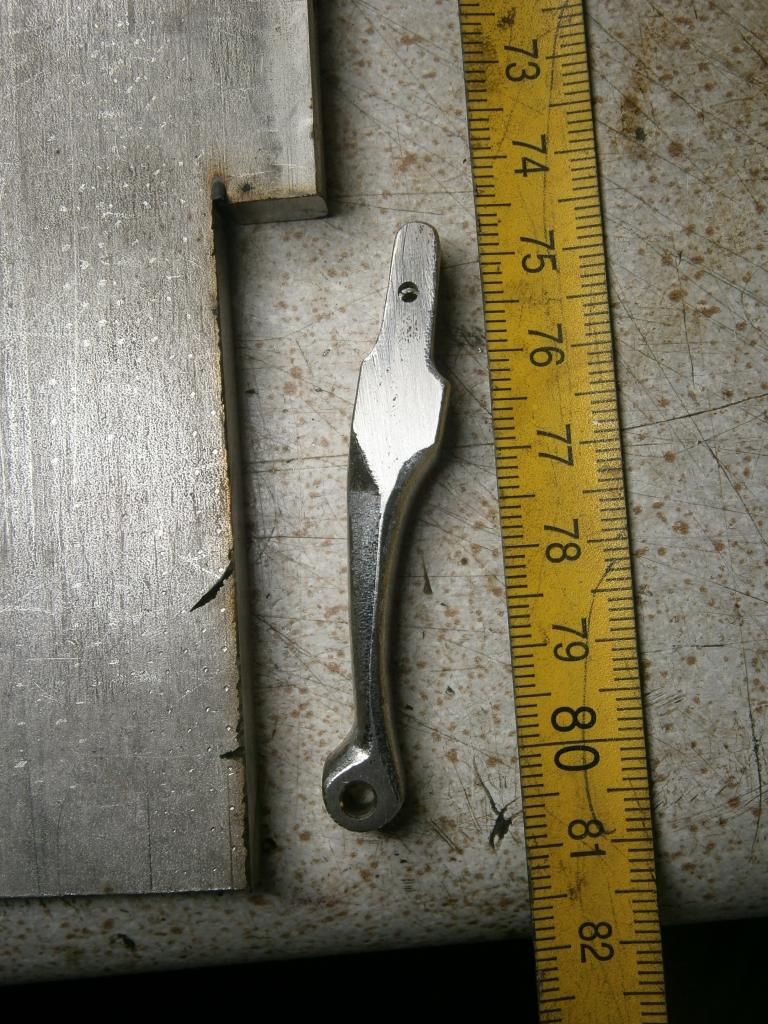
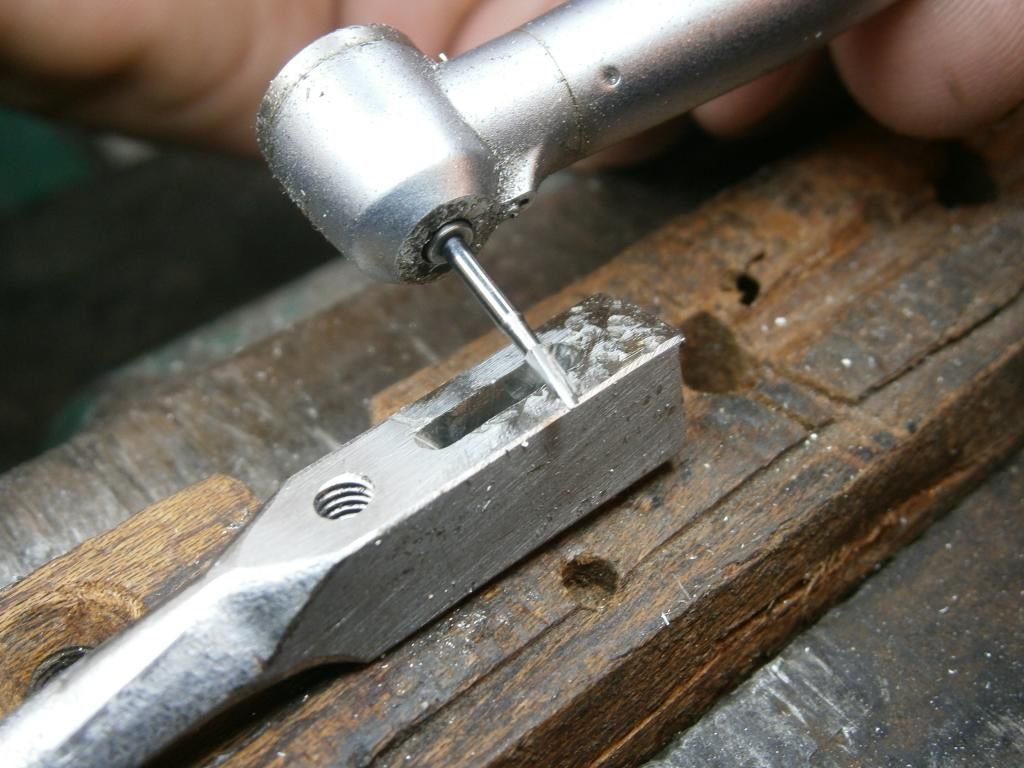
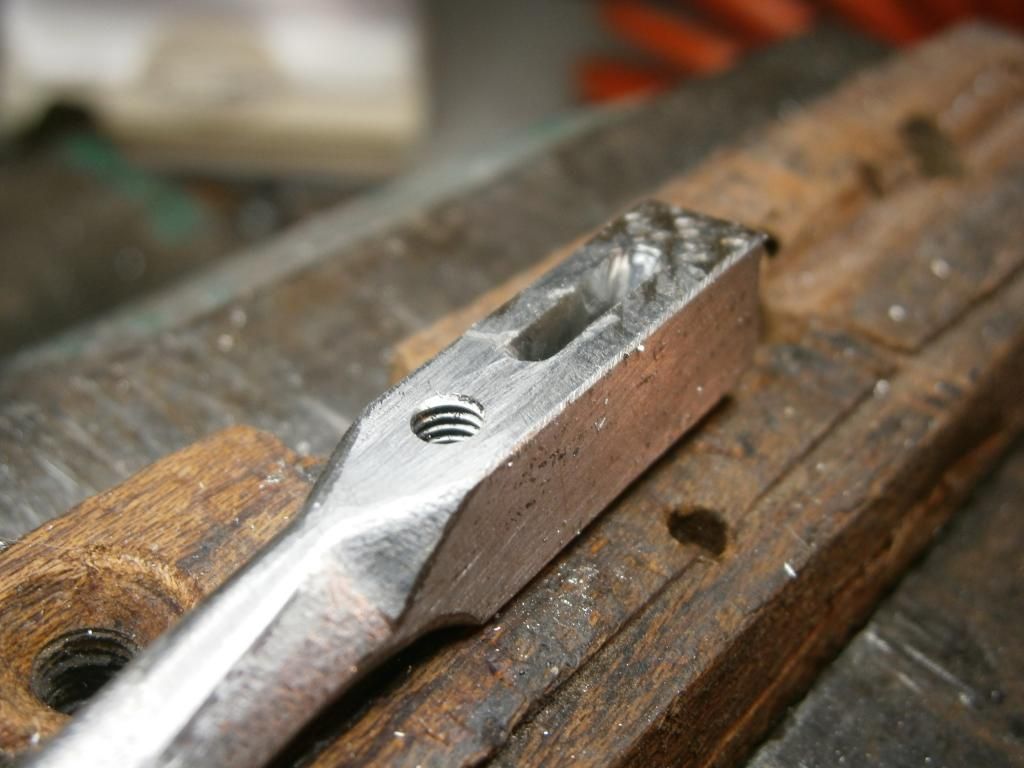
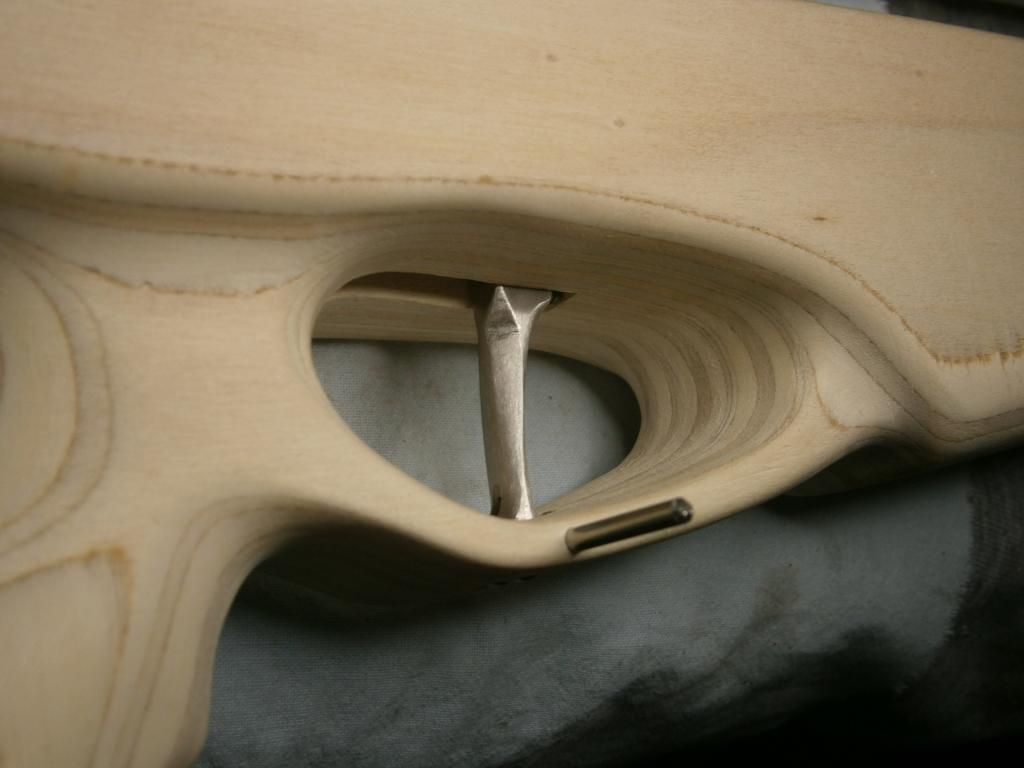
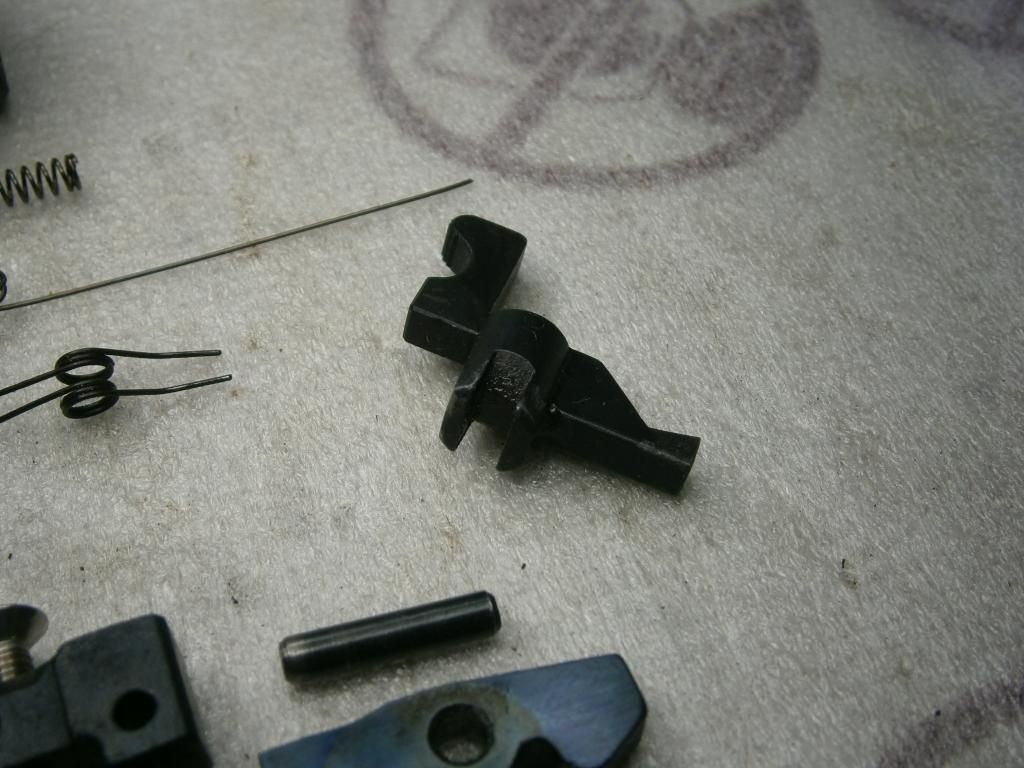 Milled a slot in the factory trigger blade
 3 mm wide using a dentist's carbide mill and then drilled a 2 mm tiny hole for a decent reception of the trigger-bar:
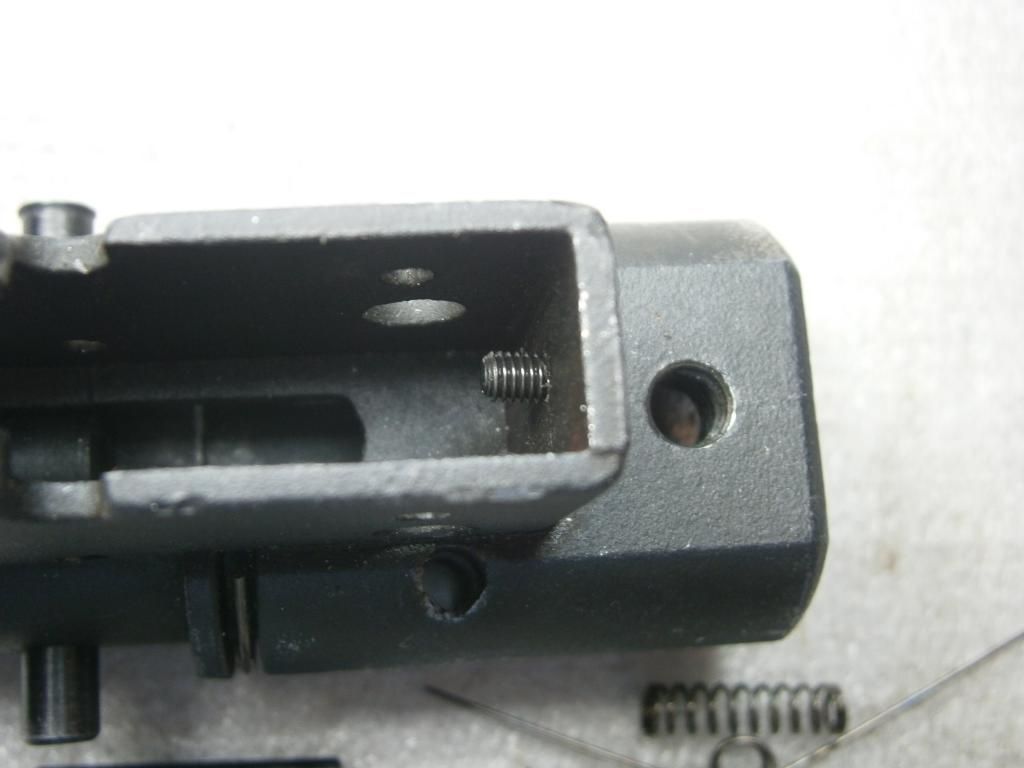
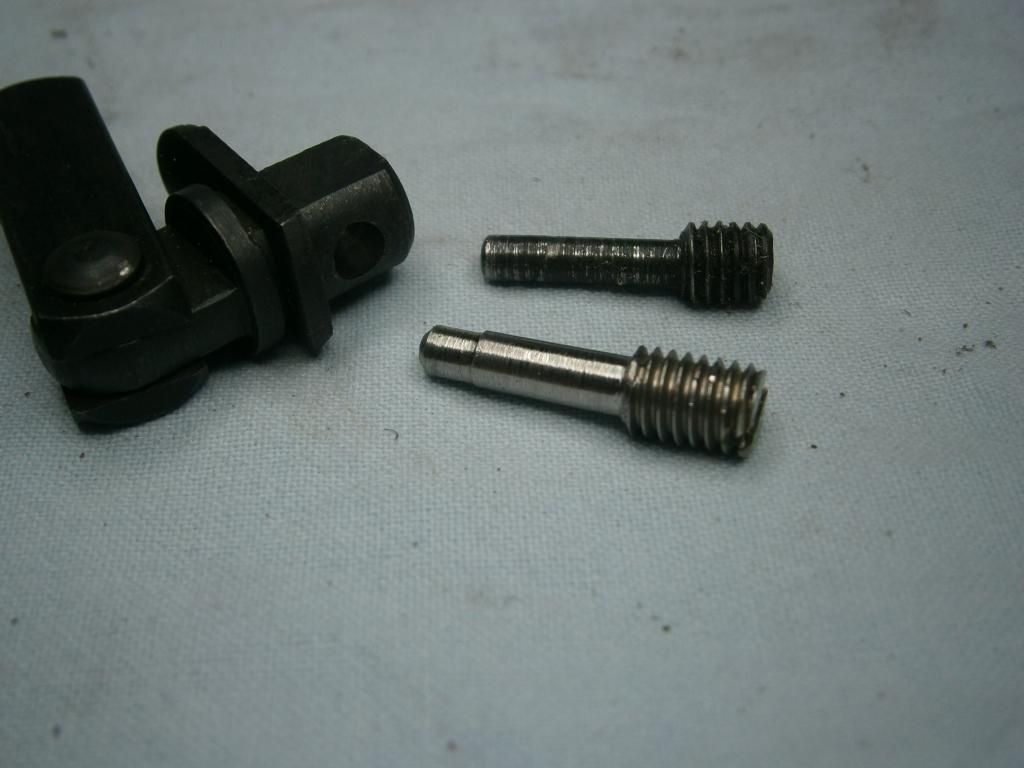
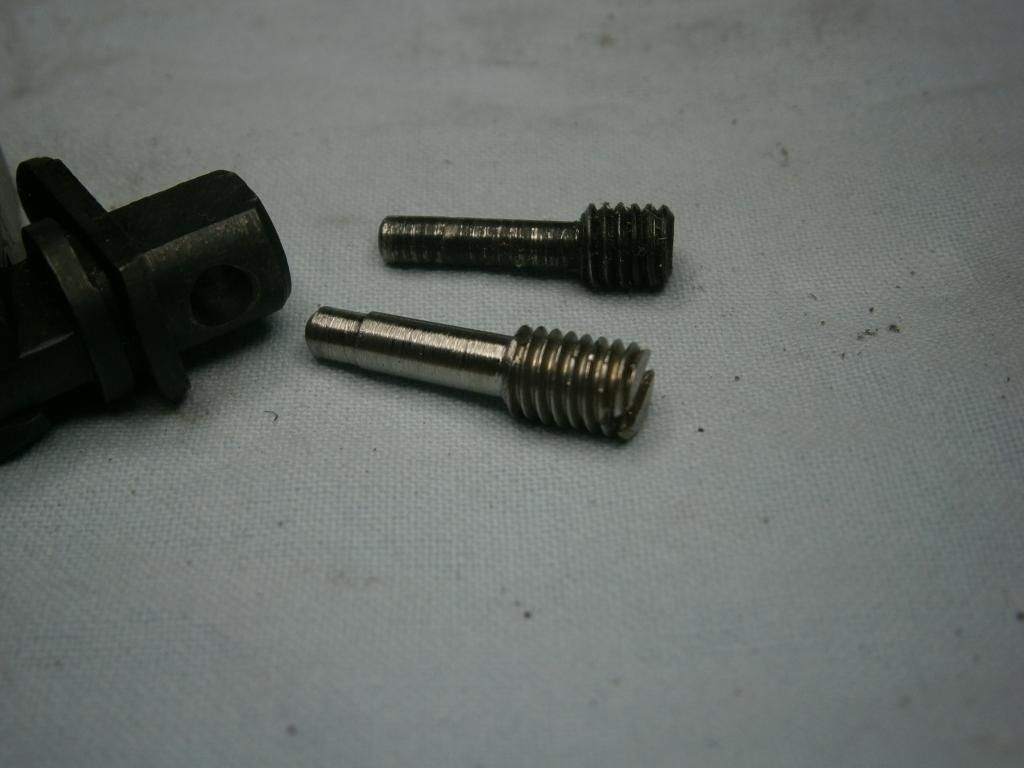
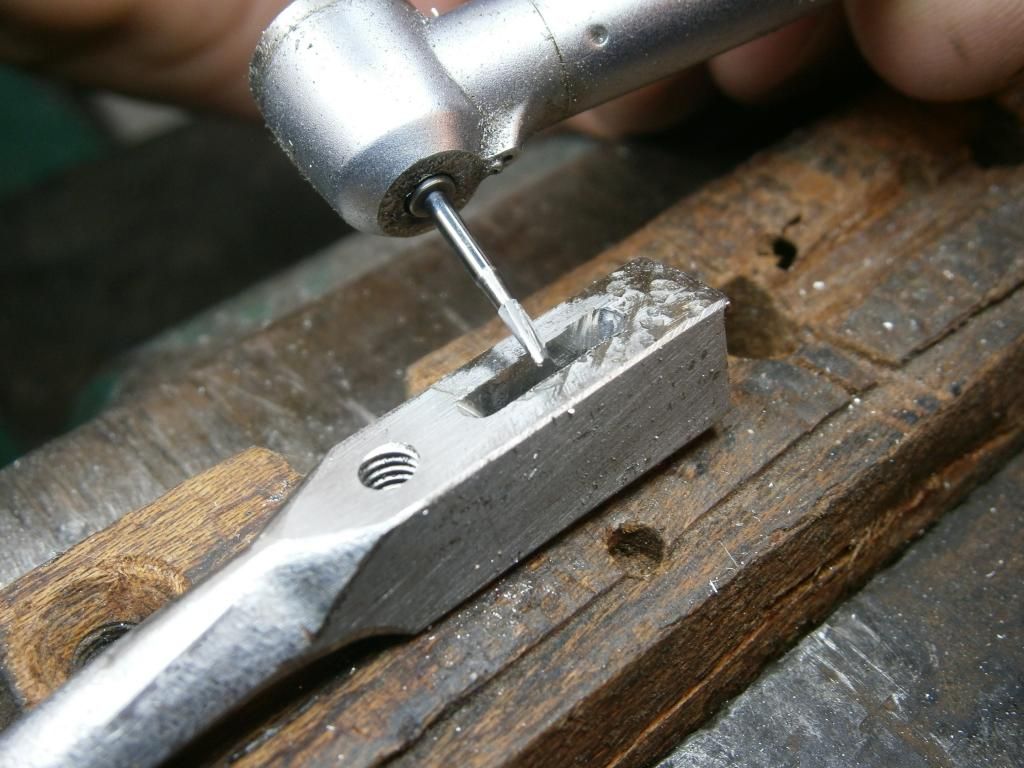
In the final form of the trigger there are two M4 adjustment grub-screws
the only functional is the rear one which is screwed mostly all the way in, near to the slotted blade. The front one, (relatively un-screwed) doesn't involve itself in the adjustment and can be rejected.
Note that in this set-up the trigger mechanism lacks first stage but has a clear, distinct and crispy second stage. When you reach this step remember the slot, the tiny hole and the M4 threads for the grub-screws, to make them before you harden this element. Also remember to round and polish the tip of the rear grub-screw, for minimal friction during the engagement:
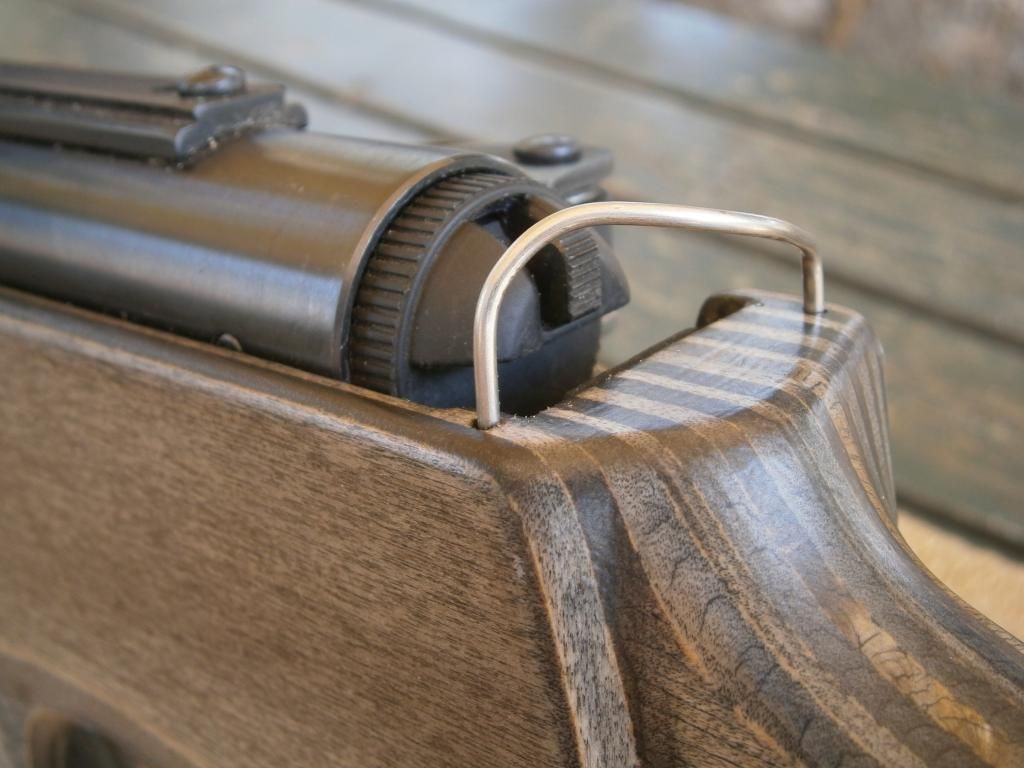
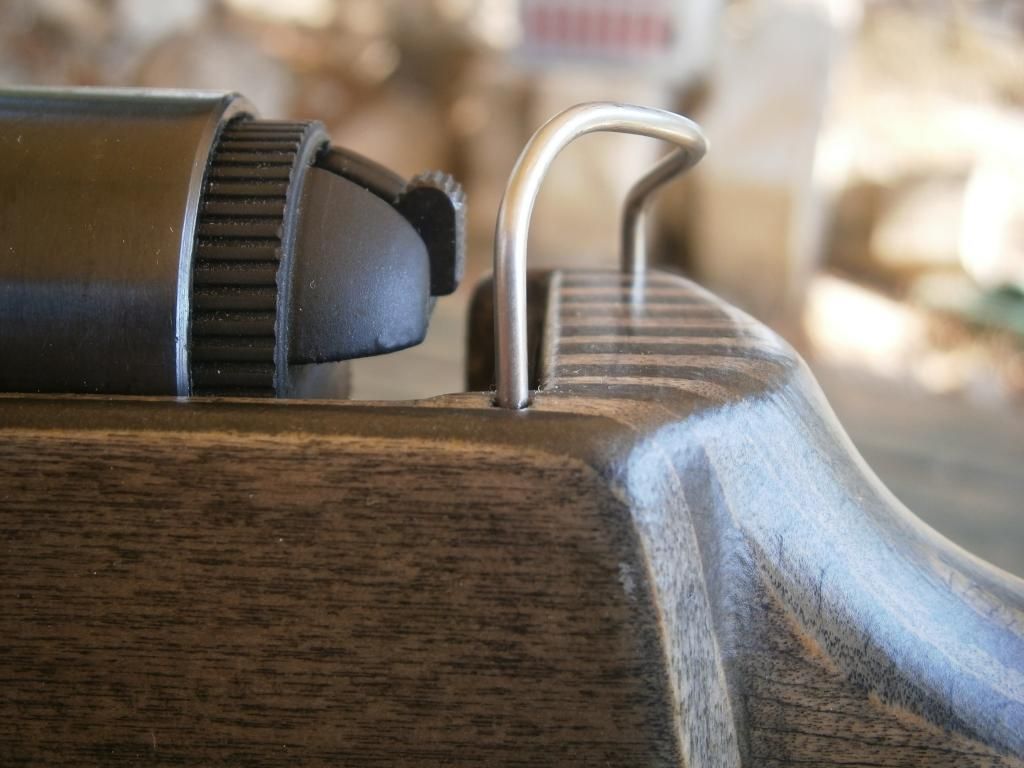
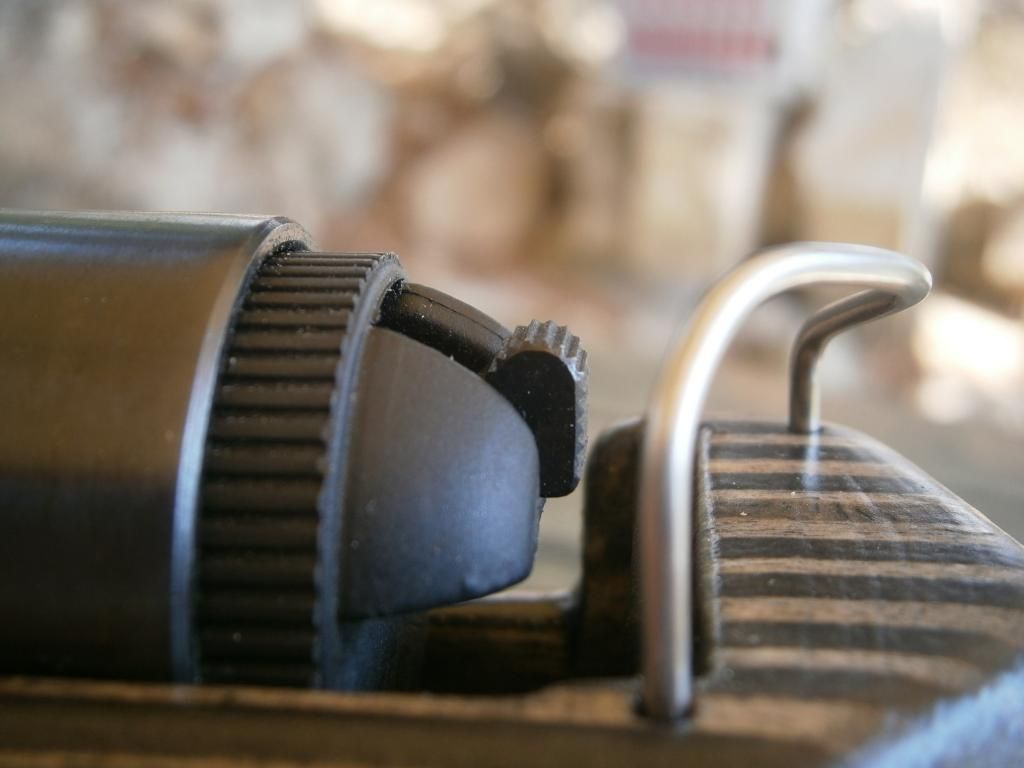
Rounded and polished carefully the head of the rear
additional safe activated while extending the side-lever because it was roughly machined from factory, scoring badly the plastic end of lever.
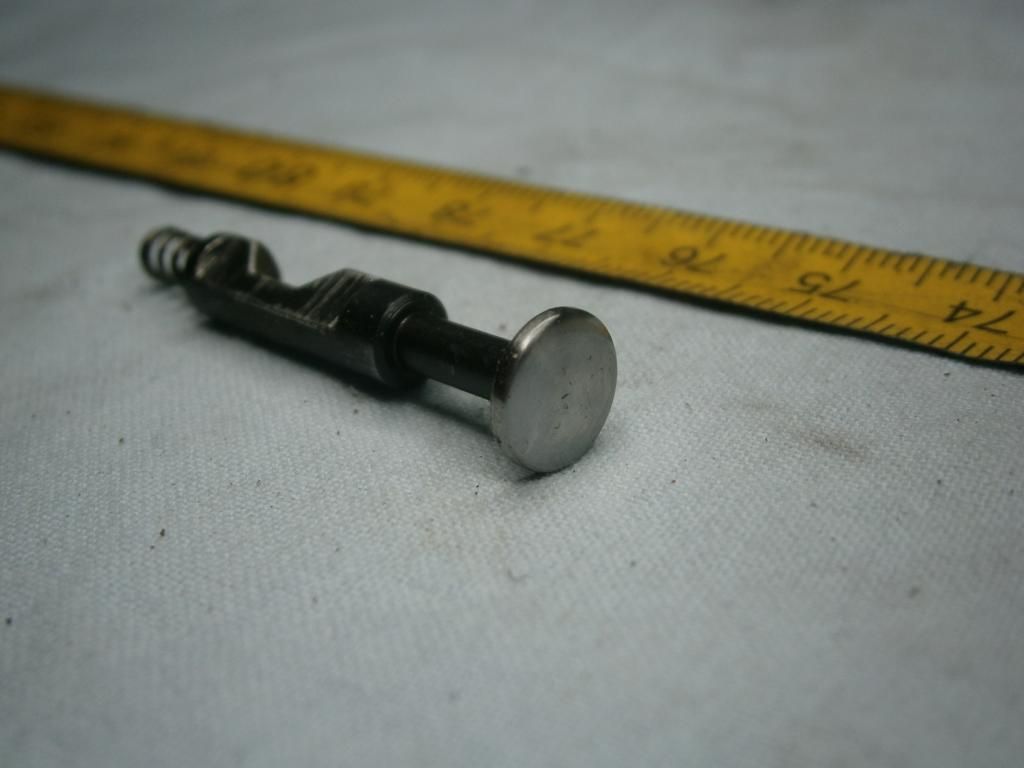
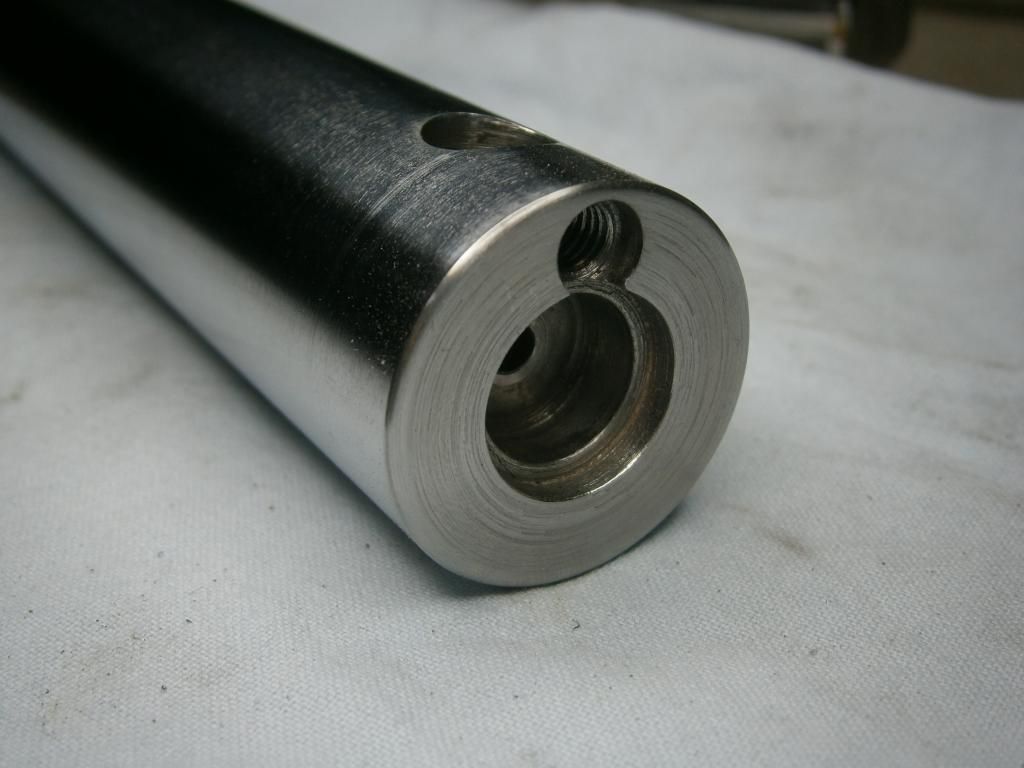
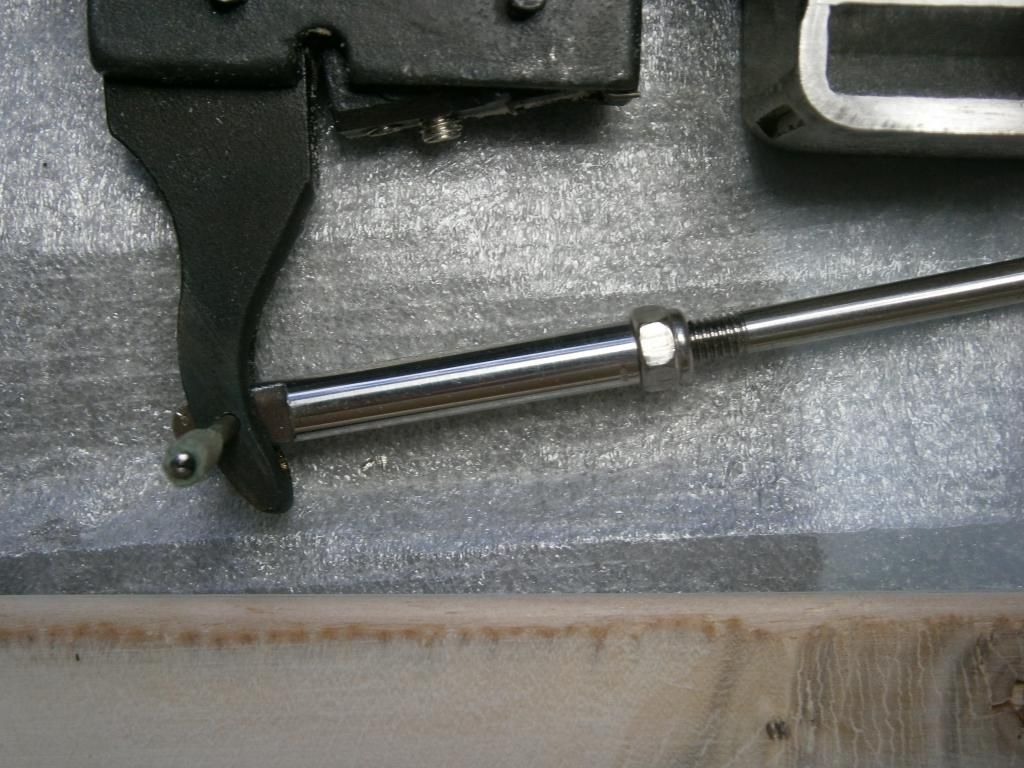
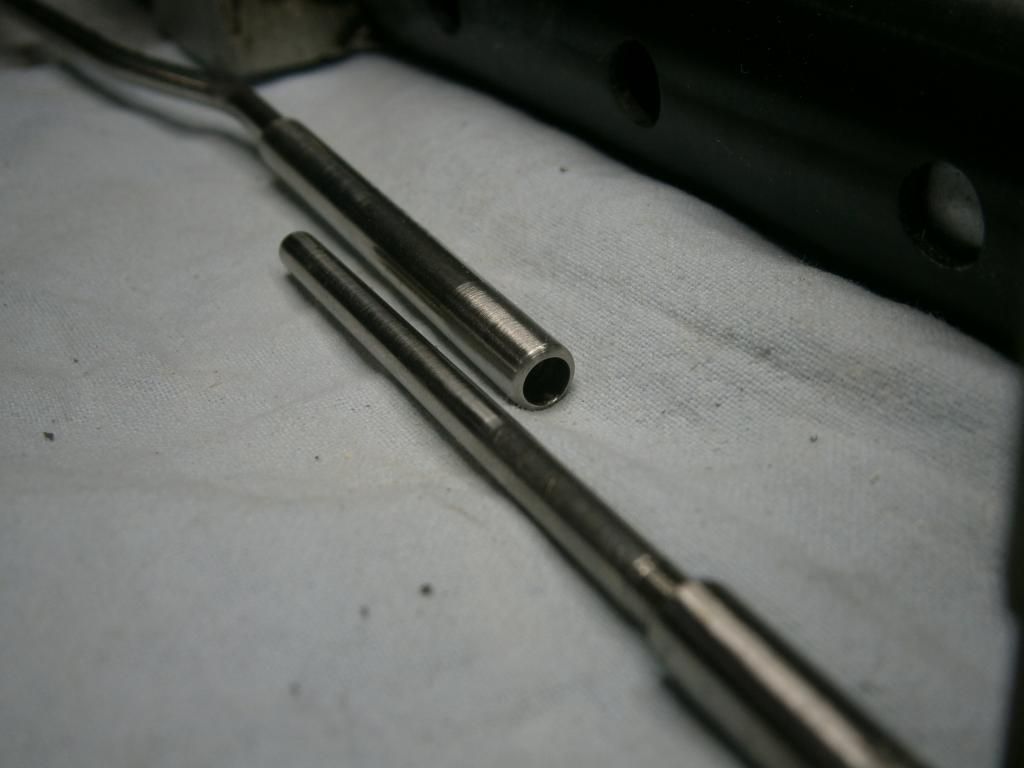
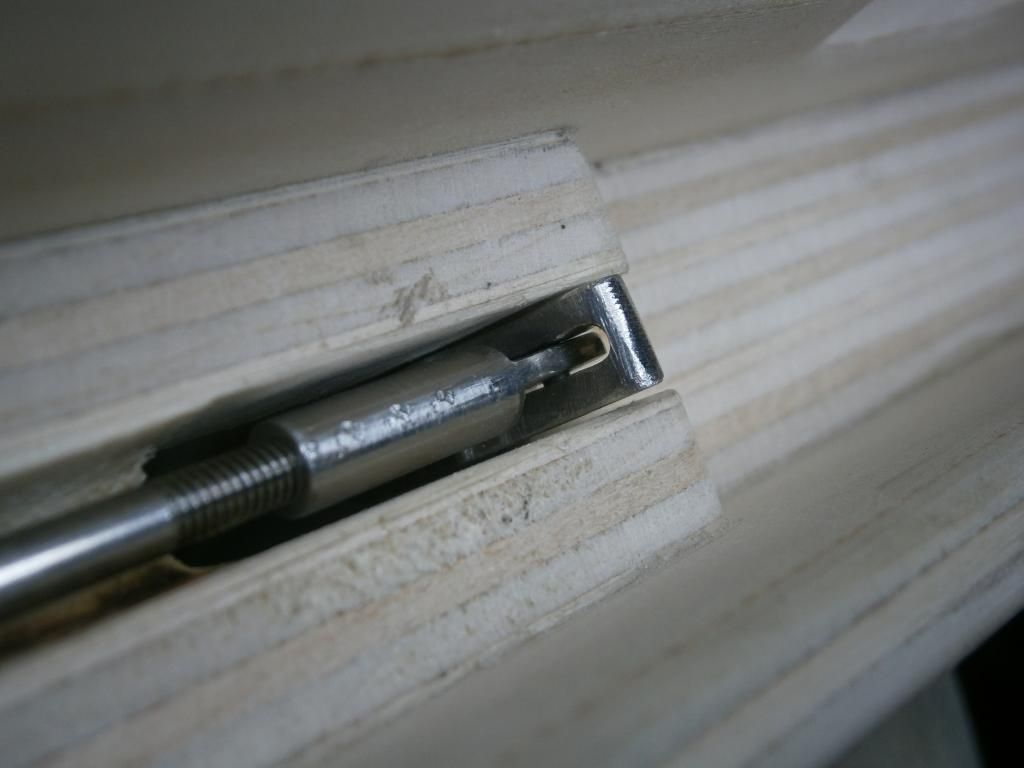
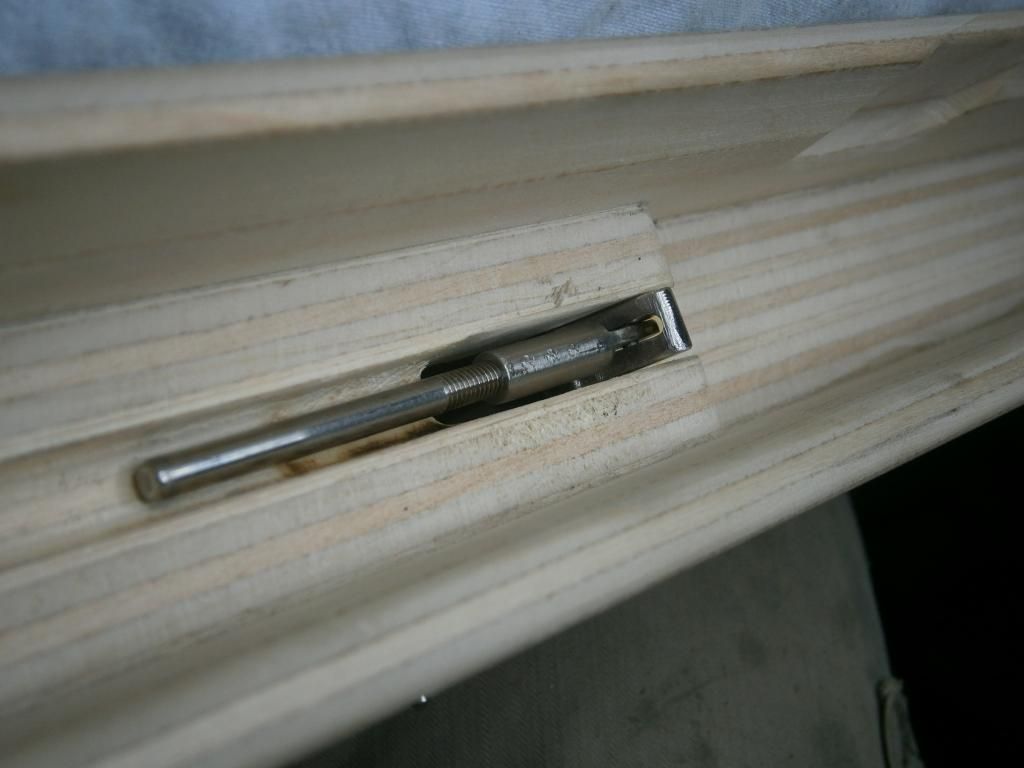
 A nippled grub-screw
 supporting the front seat of the trigger bar in it's hollow point, made from scratch by turning on the lathe a stainless M6 screw. The pull-bar was treated by hand with a round-shaped file because the factory screw and fit were poor, although not a functional impediment but somehow noisy and annoying:
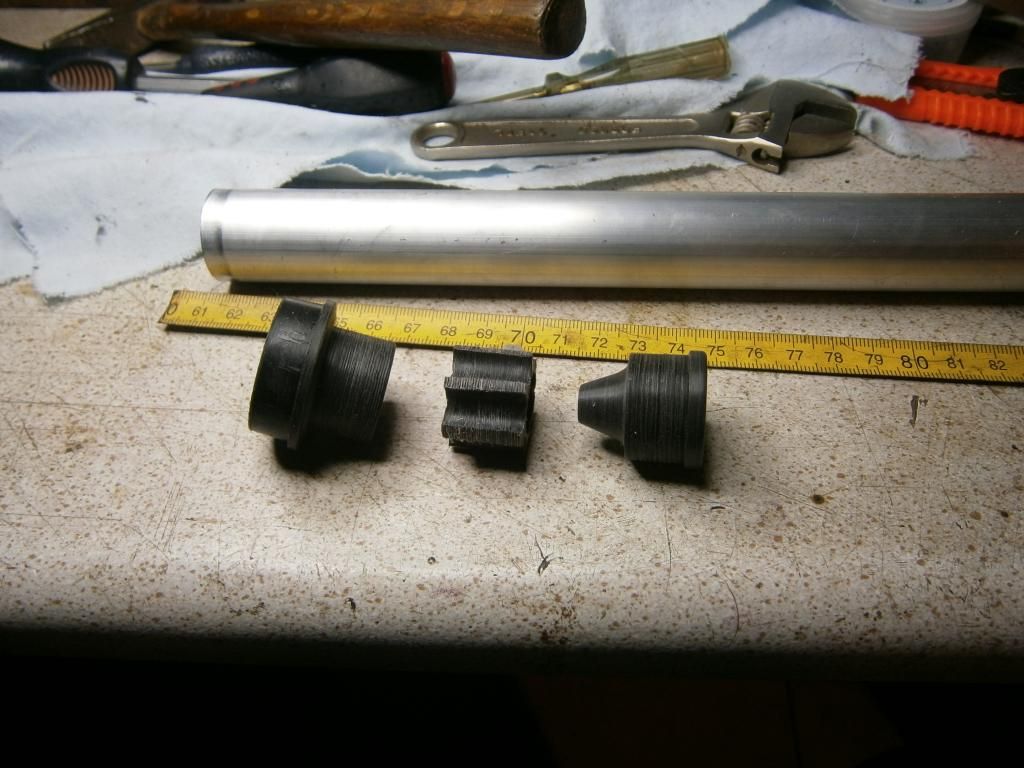
Using a laser-cut 3mm stainless steel sheet, (Lazarou 's shop in Volos, just send him the drawing and he cuts the shape on any desirable metal), bent and welded properly, a pair of identical boxes/sliders have been constructed, providing a total 18mm of travel to the gun block. Boxes were welded (not so neatly but sturdily, I have to admit) using stainless electrode on the outer gun tube, completely parallel to it, optically aided by the semi-round end-of-travel design. Later, It was realized that both boxes/slides should have been ordered in four different parts for each one because bending those parts proved a quite difficult thing to do:
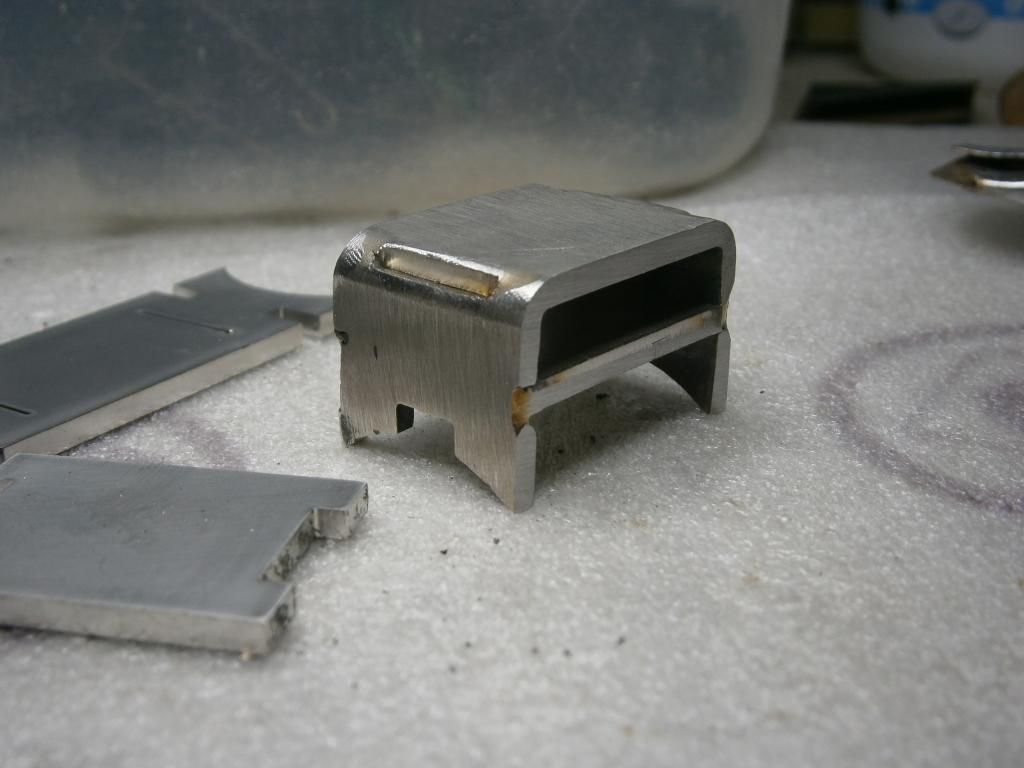
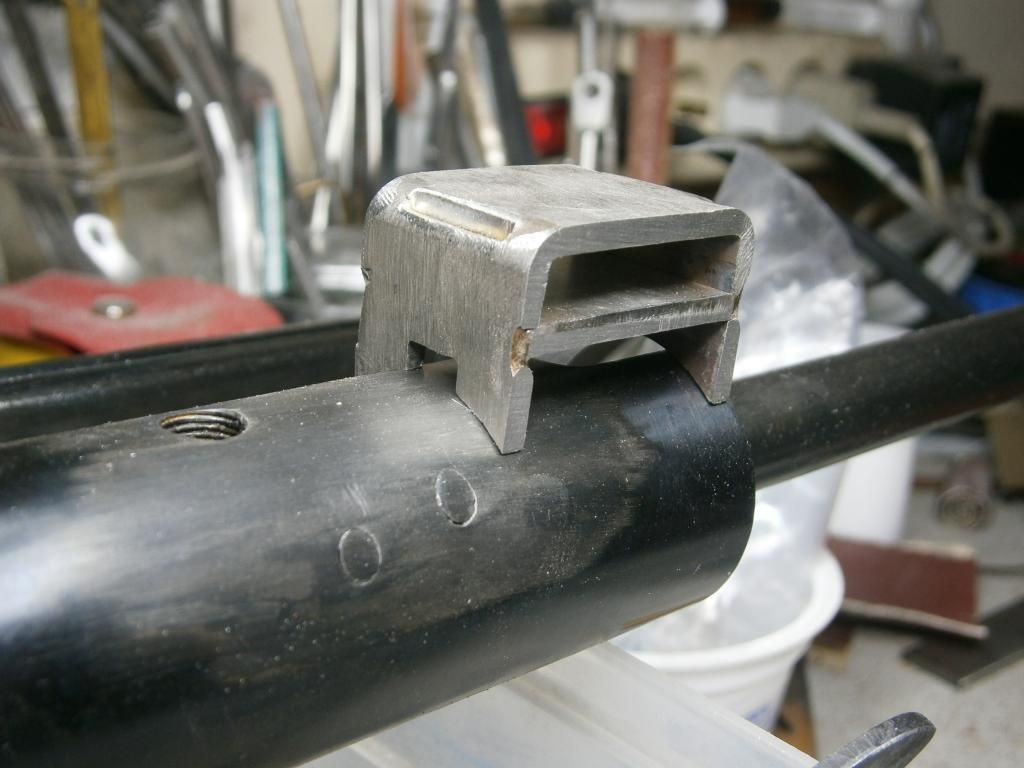
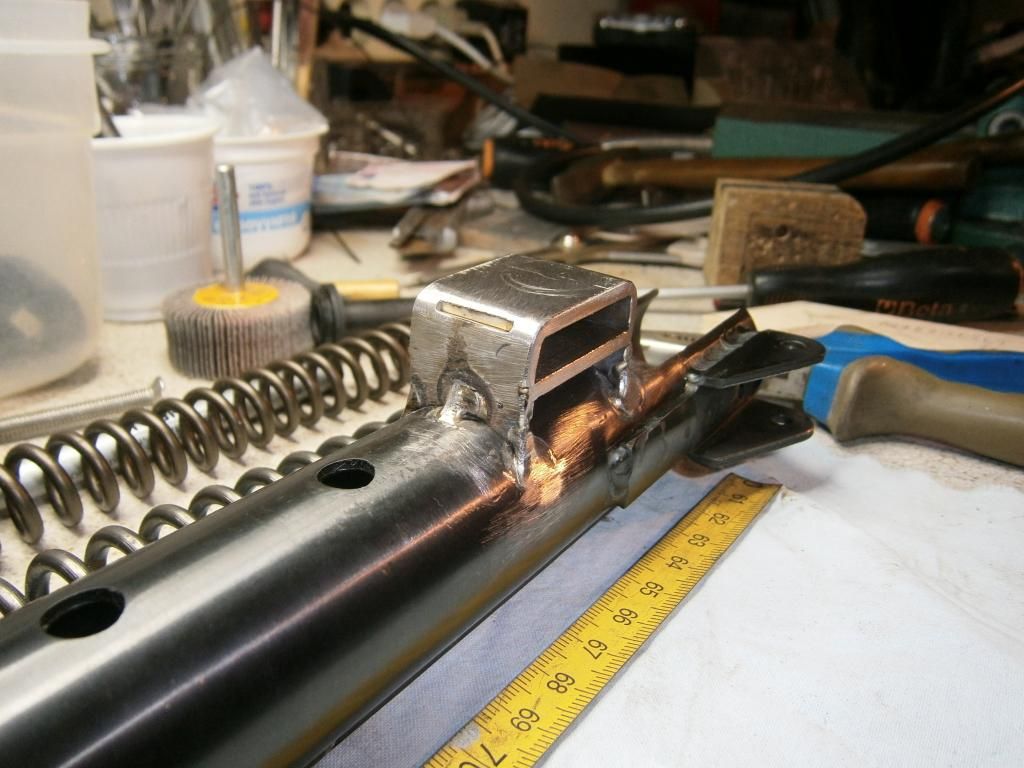
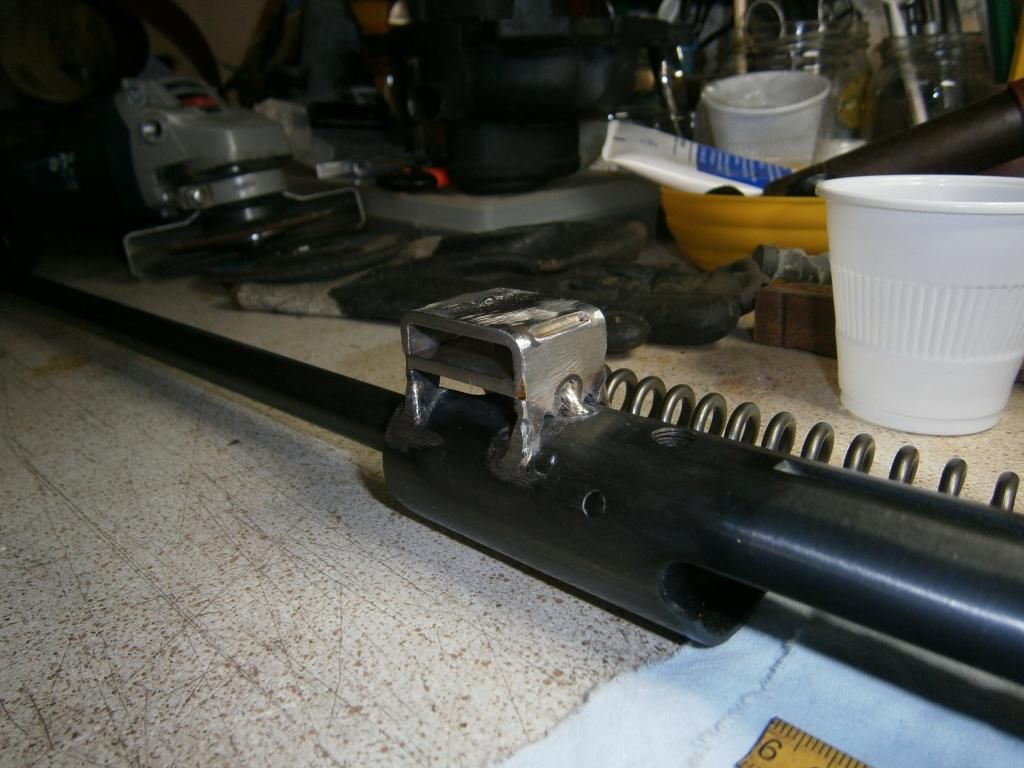
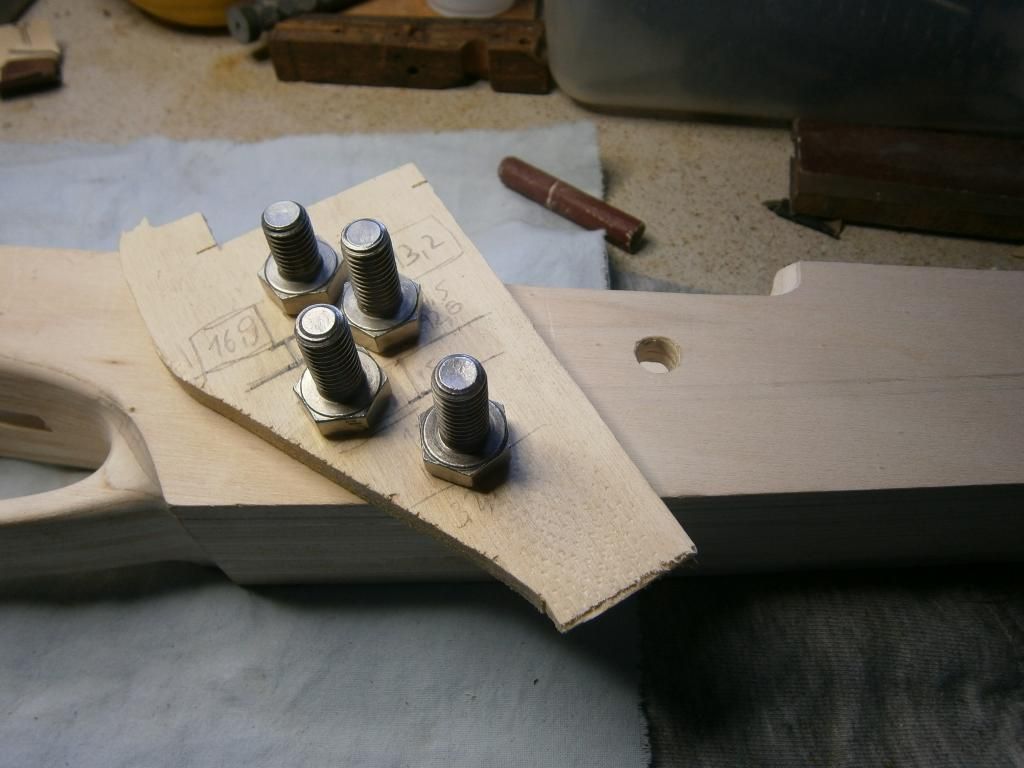
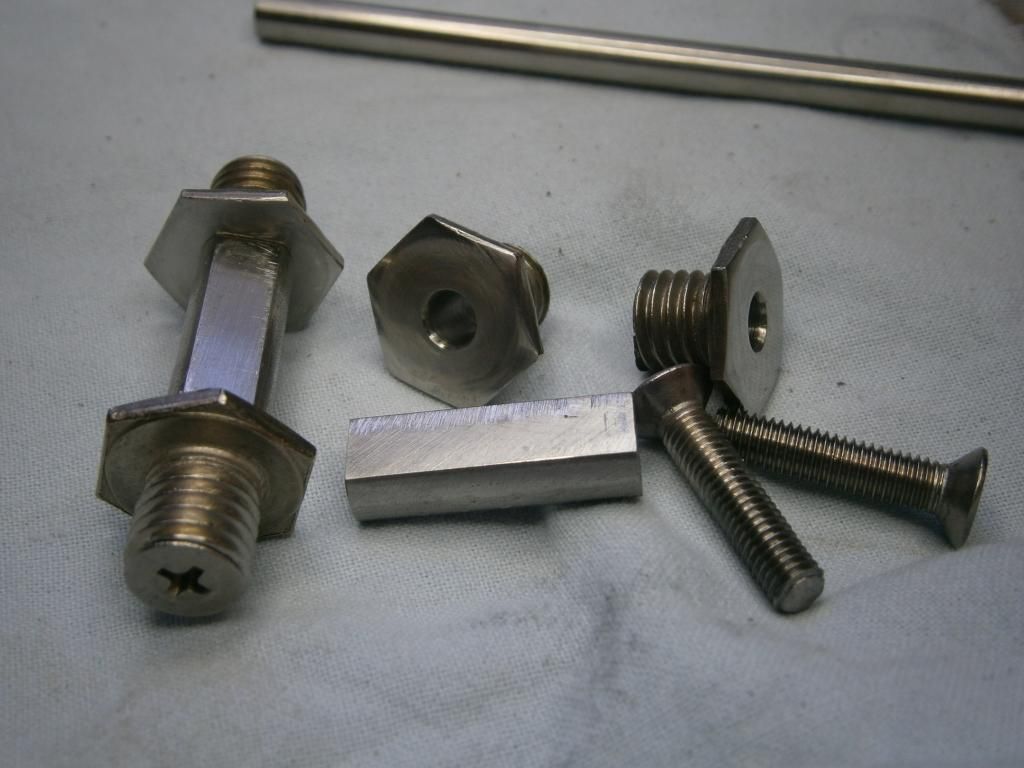
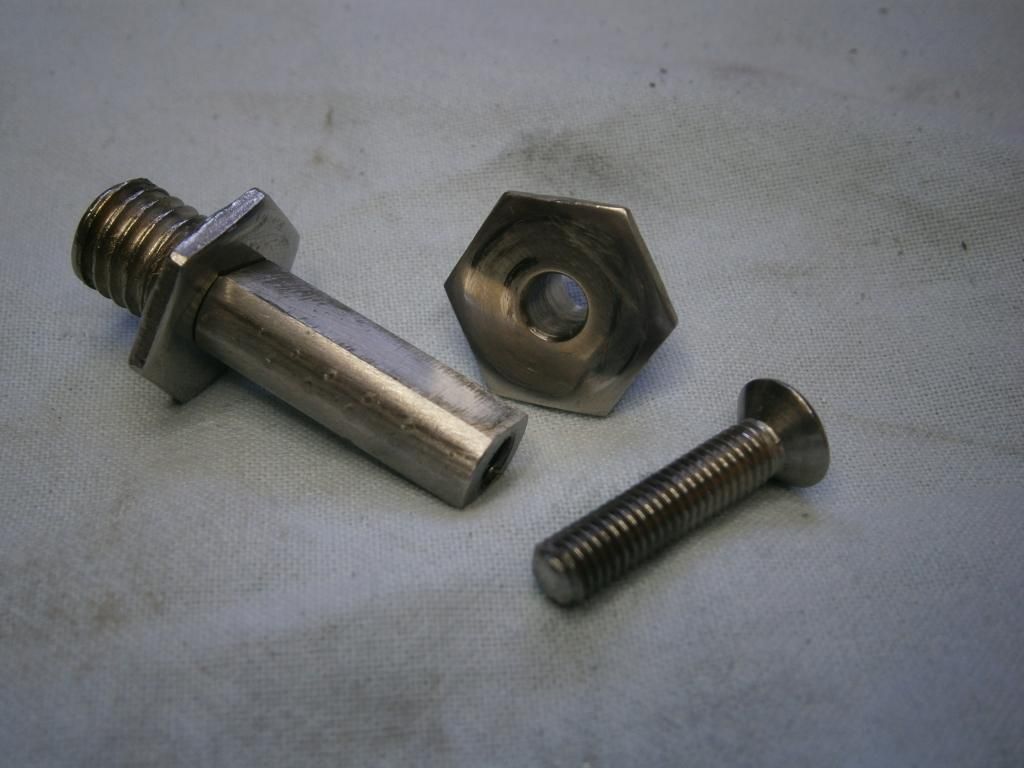
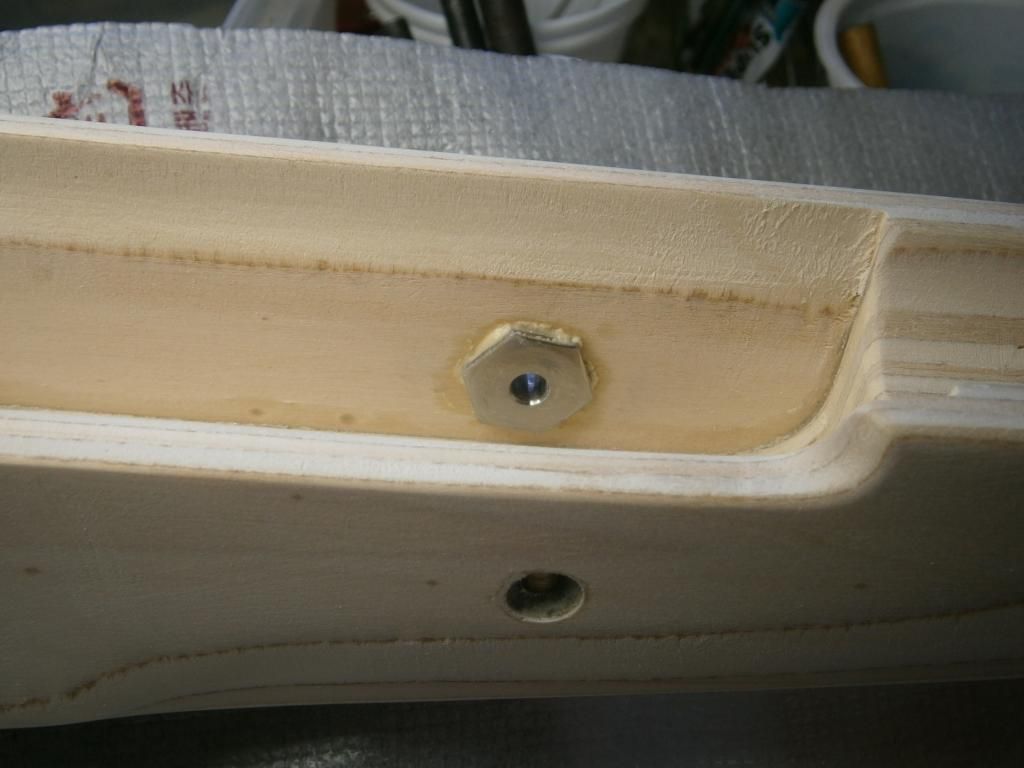
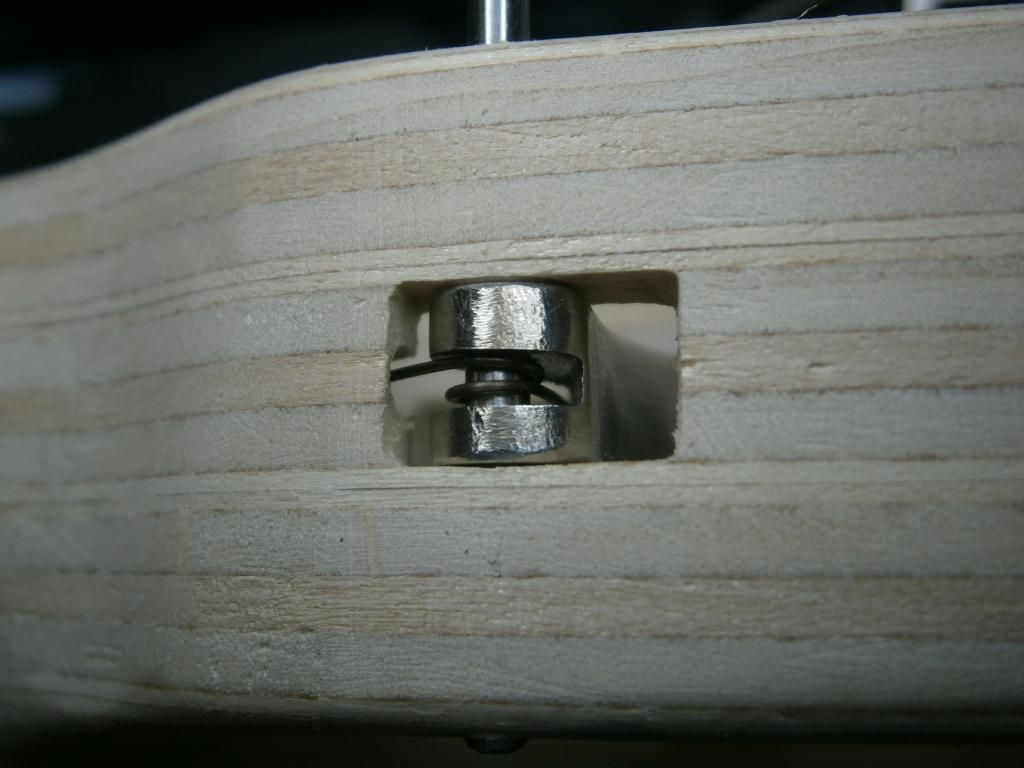
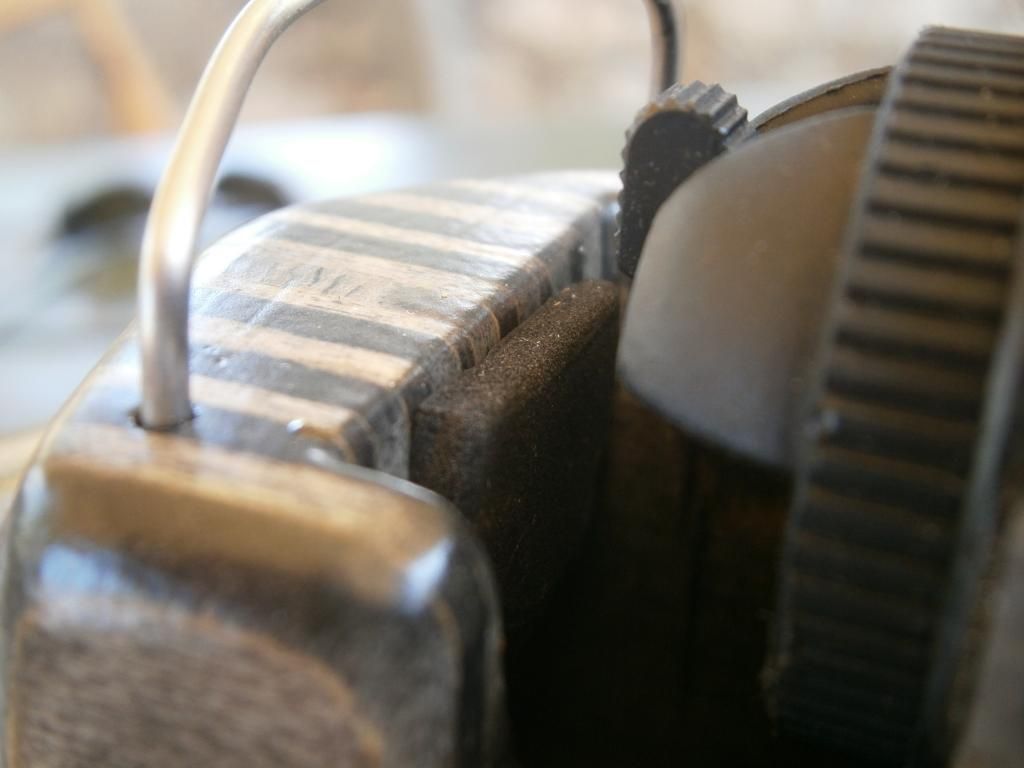
Sliders' construction was integrated by the addition of
four hexagonal buttons made from M10 stainless screws on the lathe, two 7mm stainless steel hollow blades with internal female M5 threads, each blade slides into the corresponding box and is supported by a stainless M5 screw for each slider. The hexagonal button faces were polished carefully up to a 2000-grit sand-paper, hand-achieved tolerances are quite minimal, there has been tons of patience and attention to make those babies work:
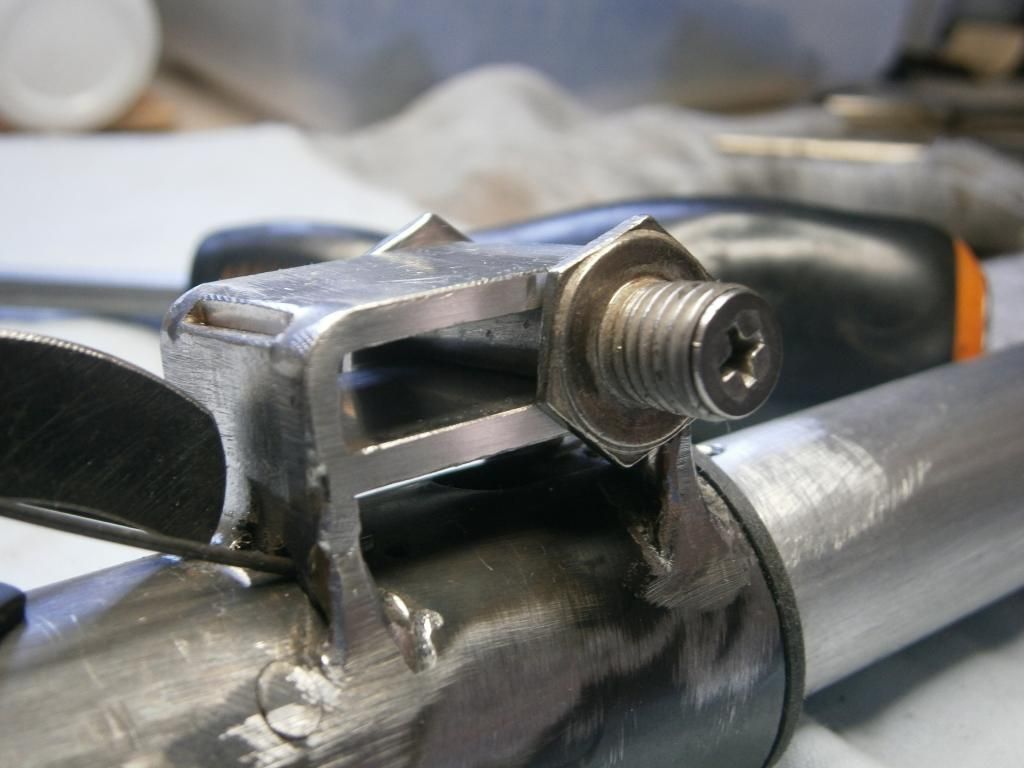

A modification of the
anti-bear trap spring with a carbide milling bit was needed because the front slider covered the two tiny holes anchoring each end of it. Now, they are attached on the front slider, on two properly milled holes. Necessary was also a slight grinding of the anti-bear trap blade, because of the slider too:
 All four stainless hexagonal buttons glued with epoxy compound
 (a mixture of epoxy resin, wood chips and glass bubbles) color resembling wood
into carefully marked and drilled 10 mm holes in the stock:
Polished very carefully the piston chamber (15 mins on the lathe were adequate to mirror-shine) up to 2000-grit damp sand-paper and some light grinding paste on chord because this part has arrived from China almost as rough as a corn field:
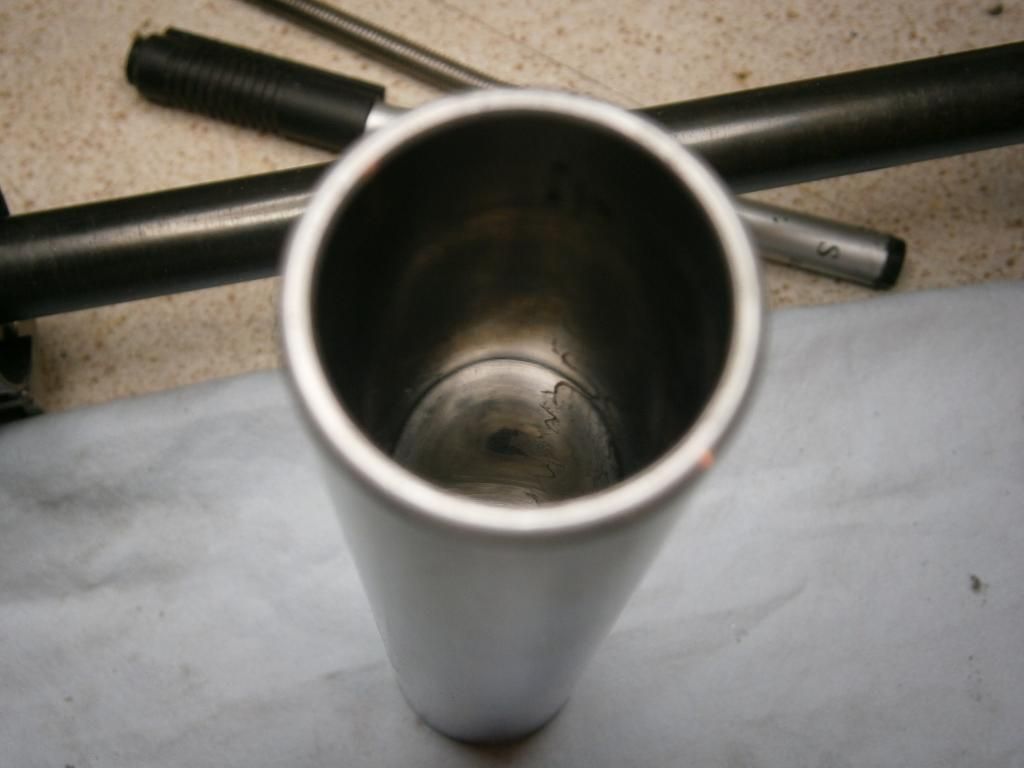
Aiming towards a longer piston stroke, the compression cylinder has been shortened on the lathe by scraping off 2.5 mm of the inner face thus equally increasing stroke by the same amount. For those 2.5 mm to be useful, a semi-rusted 1.5 mm washer had to be removed, the one between the cylinder and the breech seal, which seal had to be carefully trimmed with a sharp blade. If there will be a compression lost because of this small seal I'll machine on the lathe a PET substitute:
Speaking of PET we are to the point of Change the piston seal with a reddish one turned on the lathe, rather easily, used high rpm and well sharpened cutting tool. STEMPLAST, a shop in Piraeus, provided the necessary 1/2 meter-long, 30mm OD, PET rod for 23 euros. Plenty of seals to make of it... As a novice in seal-making I decided to make it's lip a bit thicker but it definitely emits a clear "plop" when you pull the piston and slides just OK :
Piston accepted a buttoning on the rear end by a star-shaped tight acetal ring, glued with super-glue, after smoothing on the lathe the front one of factory-made bulges. Note that the factory made a similar attempt with a black plastiplex ring, decorative more or less because there was a 3mm gap between the ring and the cylinder. Front end of piston received buttoning also, using 6 small lateral mini buttons made from 4mm black acetal glued with super-glue into 4mm-deep holes. A lot of patience and attention needed to drill those holes with a carbide drill-bit, because the metal surface of the piston on this area was the only part hardened and quite difficult to drill through:
Changed the main spring with a shortened one from a HATSAN mod125, our friend Piperman donated this, (thanks, Kostas) enough for two rifles if it was bit longer . Turkish spring was cut to 29 centimeters (25 cm was the Chinese one, quite weaker) flat-rounded the first coil and polished up to 2000-grit both ends. Because of the increased OD of the new spring there wasn't any space left to accommodate any film between piston and spring, just smeared a bit of graphite grease, after I cleaned the factory dark grease. From now and on the gun needs mechanical aid to be opened and closed (for me it was an old carpenter's vice):
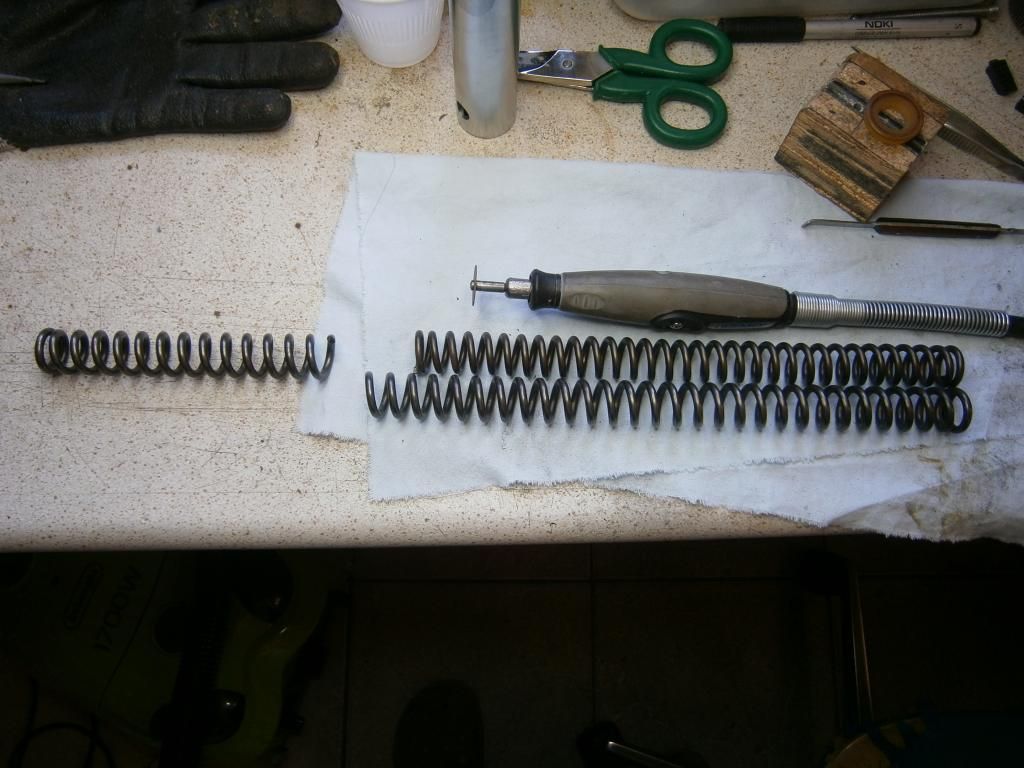
Spring guide remained the same tolerance considered as OK, just grinded flat it's rear end to fit the housing of the trigger block and polished the washers so the spring to pivot as freely as possible. Note that after the shining of both spring ends, decided that there wasn't any need for a top hat although a piece of phosphorus bronze was ready to turned for this purpose on the lathe:
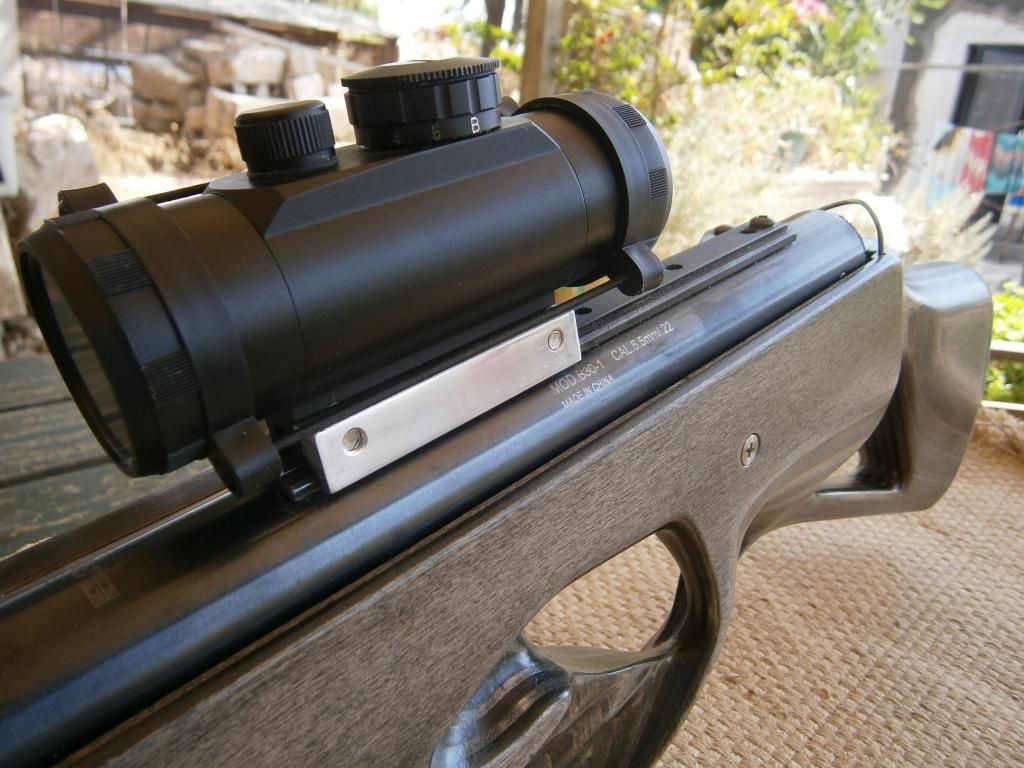
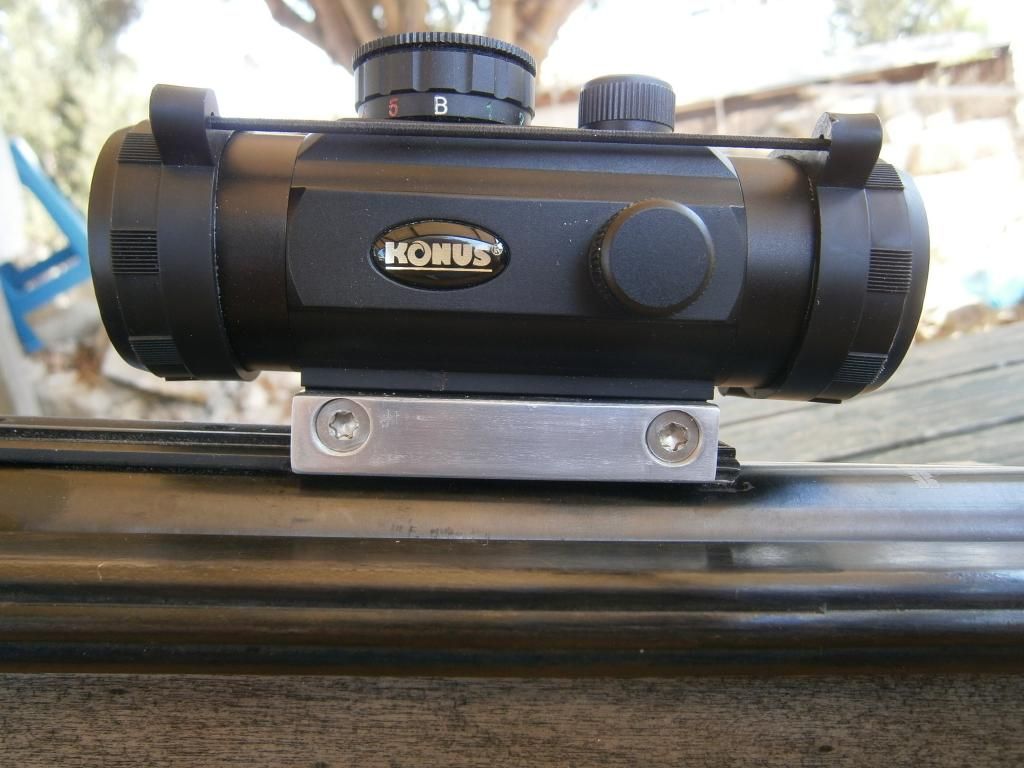
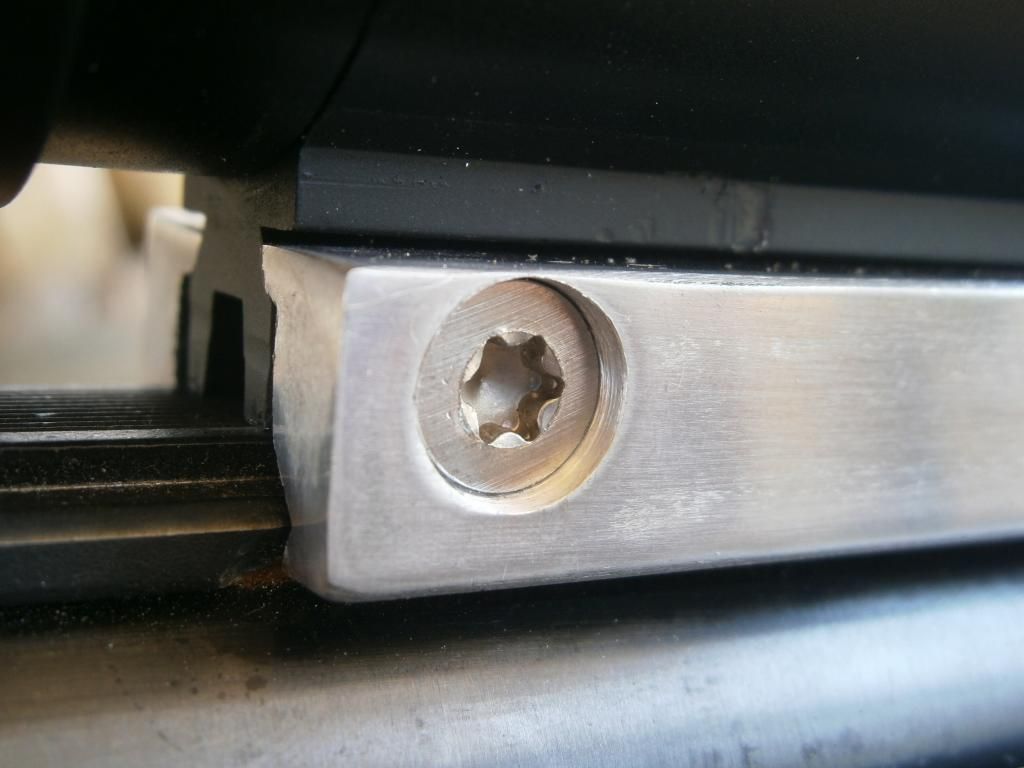
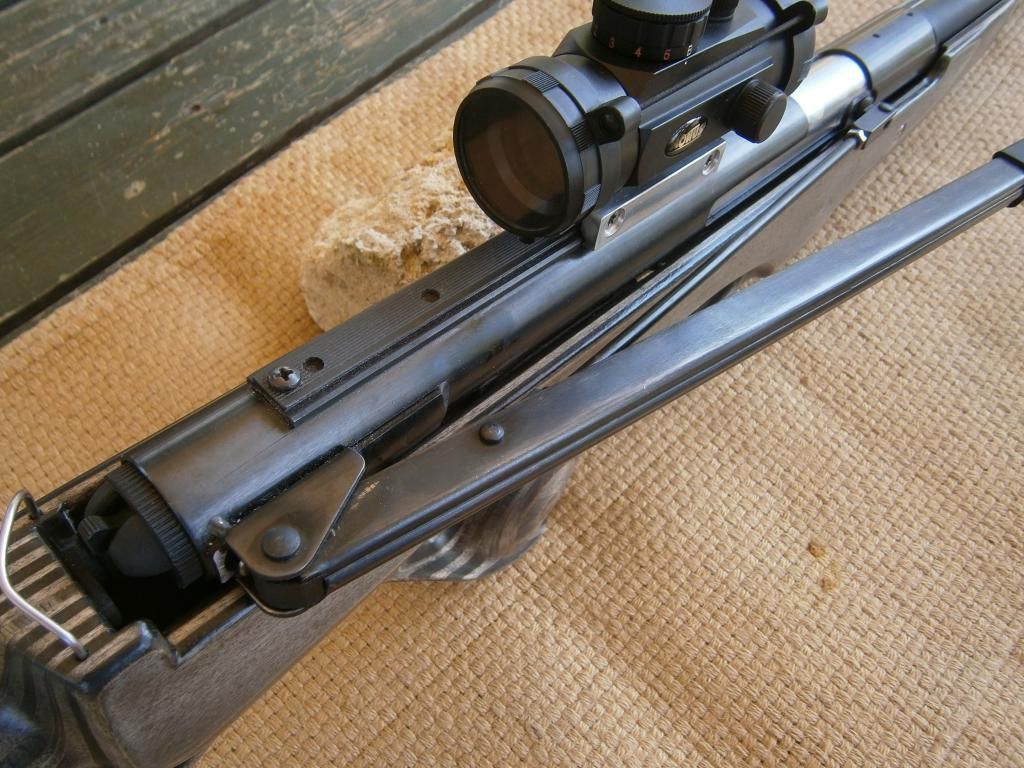
With the help of a carbide milling head on the dremel two oblique shoulders have been carved into the front part of the factory scope rail (~75 mm long) forming a somehow narrow weaver rail, it's only 18.8 mm wide, because the 30-1 doesn't come with a weaver rail from factory. I had a red dot sight available for this project, with a little mod of it's base, it has fitted perfectly on the rail:
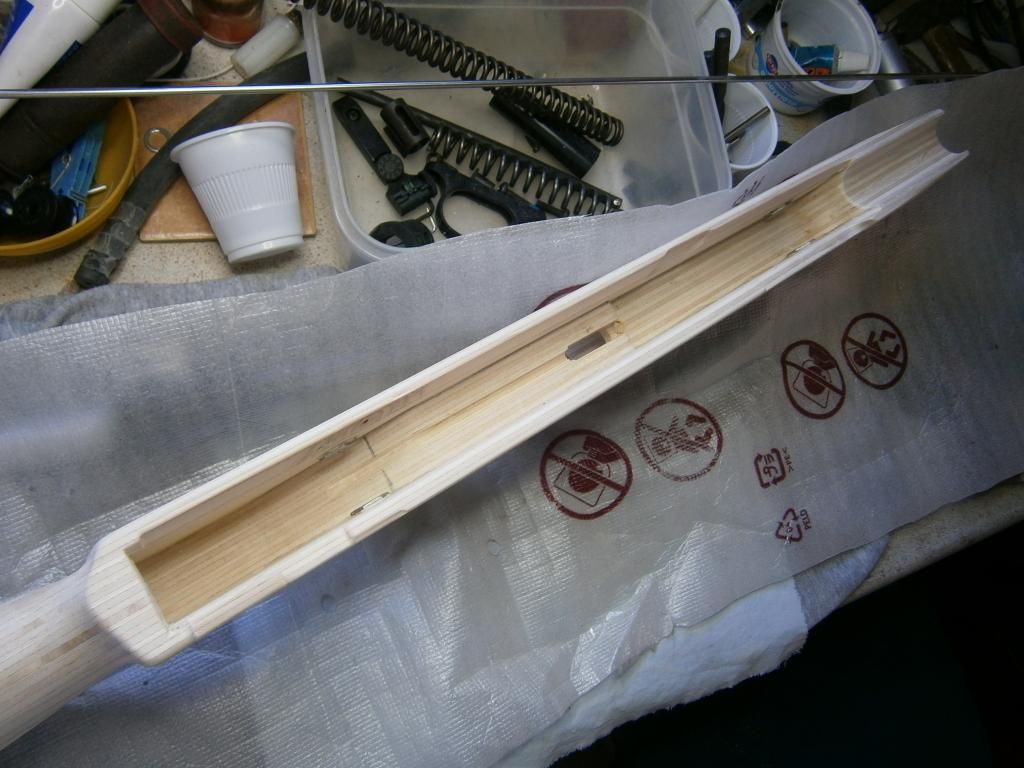
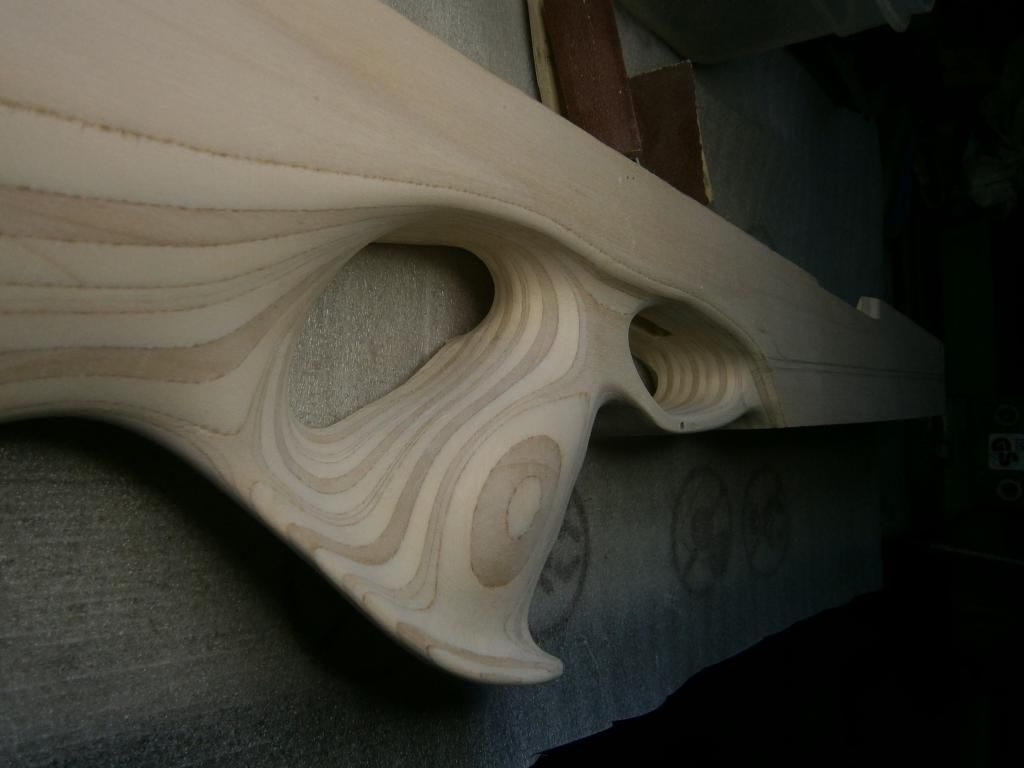
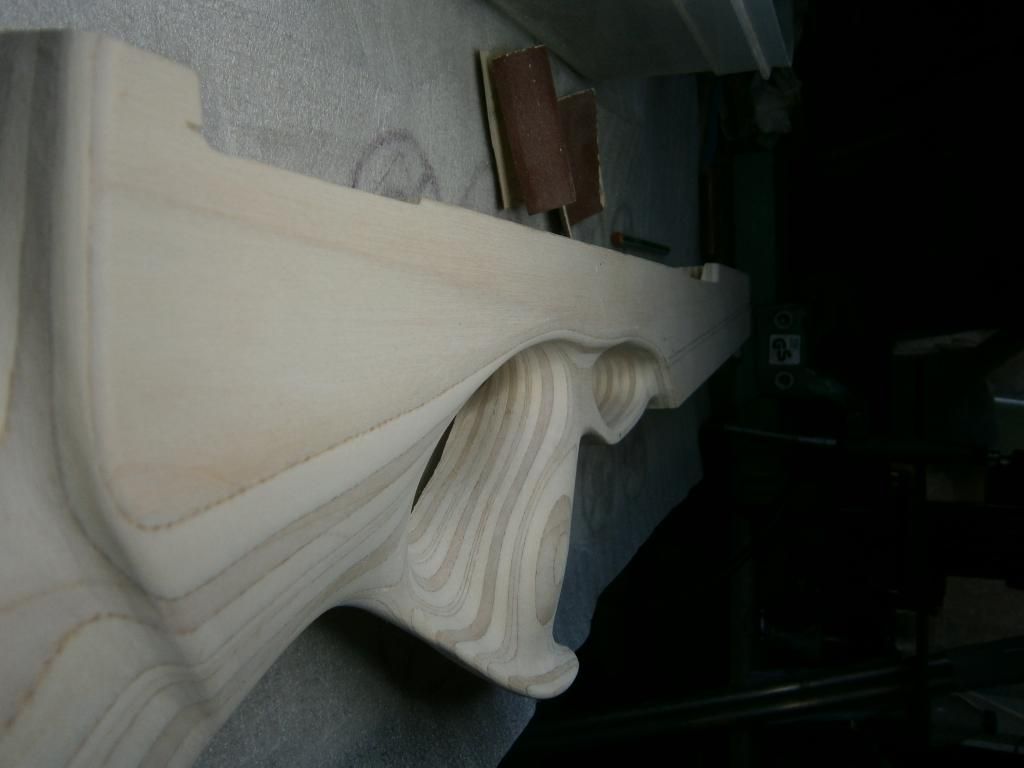
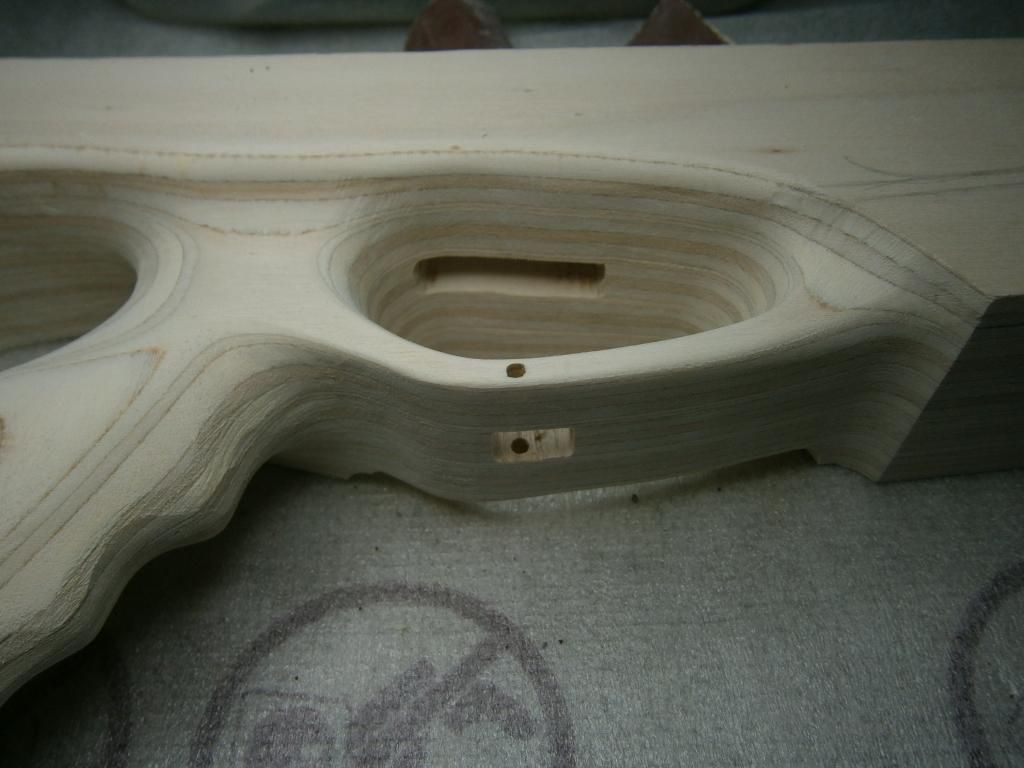
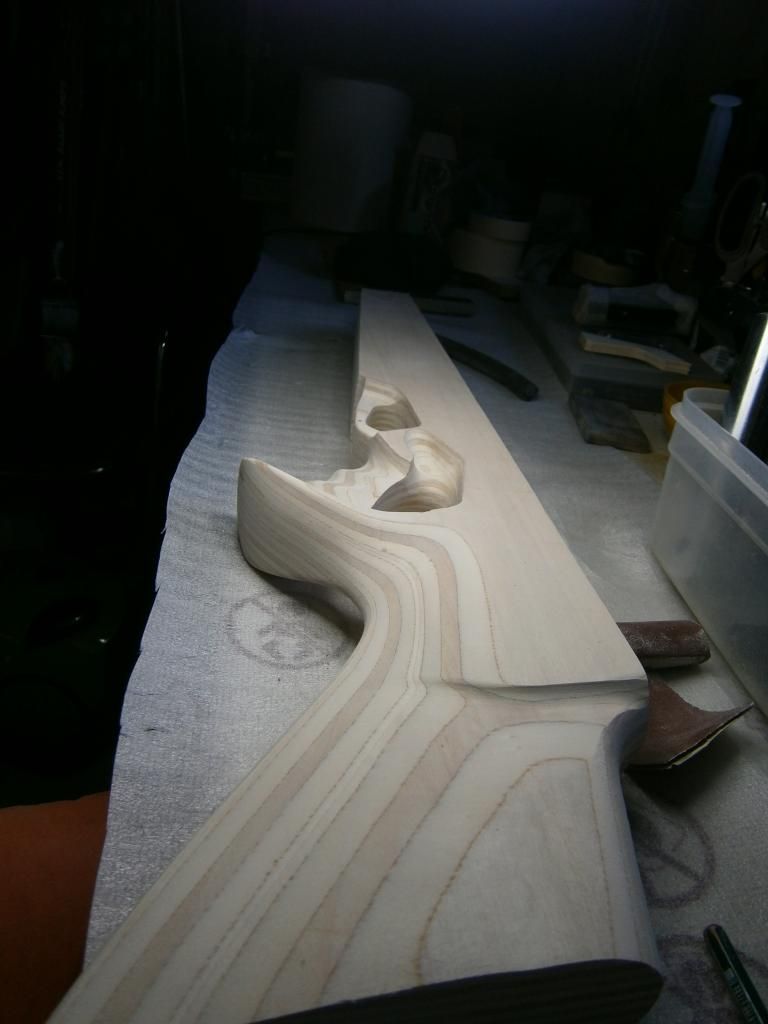
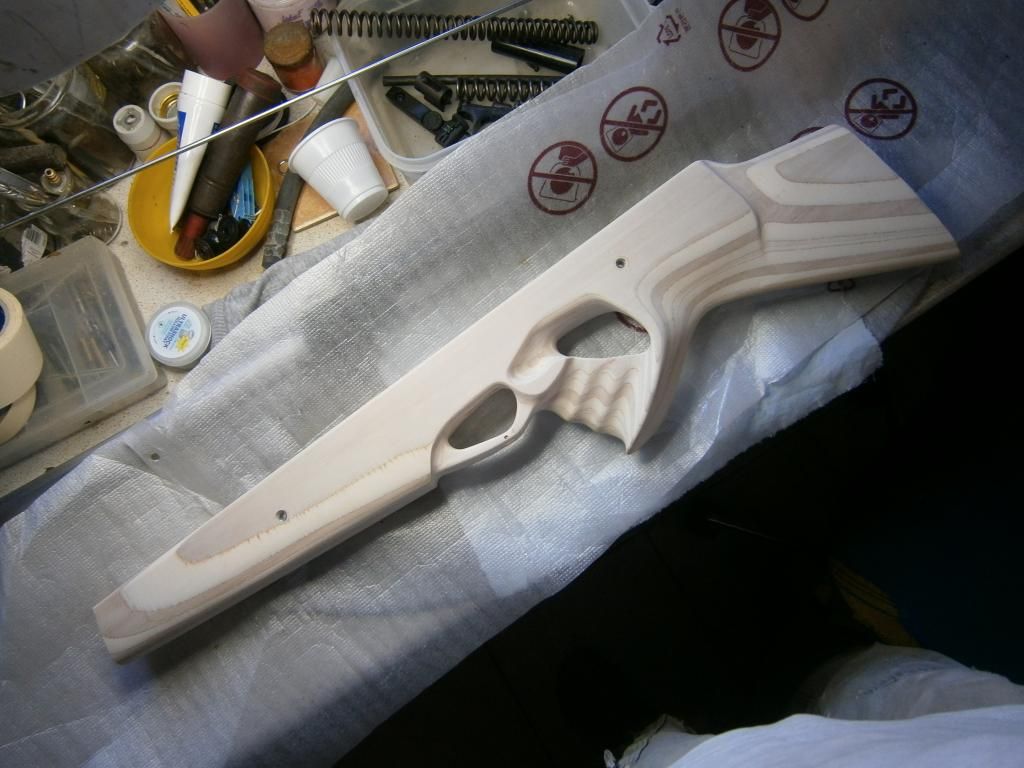
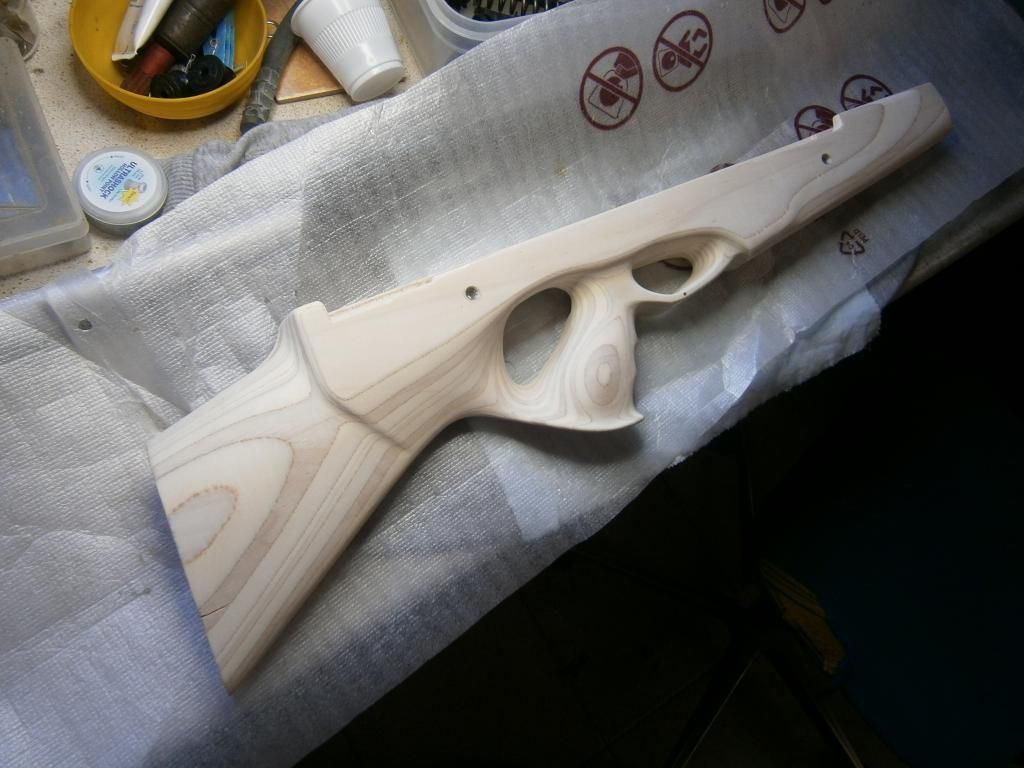
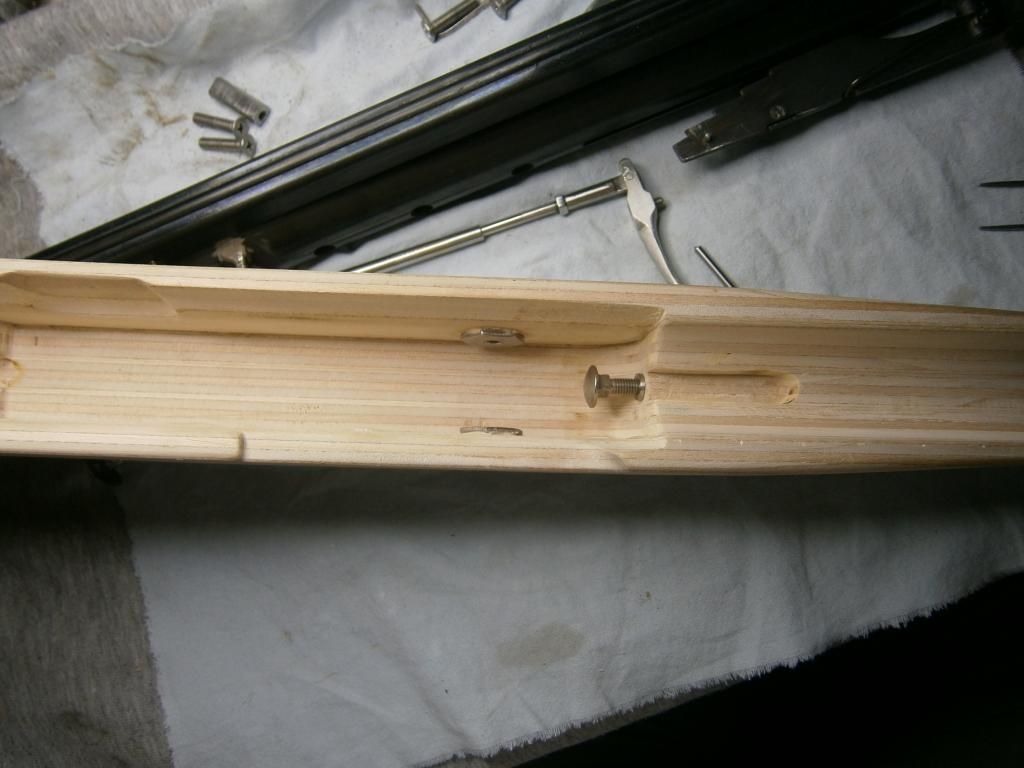
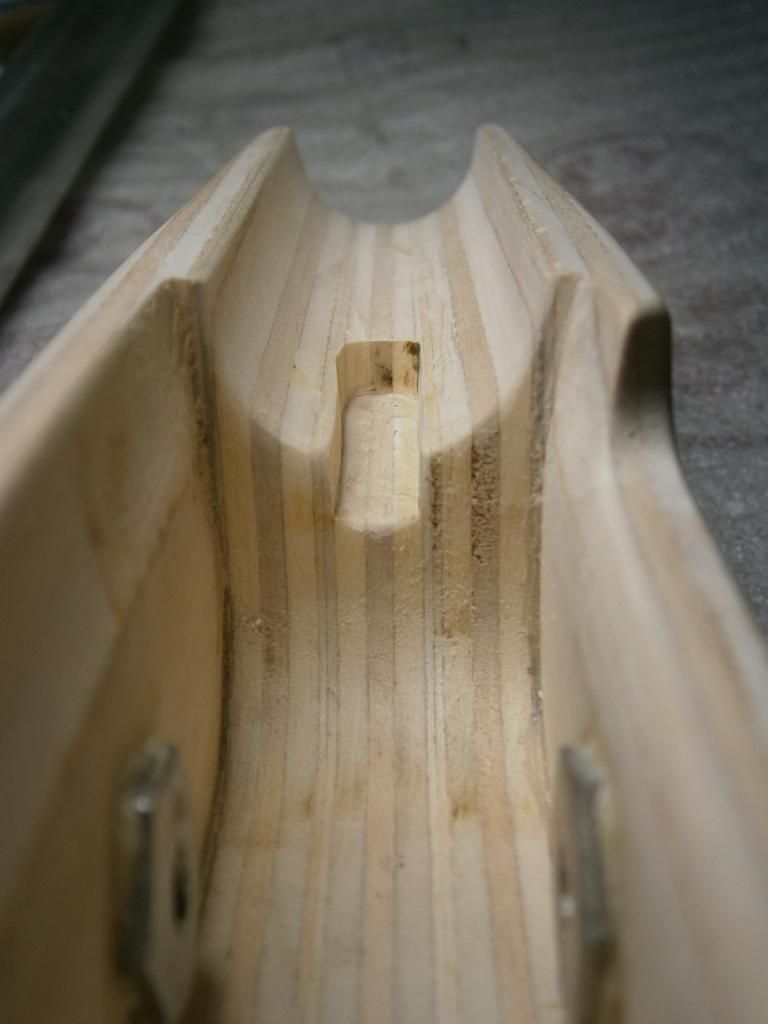
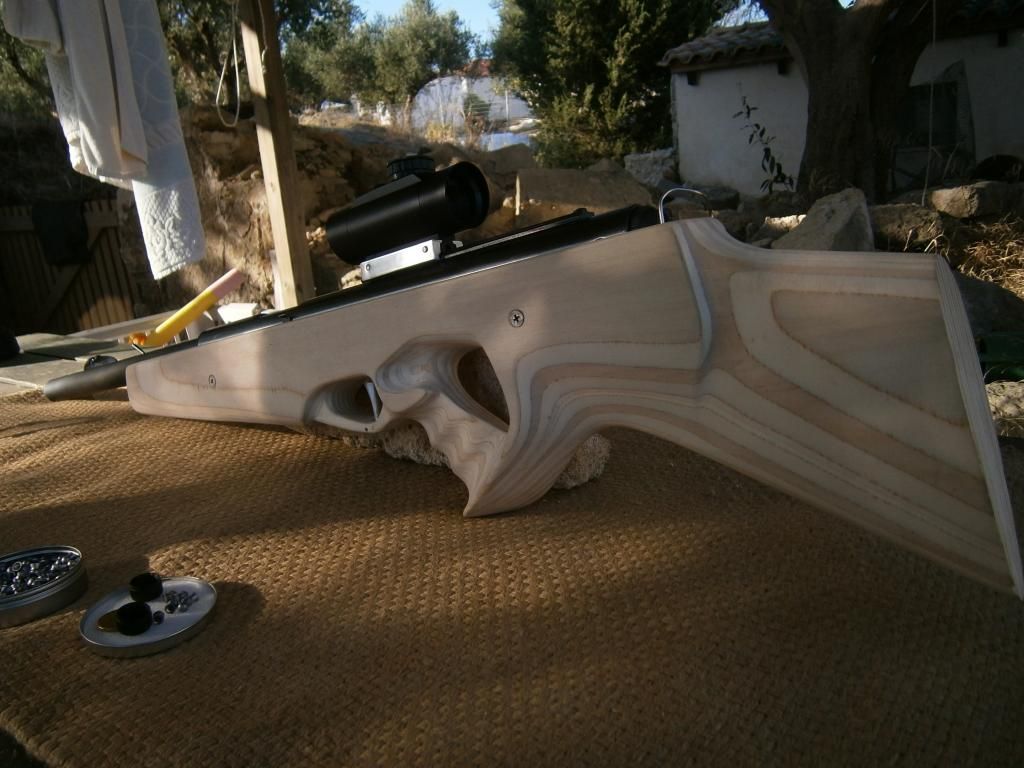
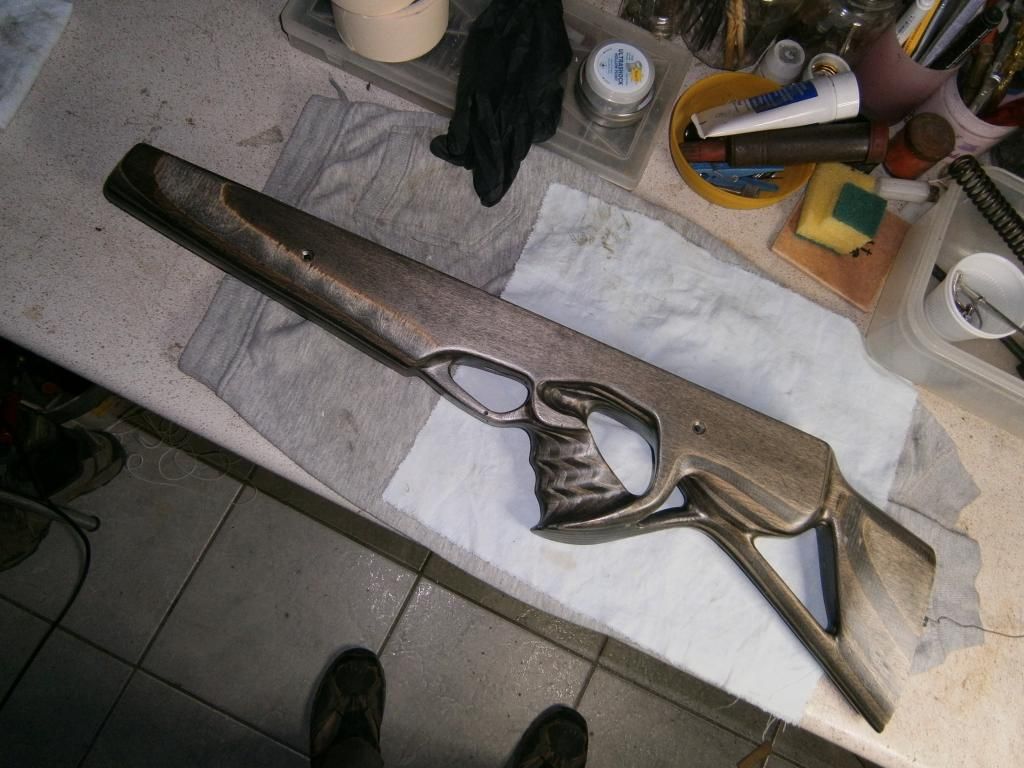
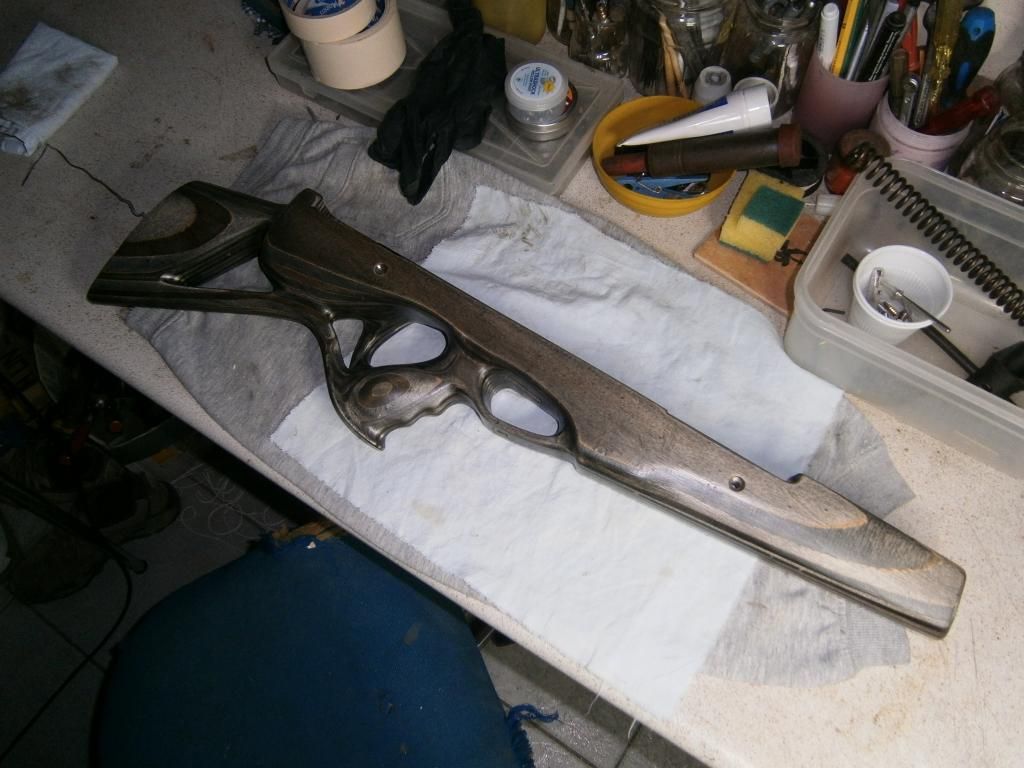
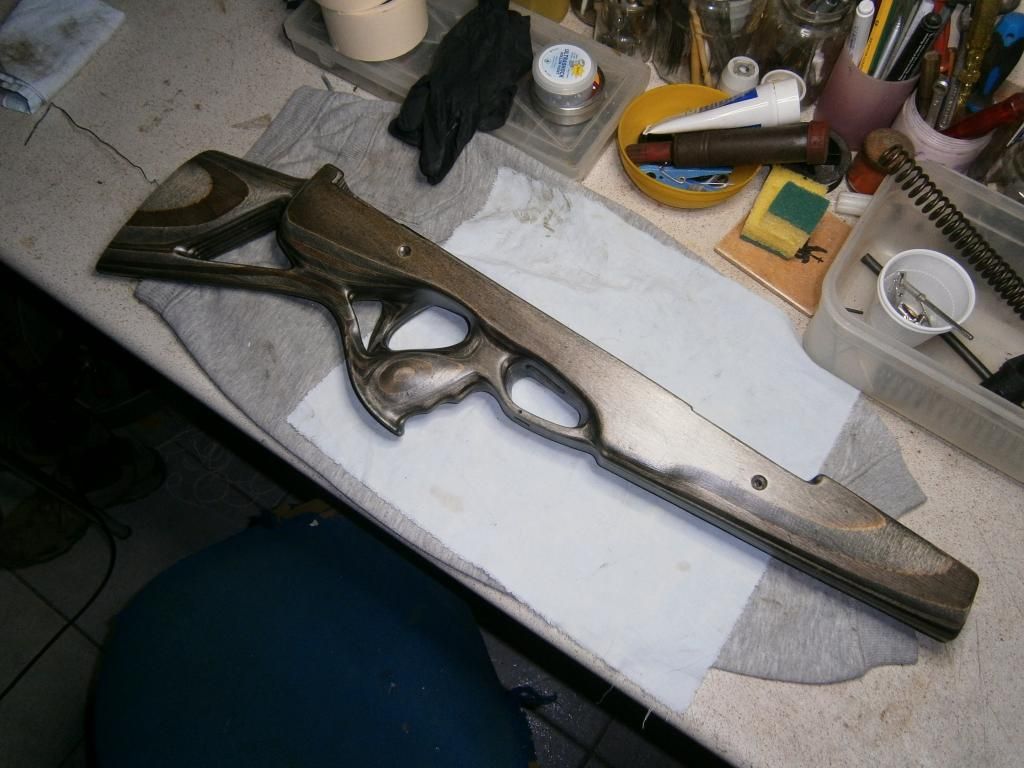
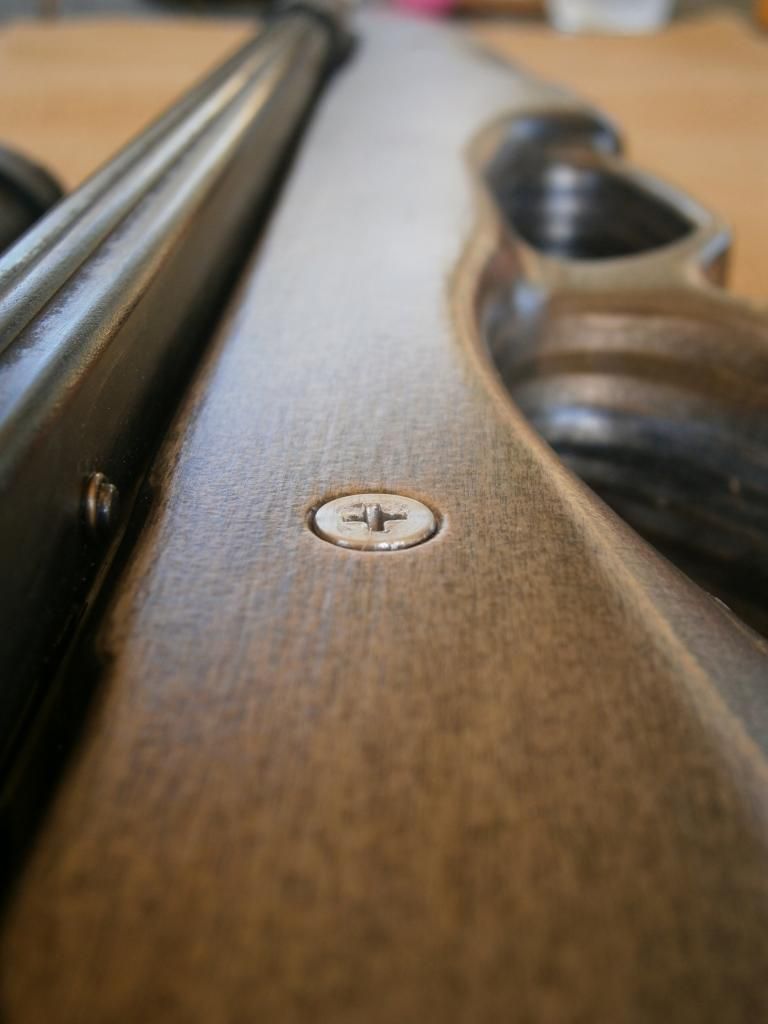
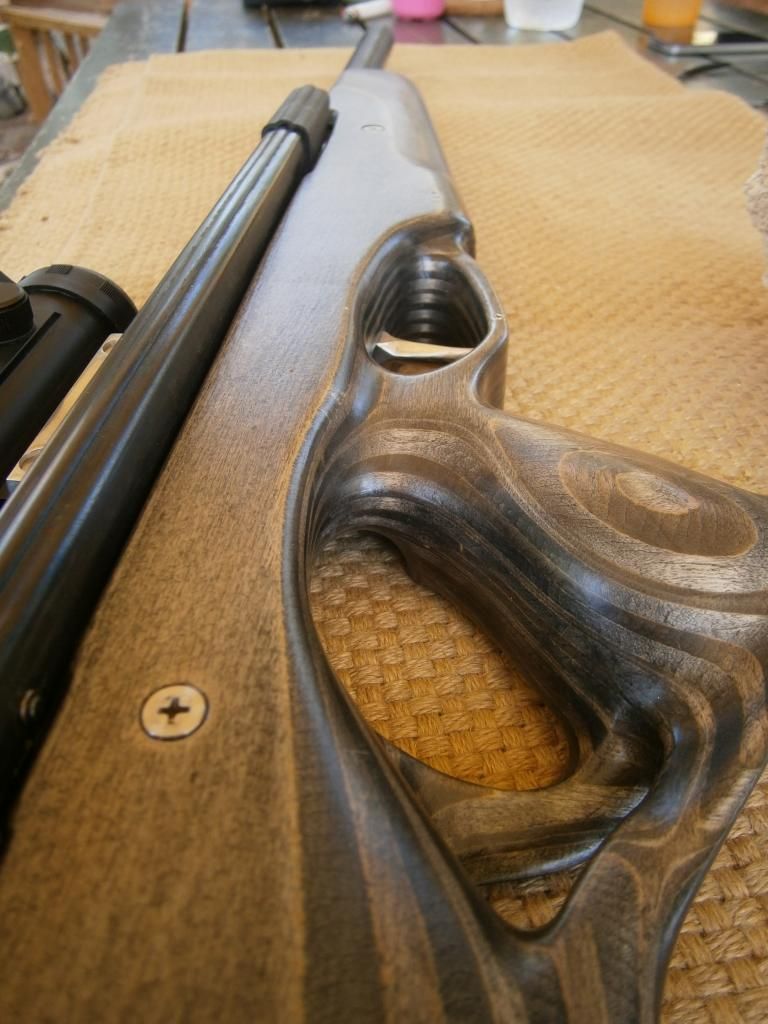
The stock, thumb-hole for strength and looks, made from 5cheap, white, soft 10mm laminate sheets. The three layers in the middle section were marked and cut carefully with a jigsaw, forming the recess for the gun block and the two slides, the external ones just hide the "guts" of the mechanism. Cost for all this was 13 euros and was super-cool because all contours, as in every laminated, is just a pleasure for the eyes. Take a look of it, unpainted, in it's forming steps:


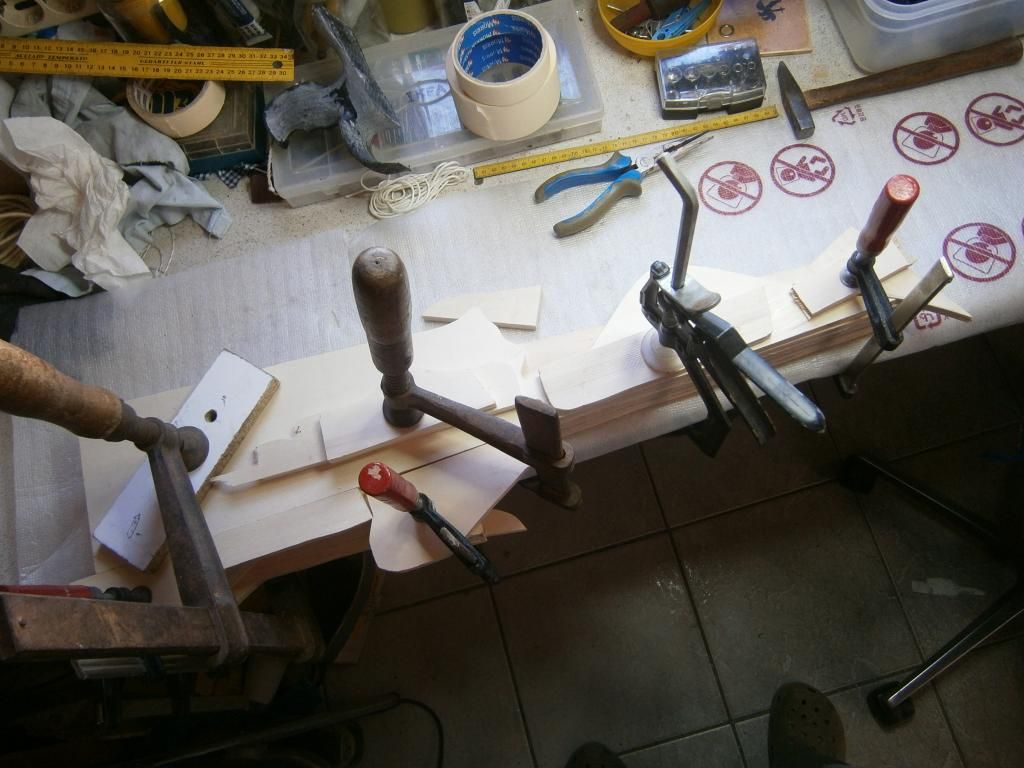
Crafting the stock with a coarse-grit daisy wheel on the angle-grinder, cylindrical sand-paper on the dremel , with a palm sander and by my precious hands:
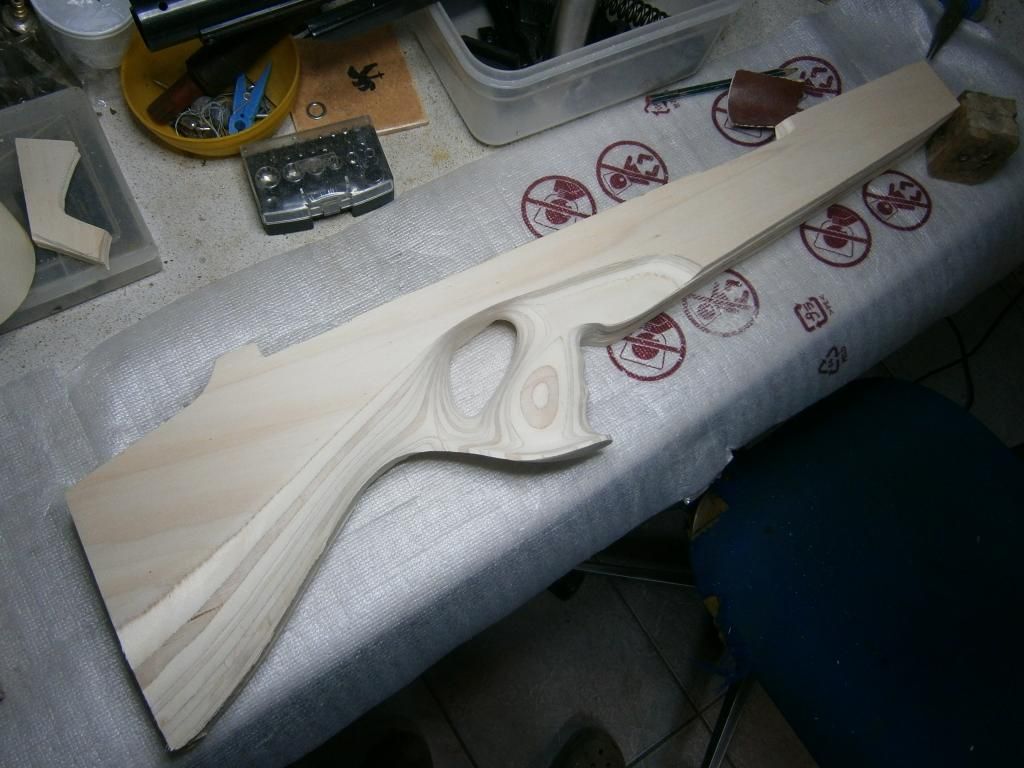
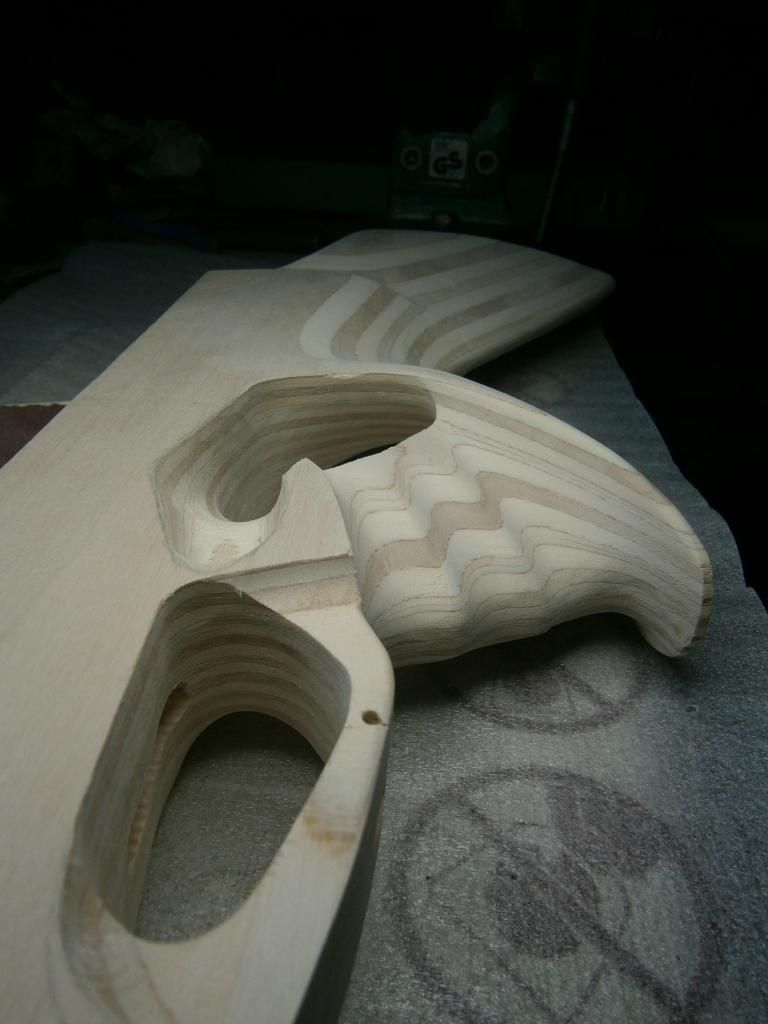

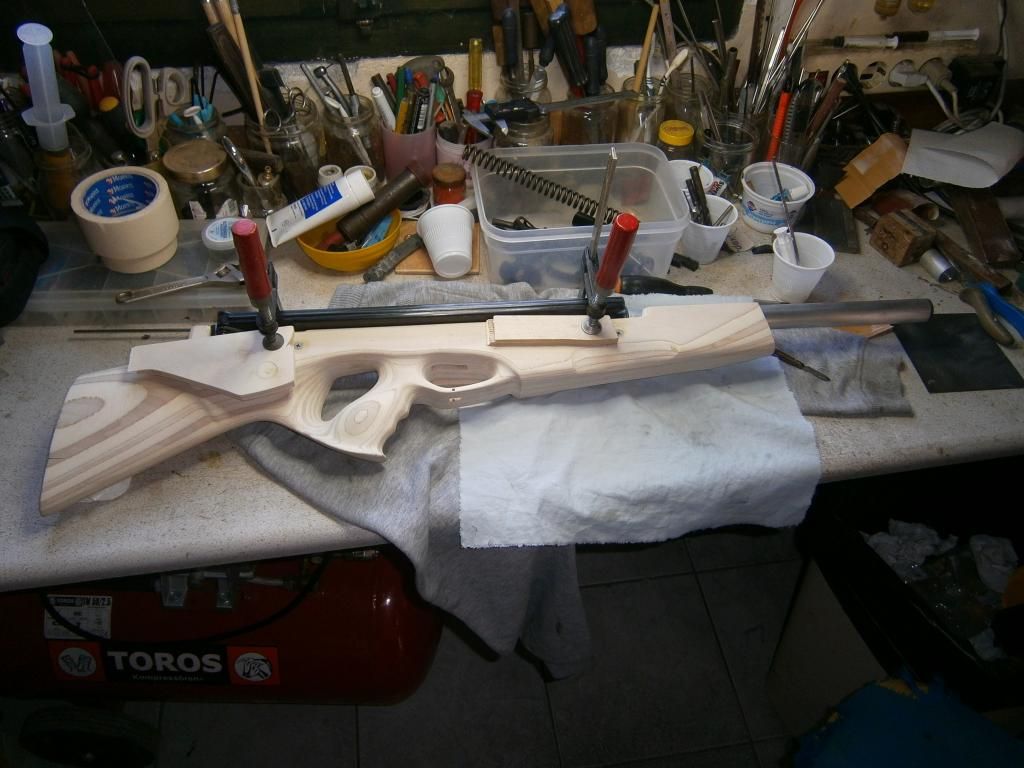
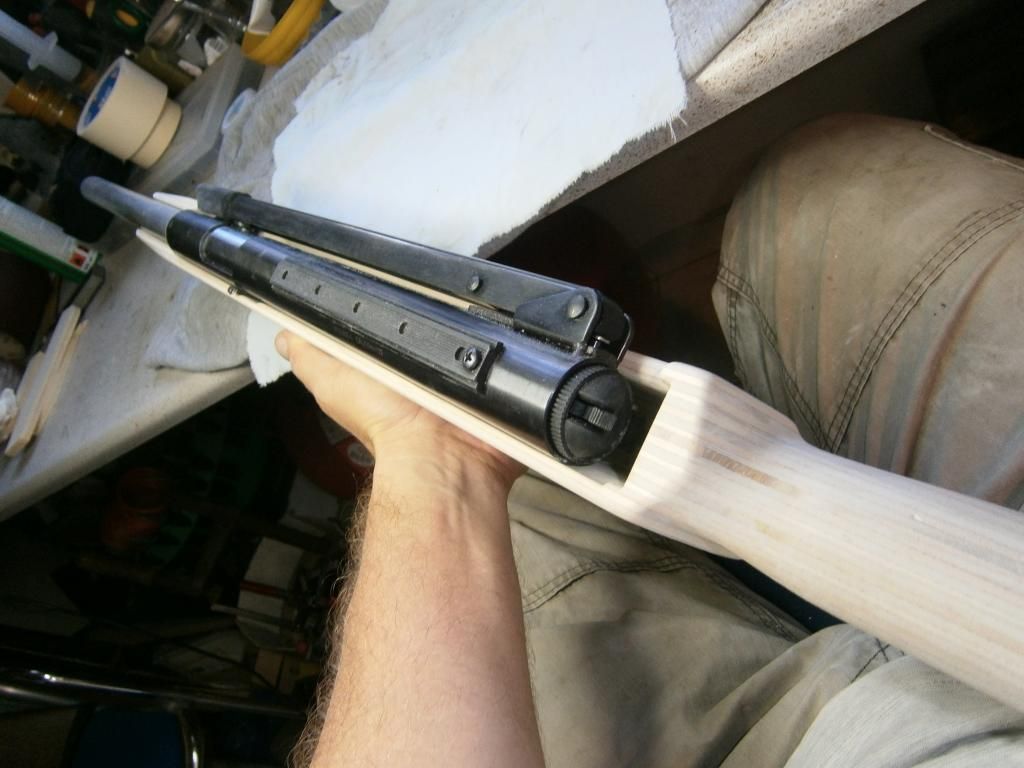
here it is with the gun block mounted in the "forward" position:
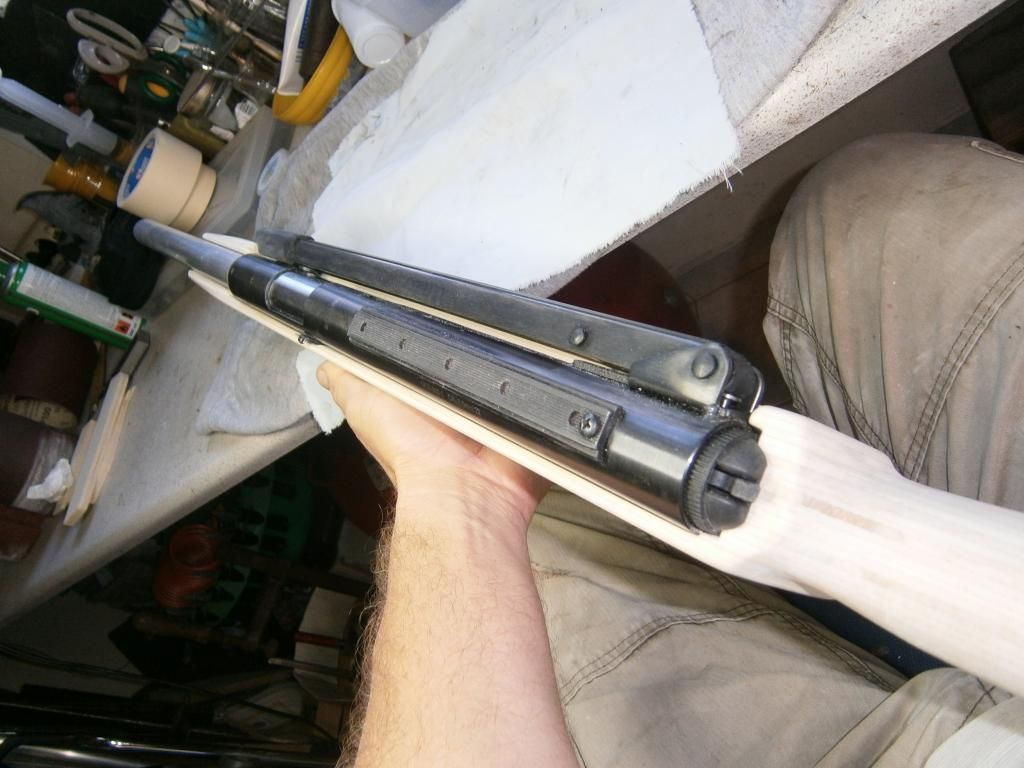
and here it is in "rear" position:

The recess for the block and the sliders in conjunction with the thumb-hole, bullpup shape, resulted in thin walls just a few millimeters someplace. The only way to control the amount of the remaining thickness is the torch and your hands:
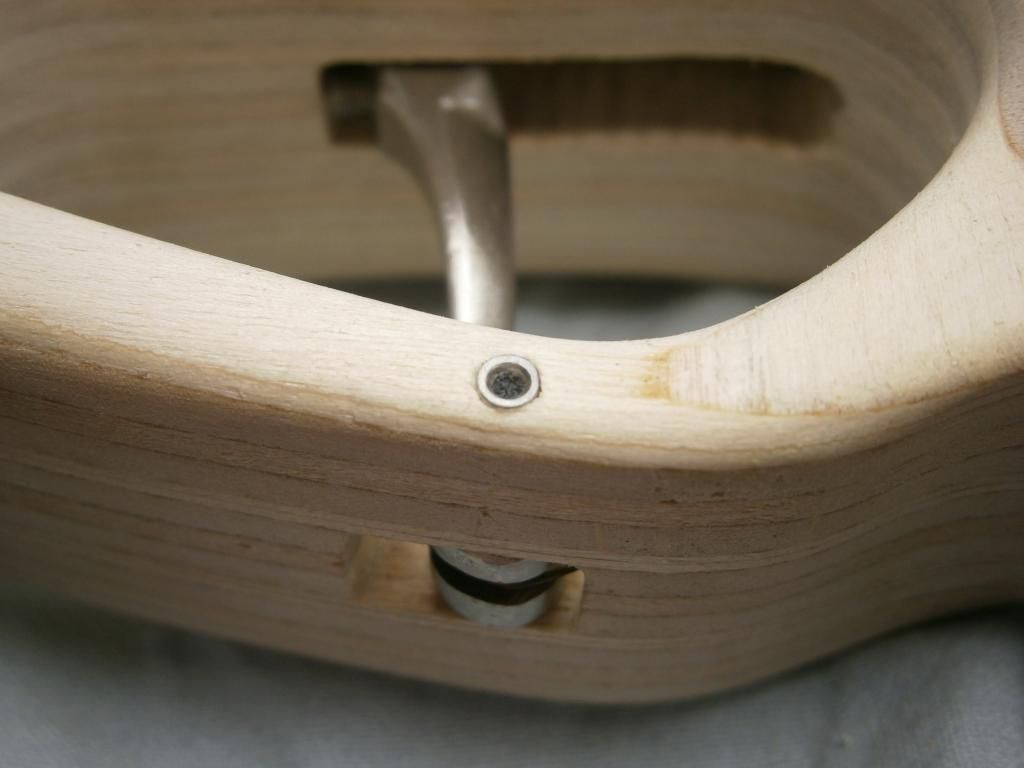
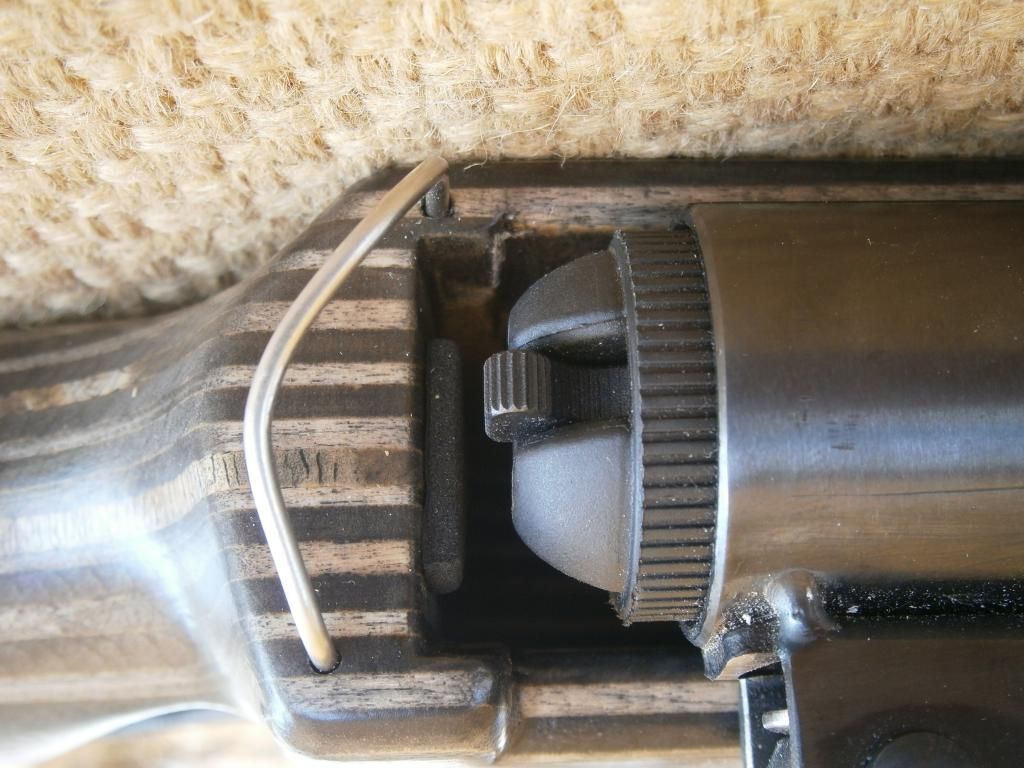
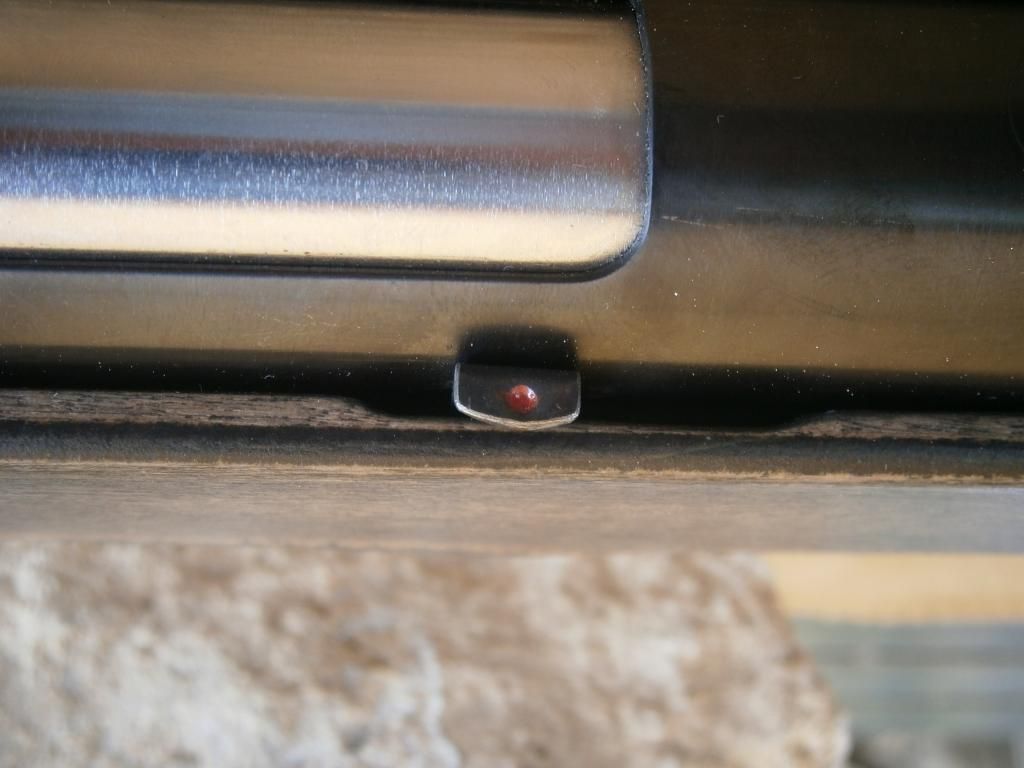
On the front side of block/sliders recess, inserted into a stainless threaded collar, there is a stainless M5 adjusting screw with a lock-nut functioning as a stopper for the forward move of the gun block, you can imagine the front slider stopping on a neoprene sponge "hat" on the screw's head, in this photo is not glued yet. On the back face of the stock's recess a bit of sponged neoprene was simply glued with super-glue working as a stopper for the backward movement of the recoiling gun block:

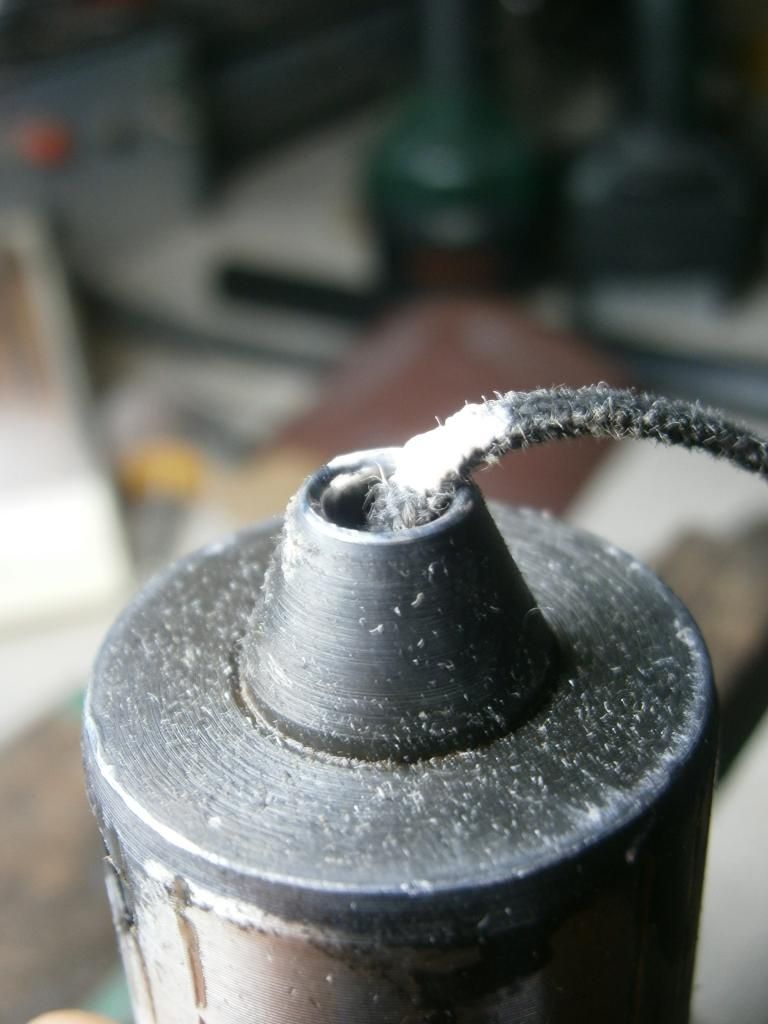
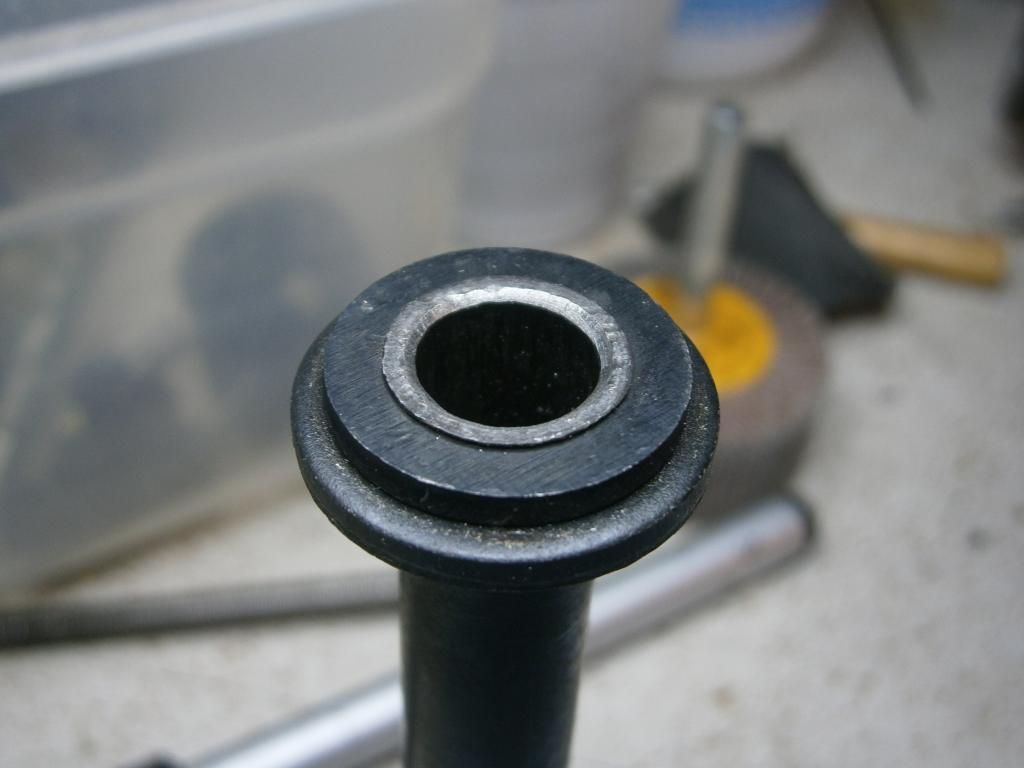
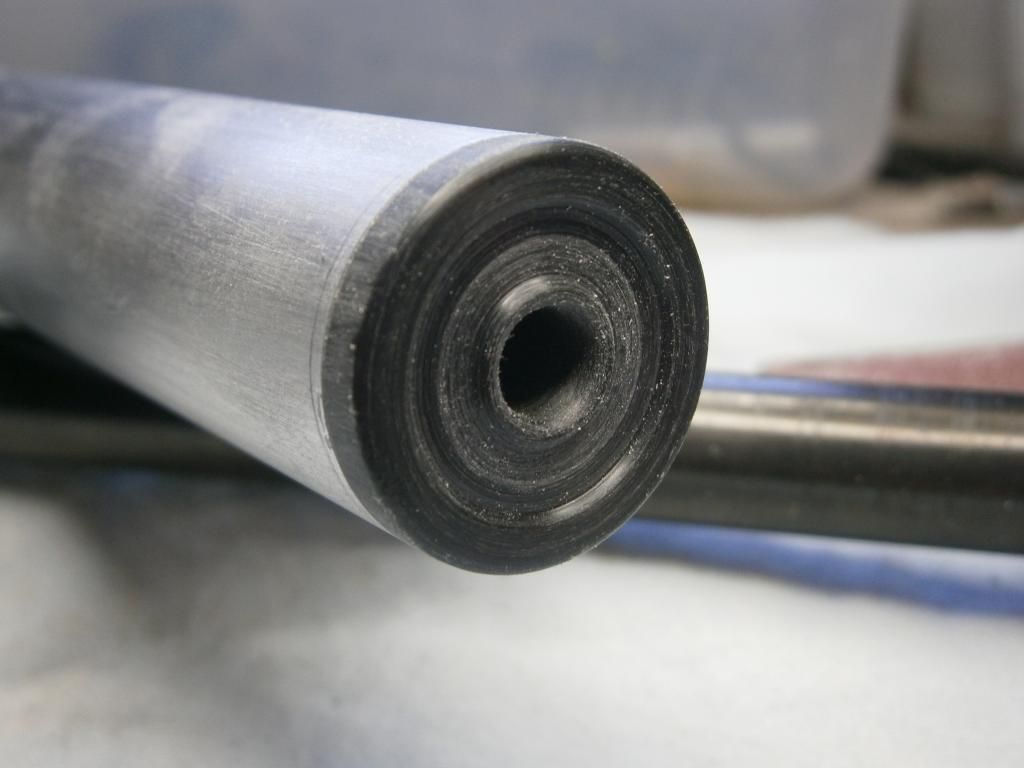
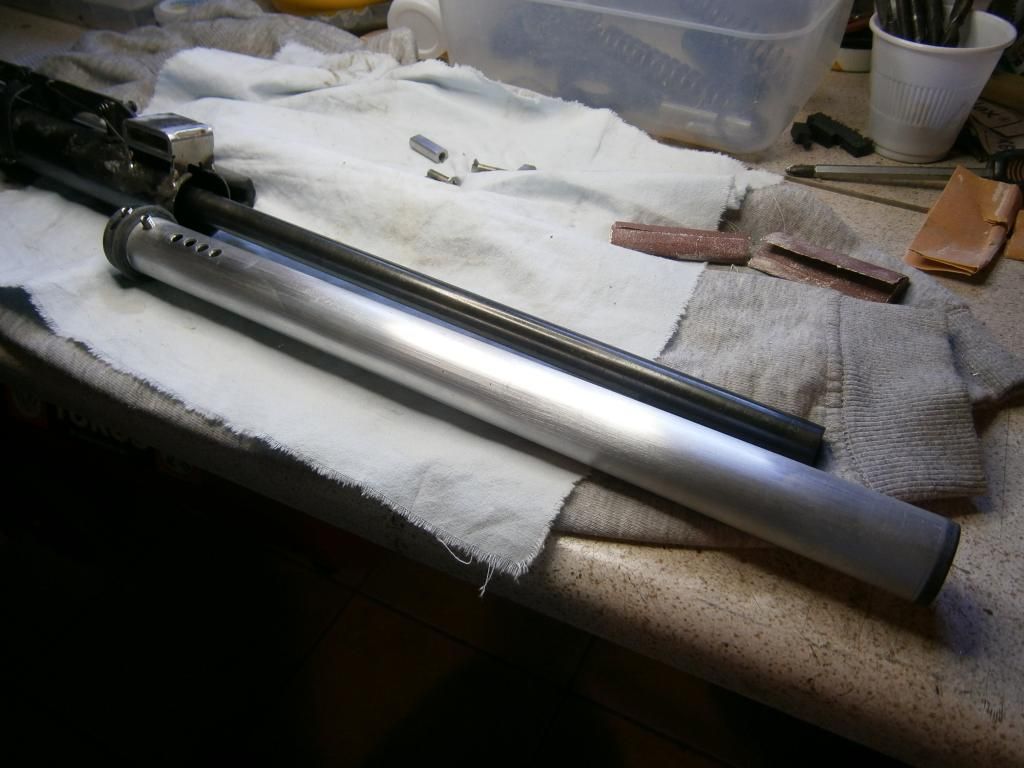
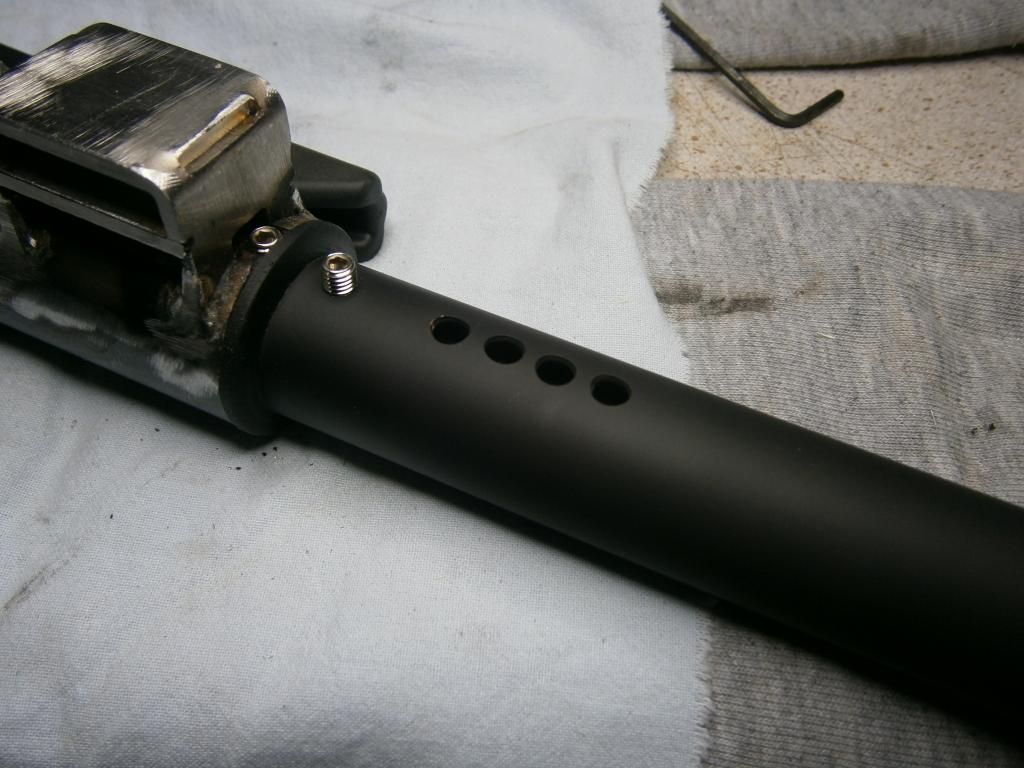
b]The one-piece shroud made from aluminum to fit the whole barrel, has ID 24mm and OD 26mm capped on both ends with black acetal caps. It supports the barrel by an internal hollow acetal, star-shaped diaphragm, glued with super-glue midway on the internal wall of the shroud which is breathing through four 5 mm hidden holes on the back. It is secured on the barrel with two M5 grub-screws. Notice the coarse surface of the acetal pieces for best adhesion. Painted matte black after it was primed with a layer of aluminum primer. Aluminum tube wasn't anodized and is quite cheap, it costs 4.8 euros for the 2.6m (ARENAL shop in Piraeus) This shroud didn't obviously cancelled the cracking sound of the shot but it deefinitely quieted down the airgun to a level almost un-noticeable from your neighbors when used in your back yard.
Front cone formed in that way so to enhance the possibility for the expanding air to return into the shroud:
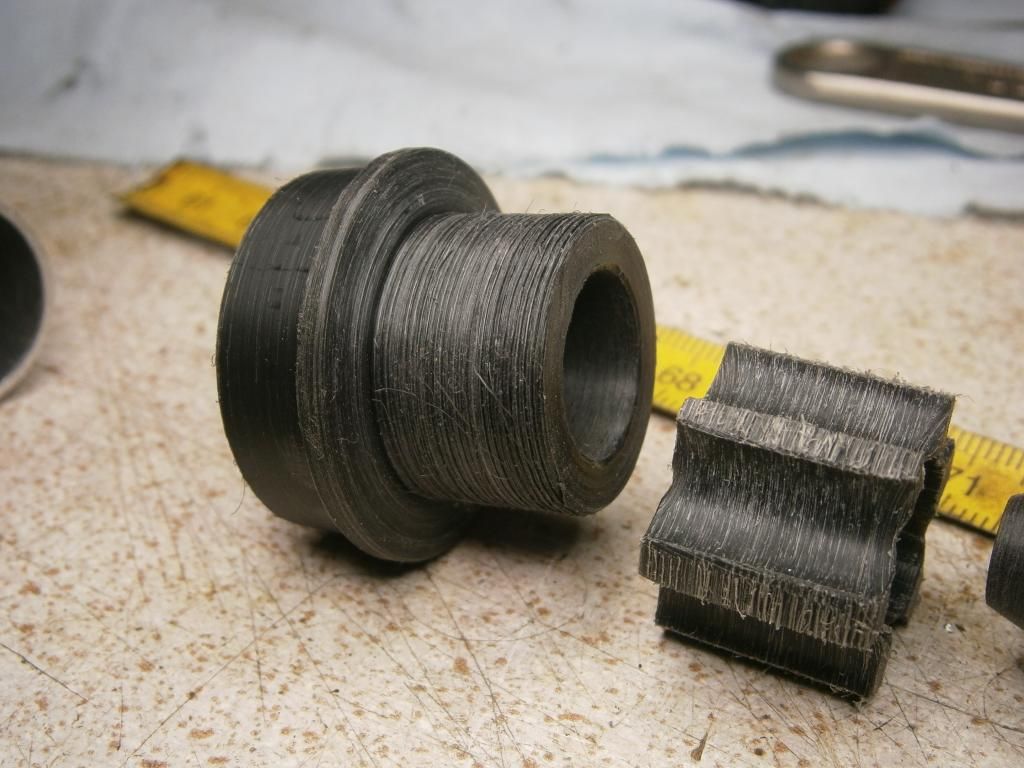
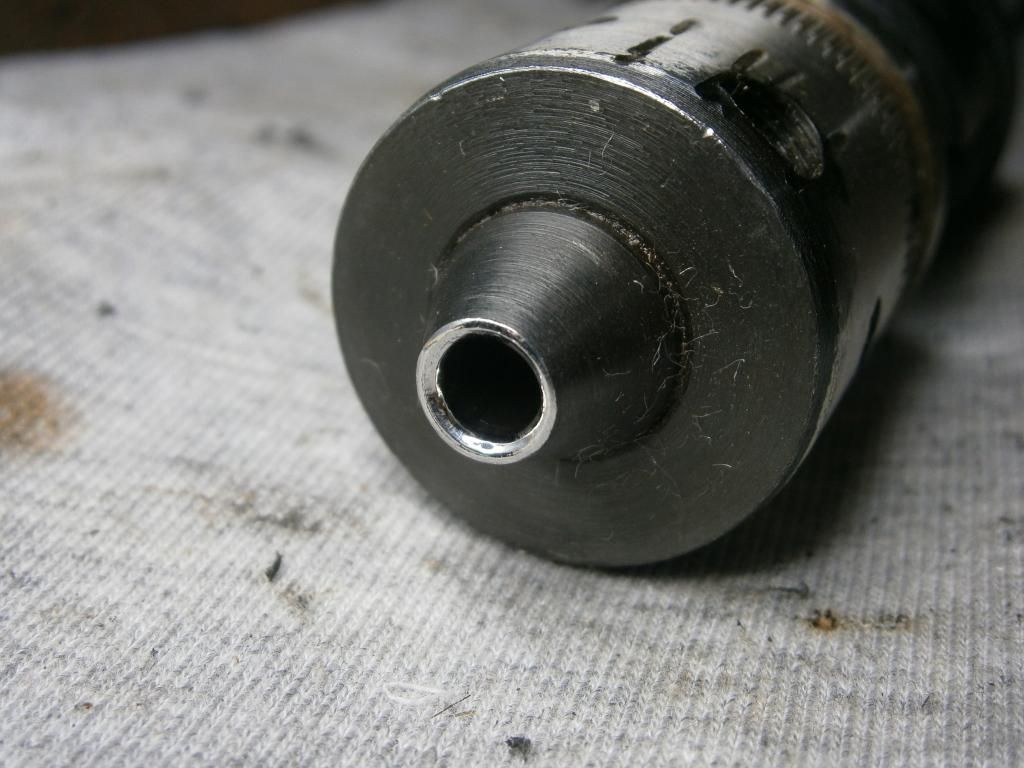
the shroud's exhaust machined to 6.50 mm:
the four breathing 5 mm holes of the shroud:
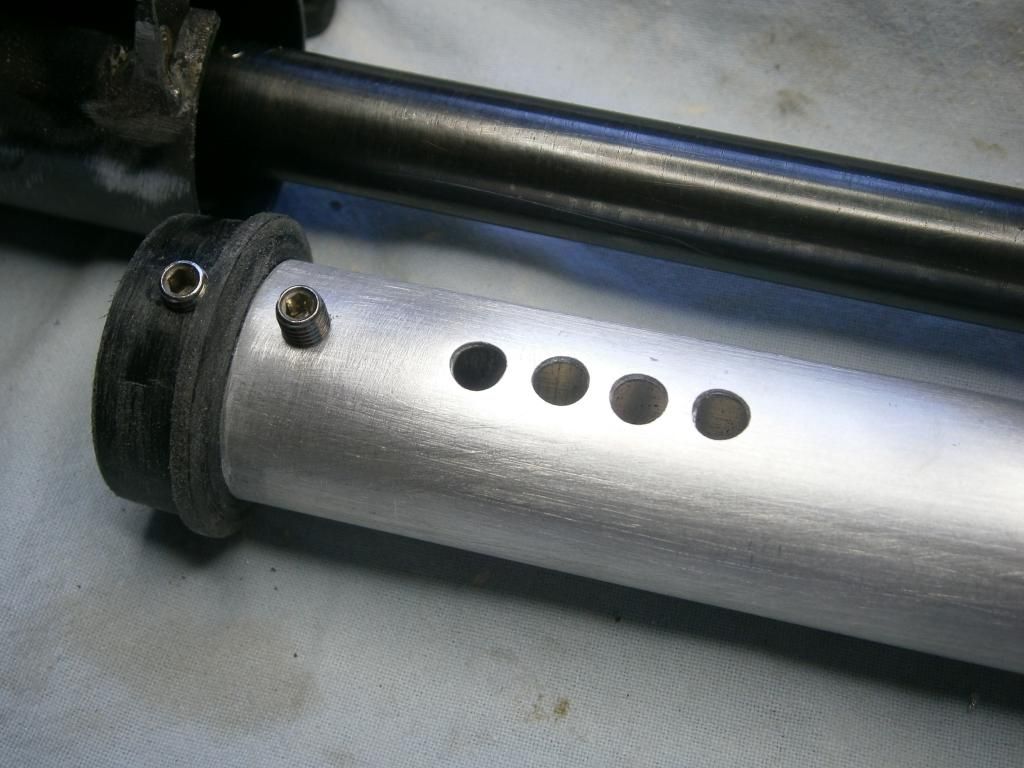
and the recess carved permitting breathing through the holes:
The shroud has been lightly polished, primed with aluminum primer and finally painted matte black with 2 layers of bumper spray:
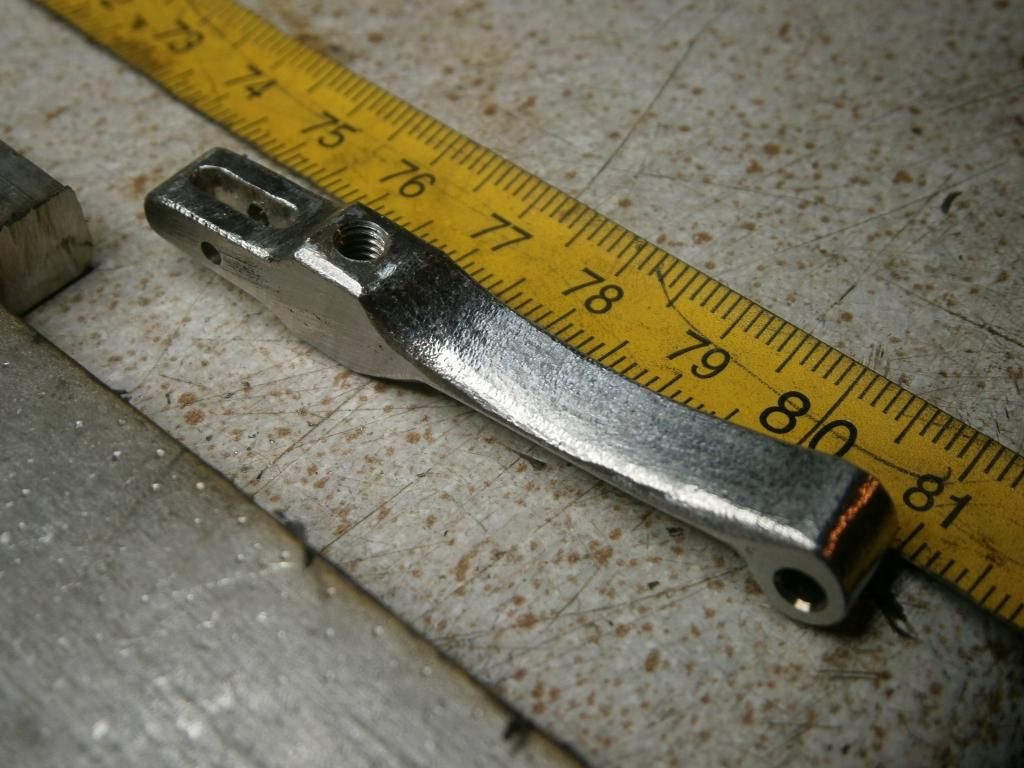
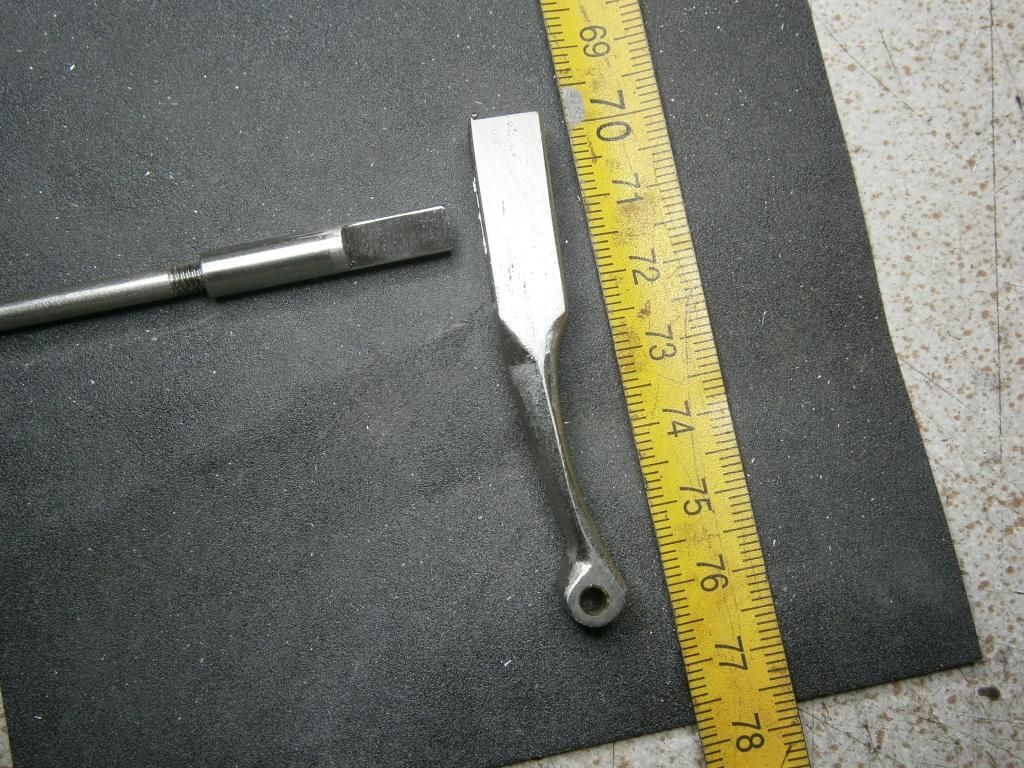
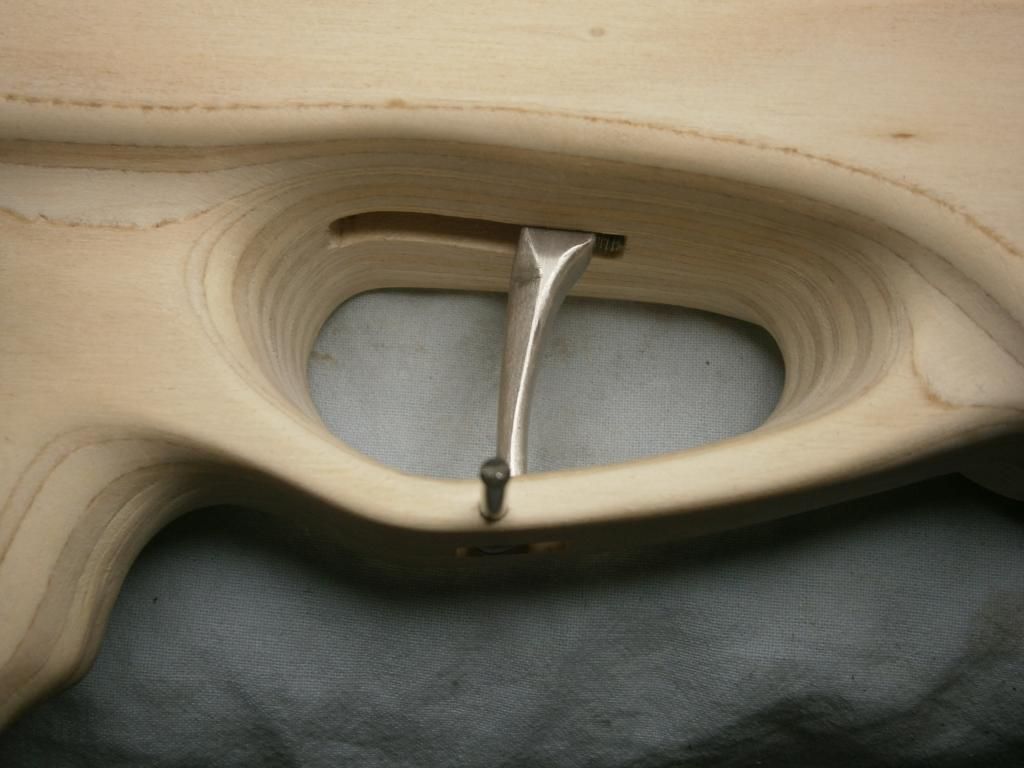
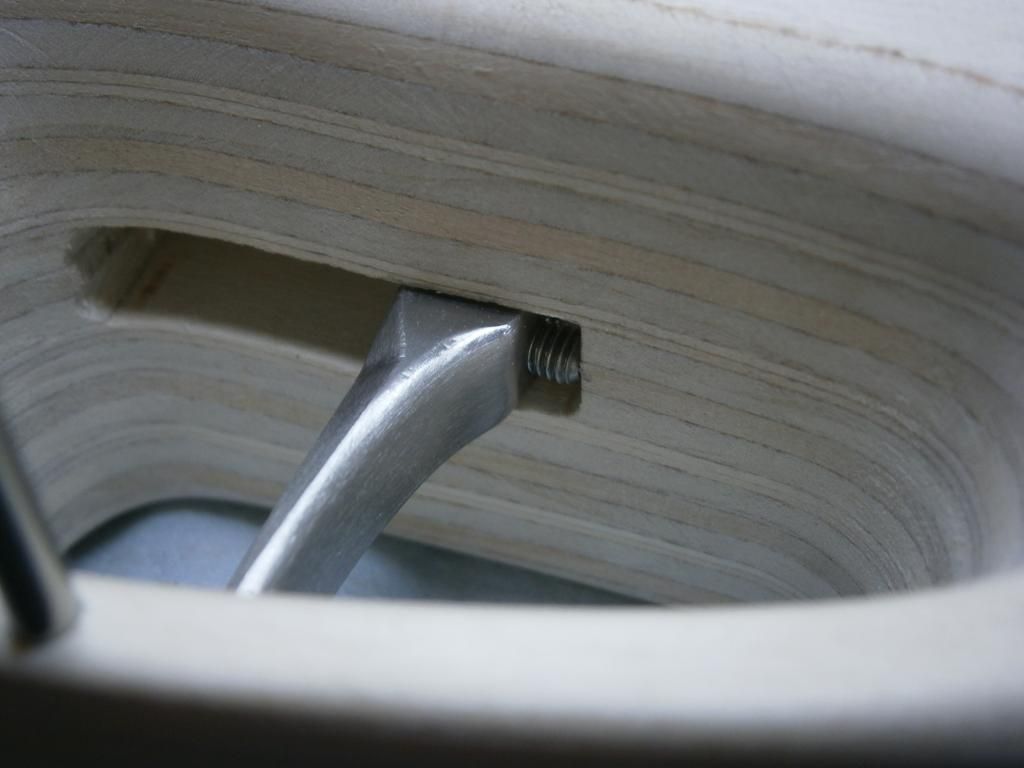
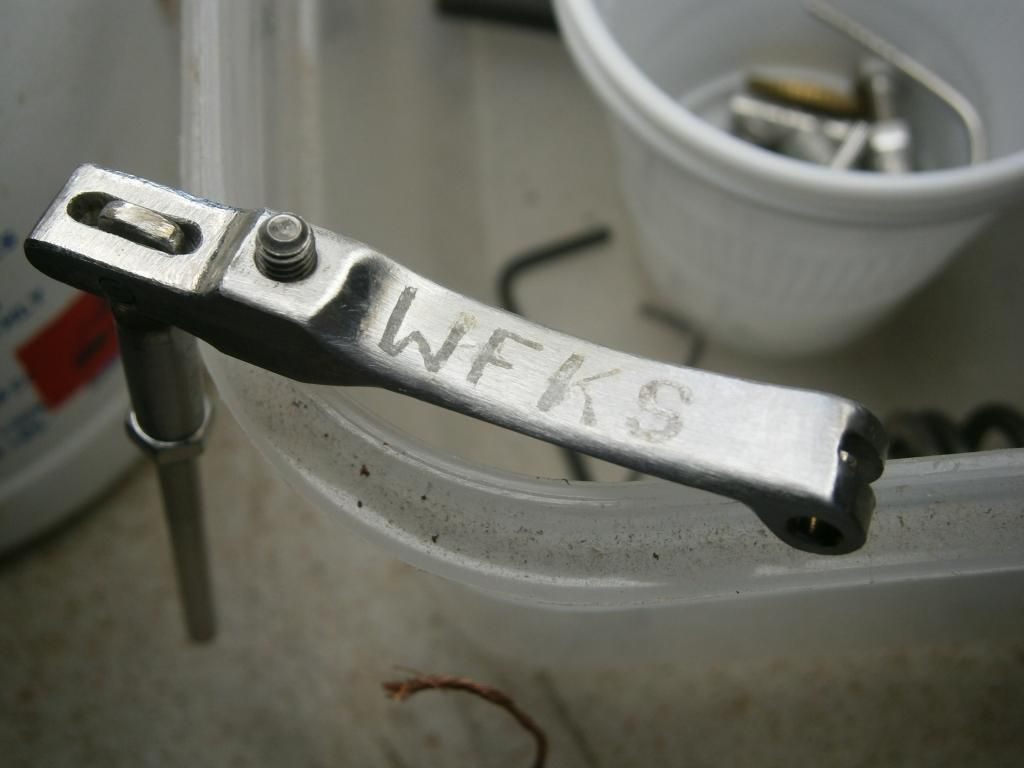
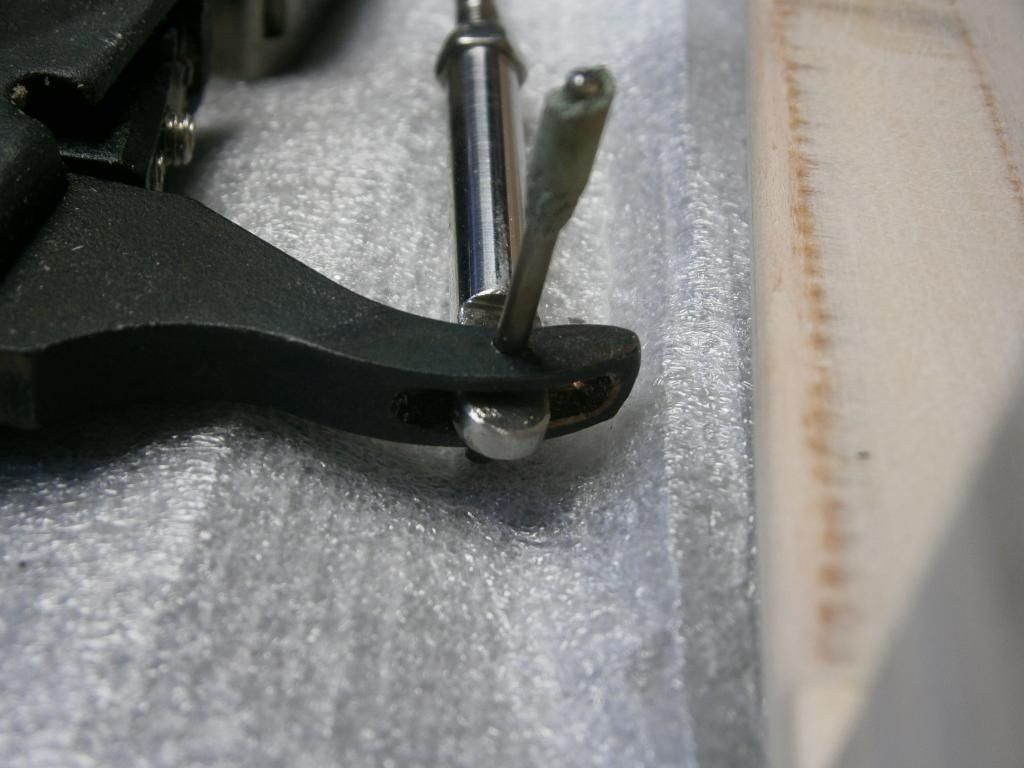
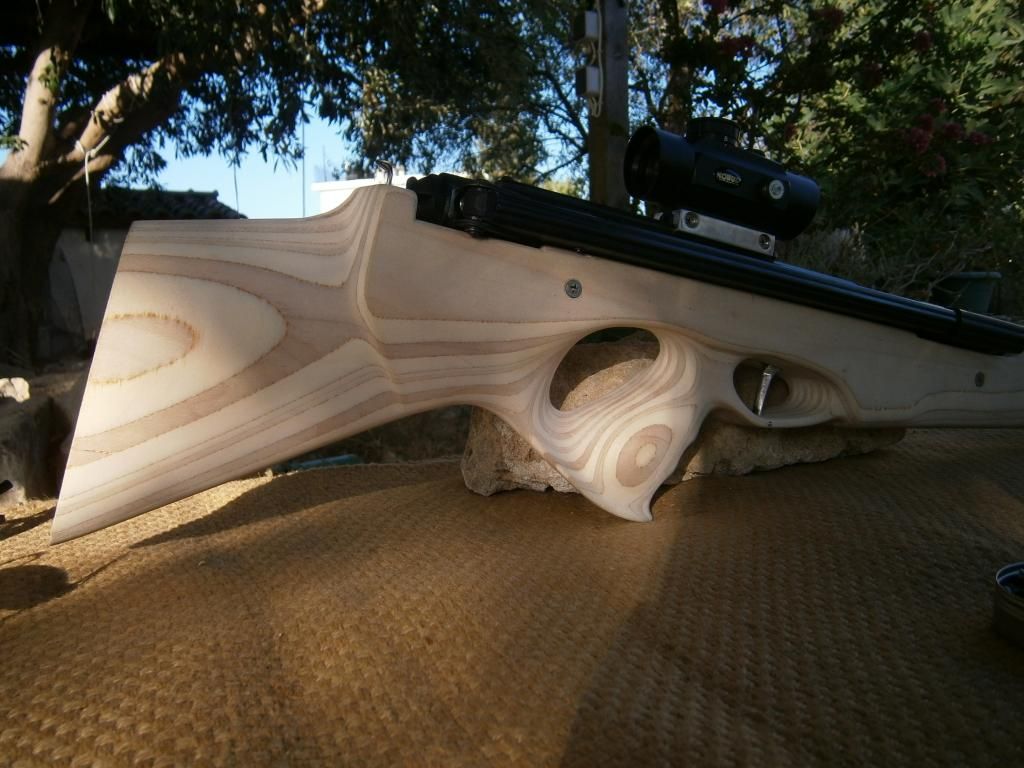
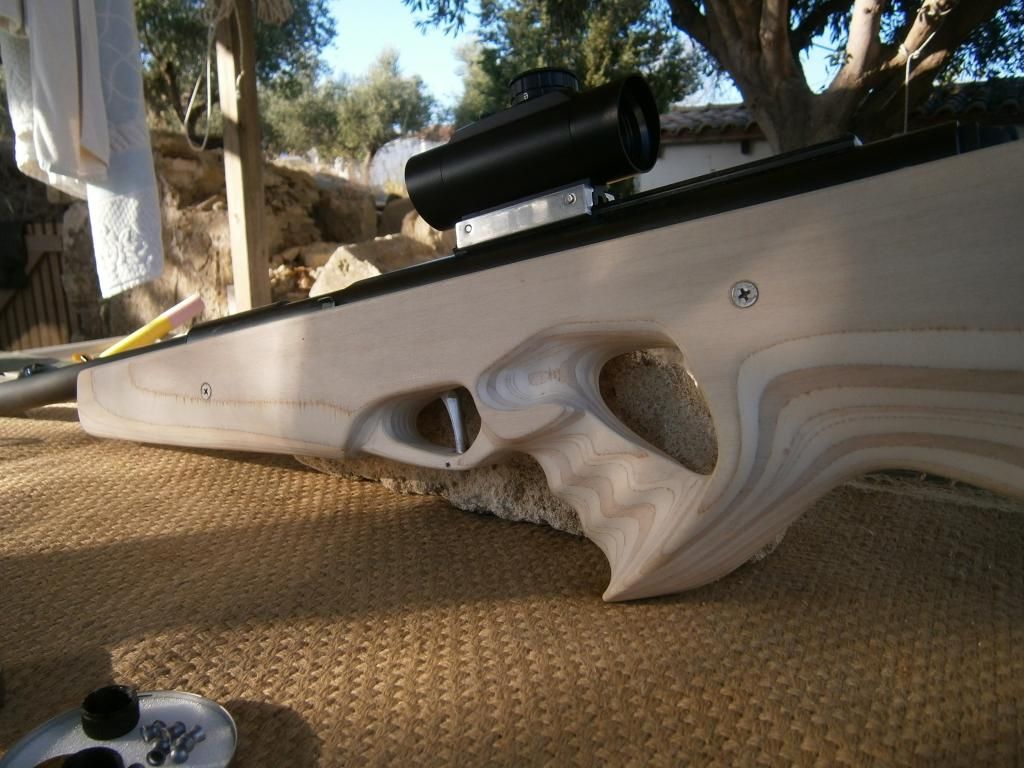
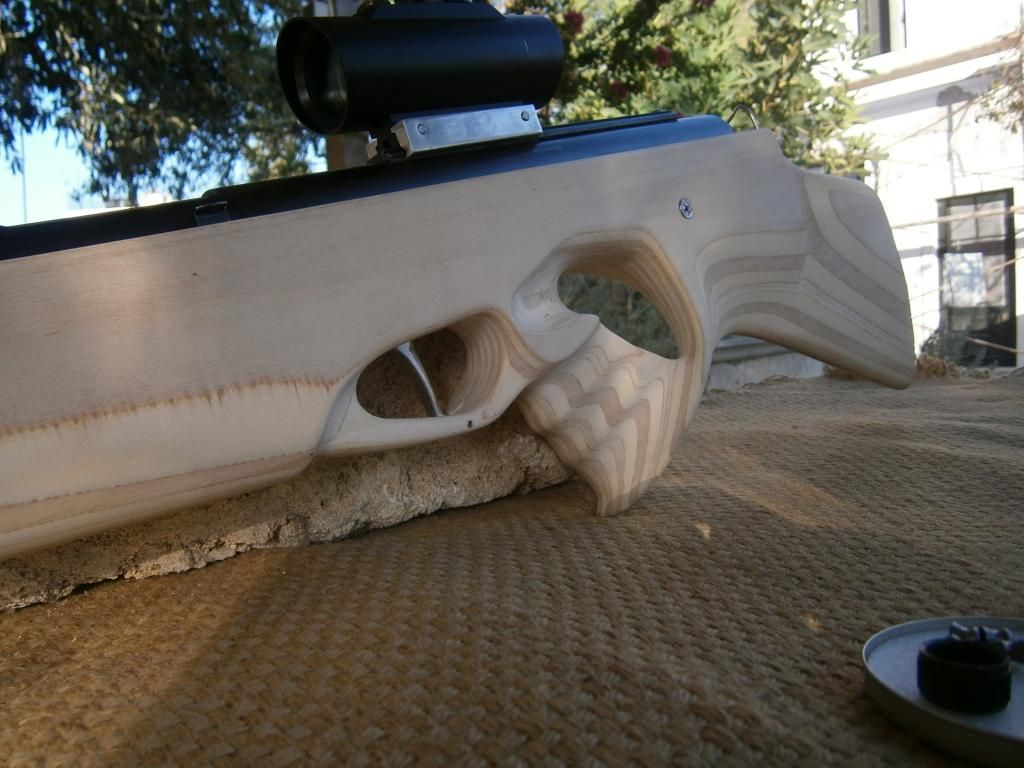
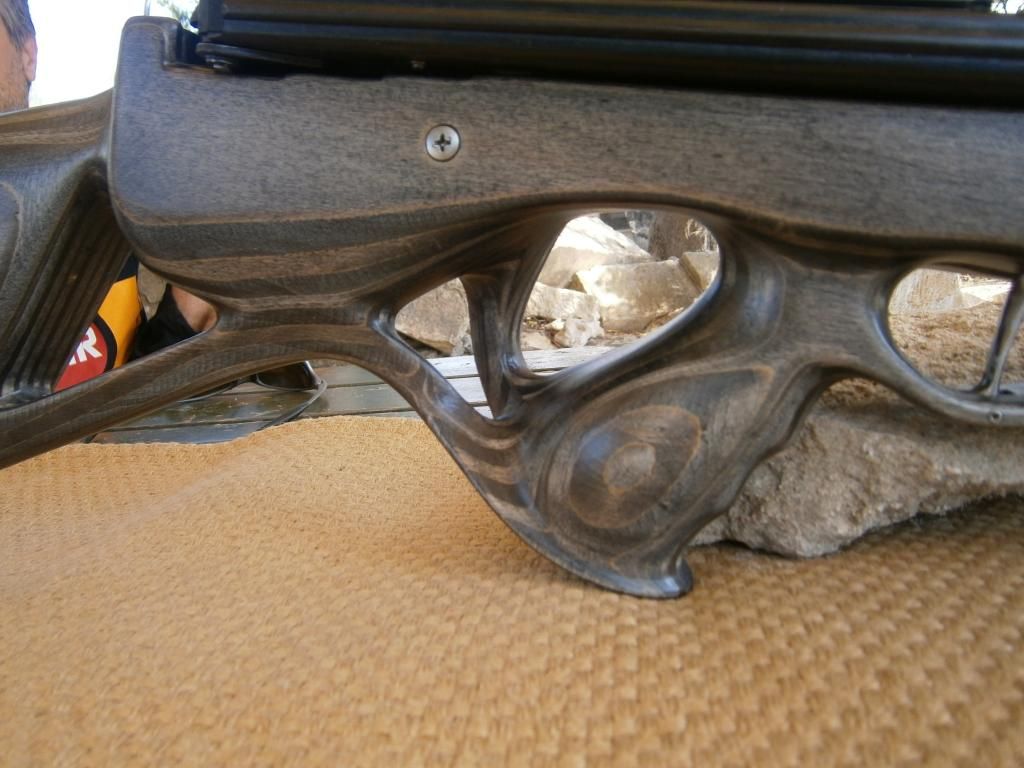
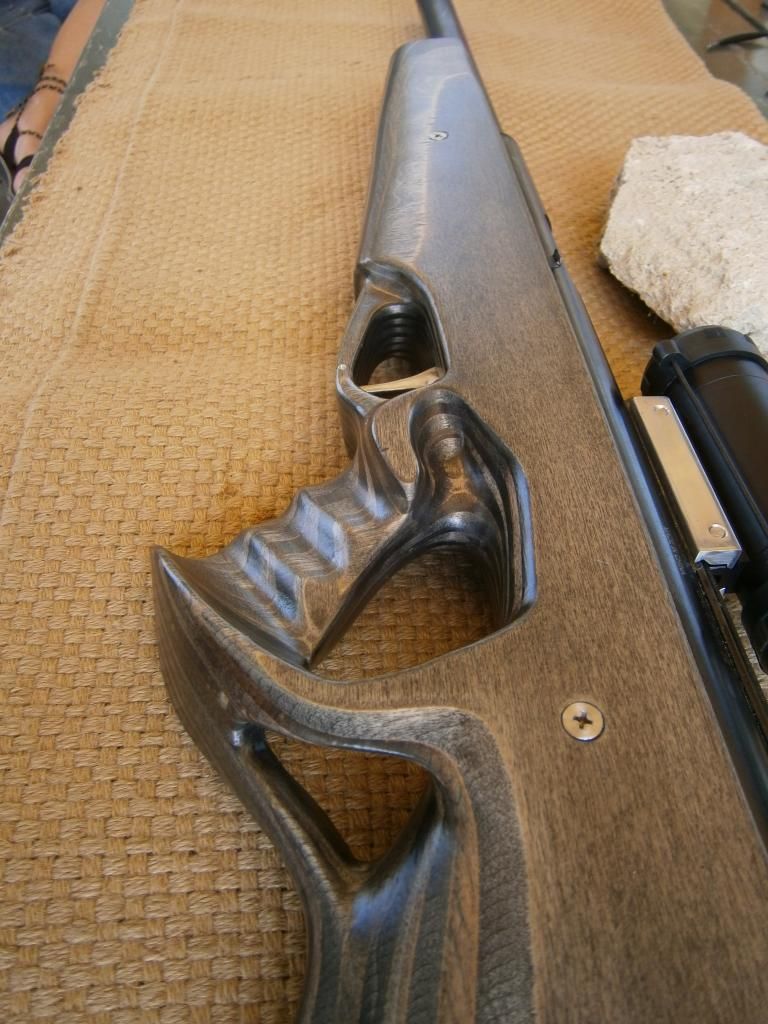
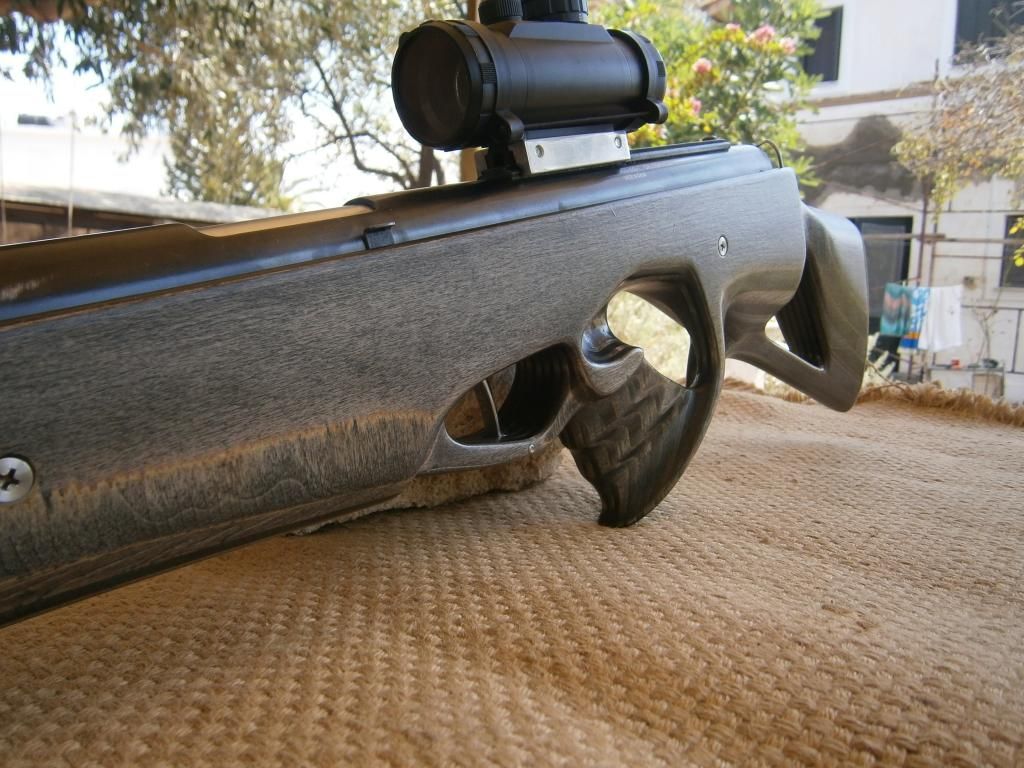
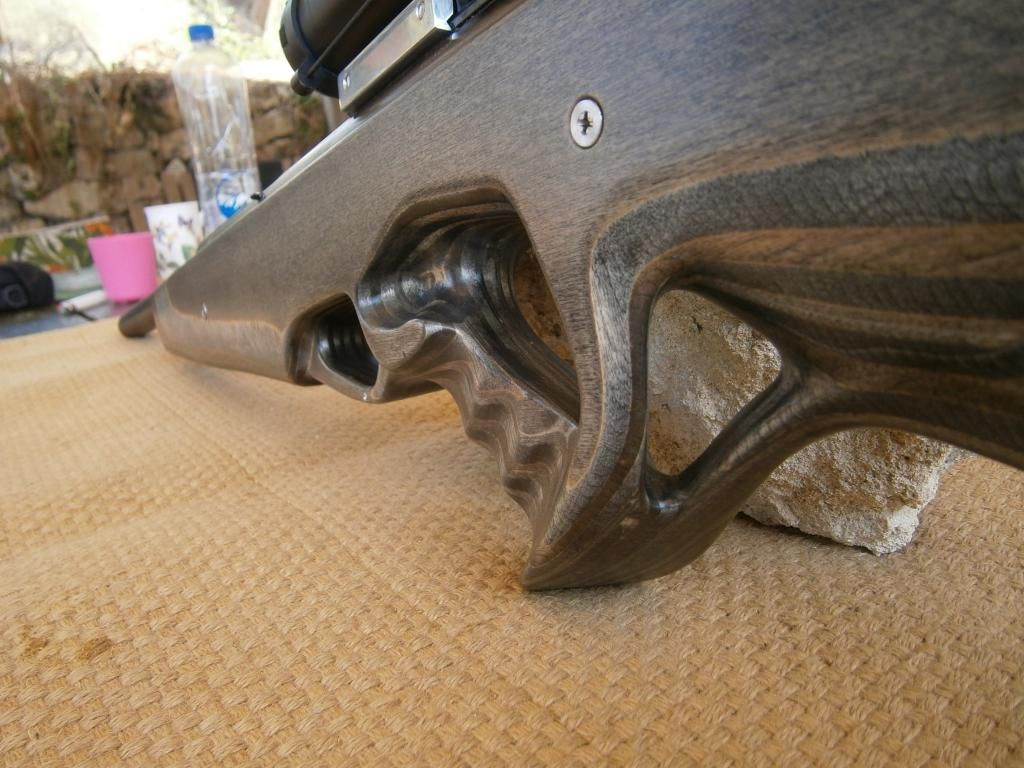
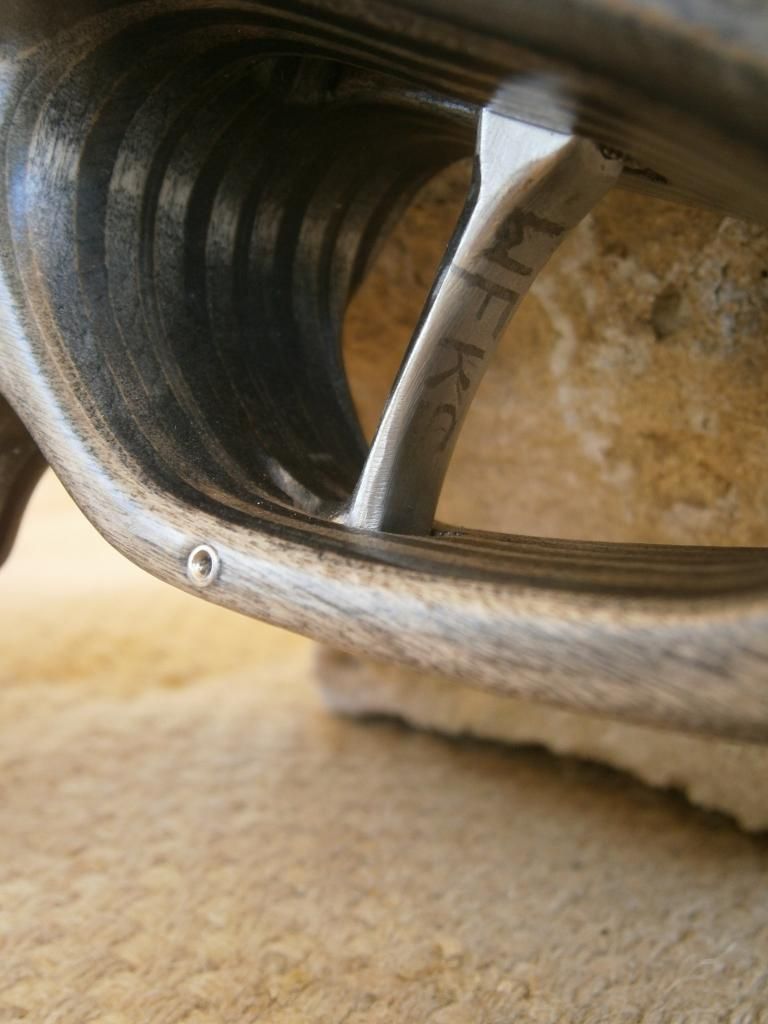
The trigger blade (the one that is touched by finger) is from stainless steel. Cut from an AISI 316 8mm thick blade, rotates on a 3mm pin through the lower end of it, the trigger guard. A small self-made tiny spring, anchored in trigger's lower end and is keeping it upright. Note that it's position is adjustable by a somehow difficult to reach stainless grub-screw (need to dismantle the airgun to be reached). With the help of a carbide milling head on the dremel a slot through the upper part of it has been carved, there, via a 2 mm pin, the trigger link bar is connected. Must say that initially I tried a carbon bi-colored blade was tested but it was rejected due to the orange-colored mid layer of it:
and during tests with a piece of electrode serving as the pin with trigger link bar:
you can see the head-less allen screw for adjusting back/forth position and is resting into the carving on the stock:
the light retaining spring which holds the blade upright and makes for first stage can be seen below. Note the slight off-center positioning on the blade but is centered flawlessly it's tip on the wood of the stock:
a few more photos of the trigger blade with the soft retaining spring hidden in the slot in the lower part:
and this is the final 3 mm pin punched with "centers" for an easy ejection, not a danger to scratch the trigger guard:
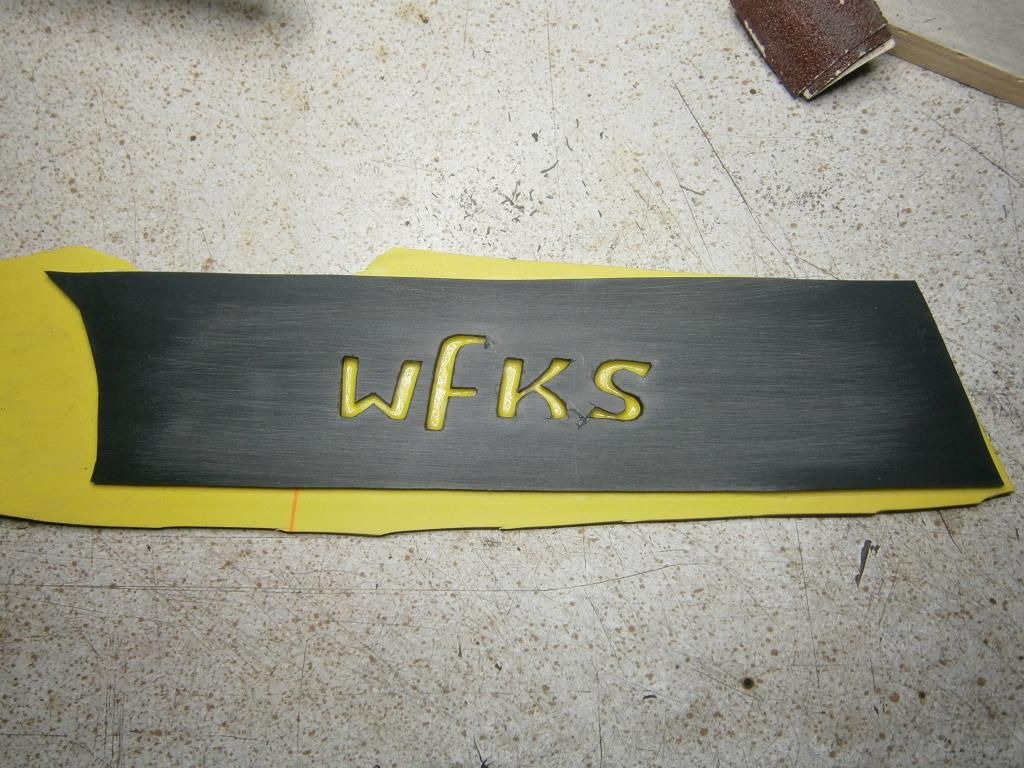
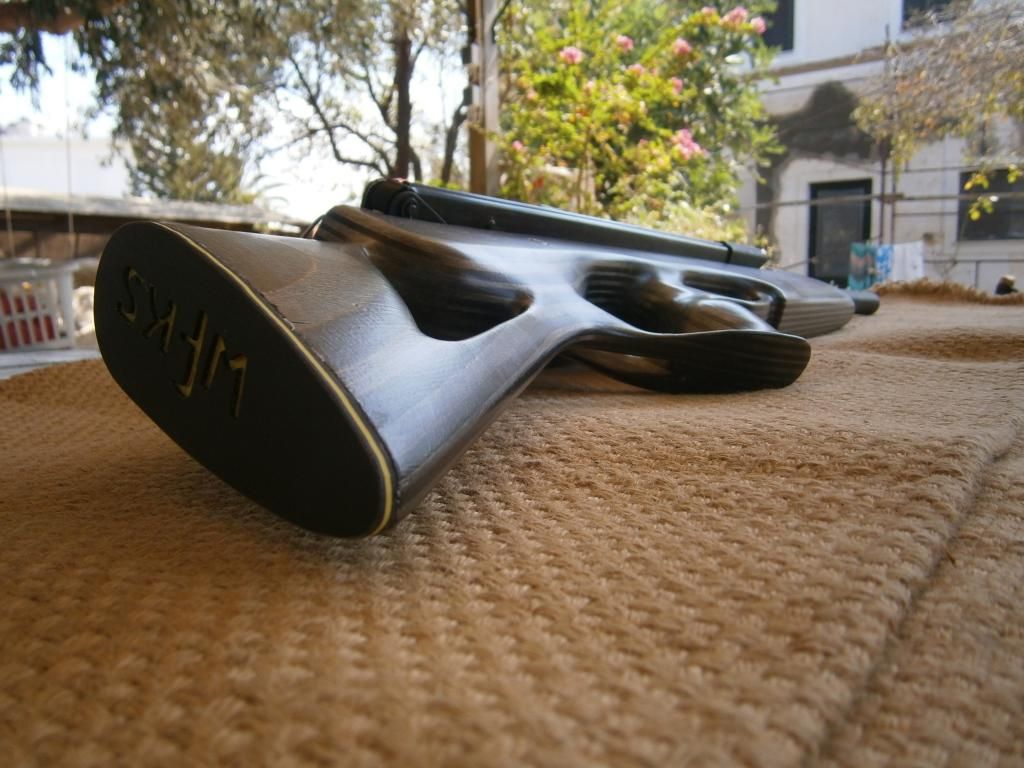
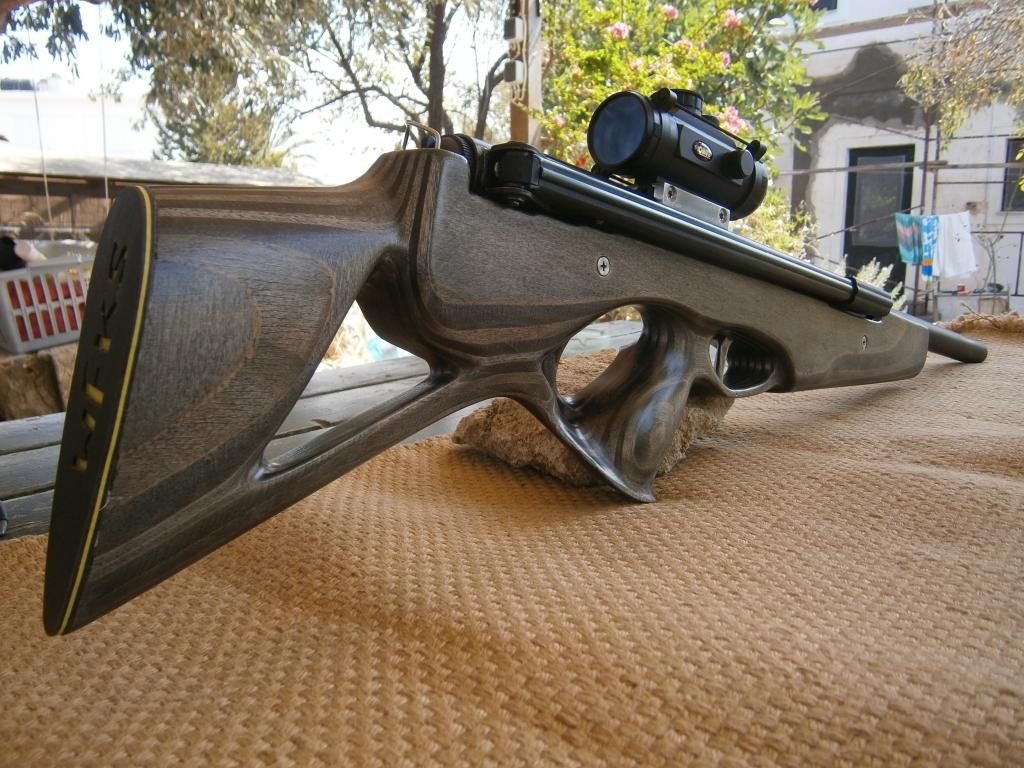
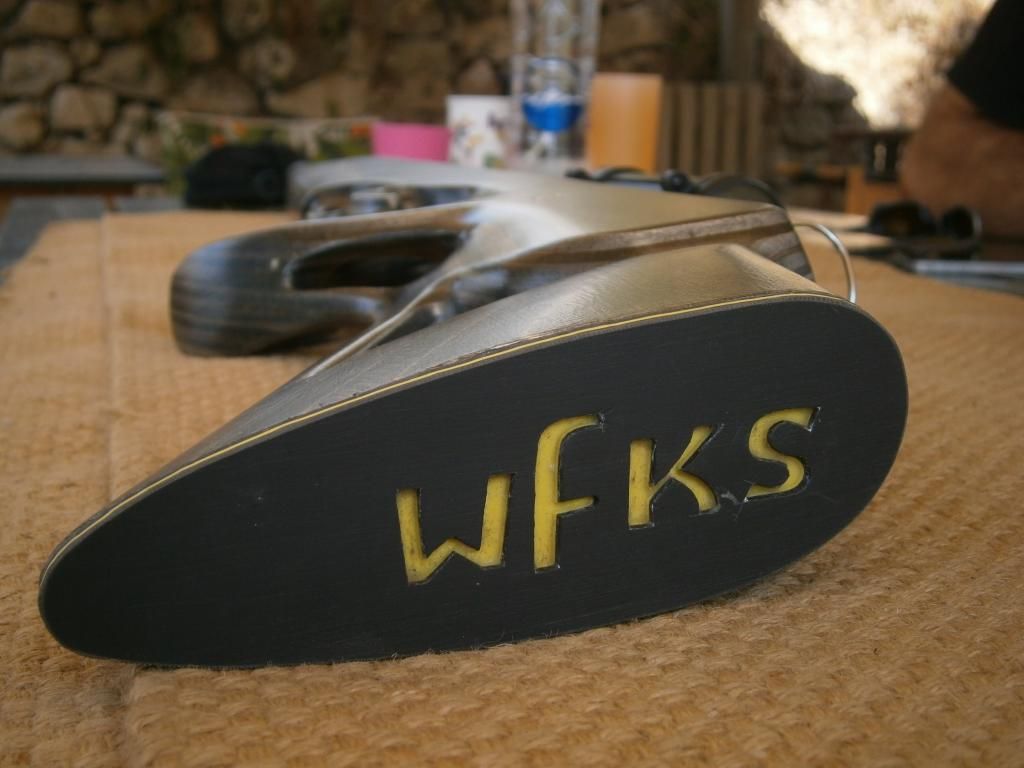
WFKS logo designed on the front of the blade by metal etching (eg electro-corrosion) to stay there forever:
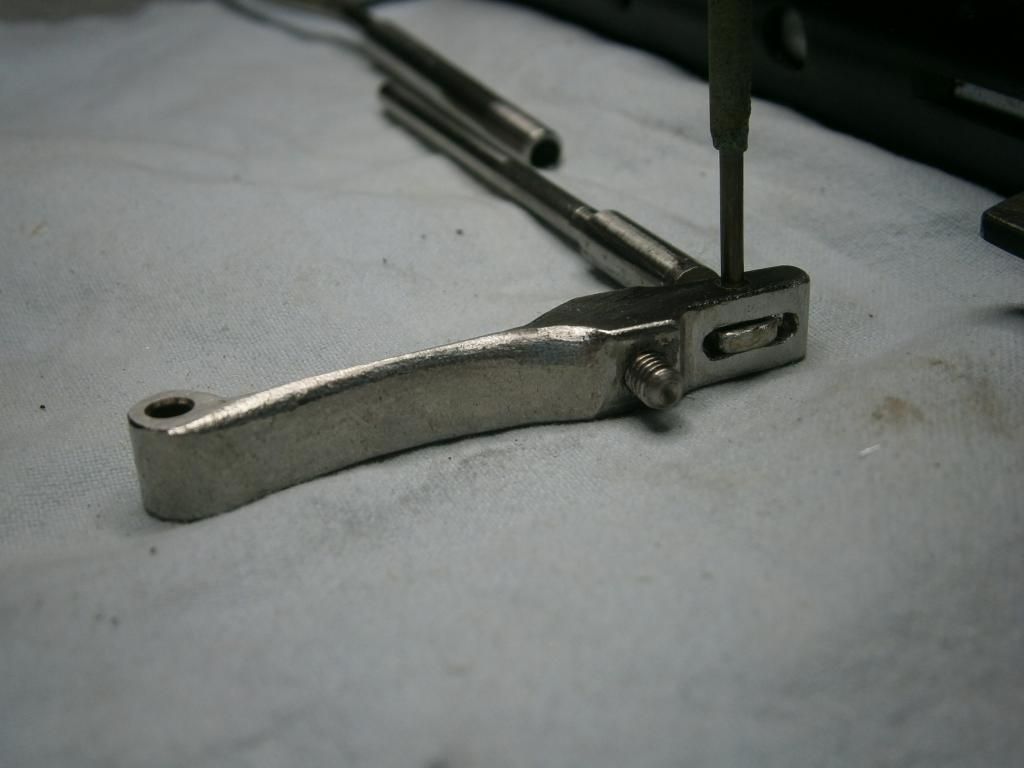
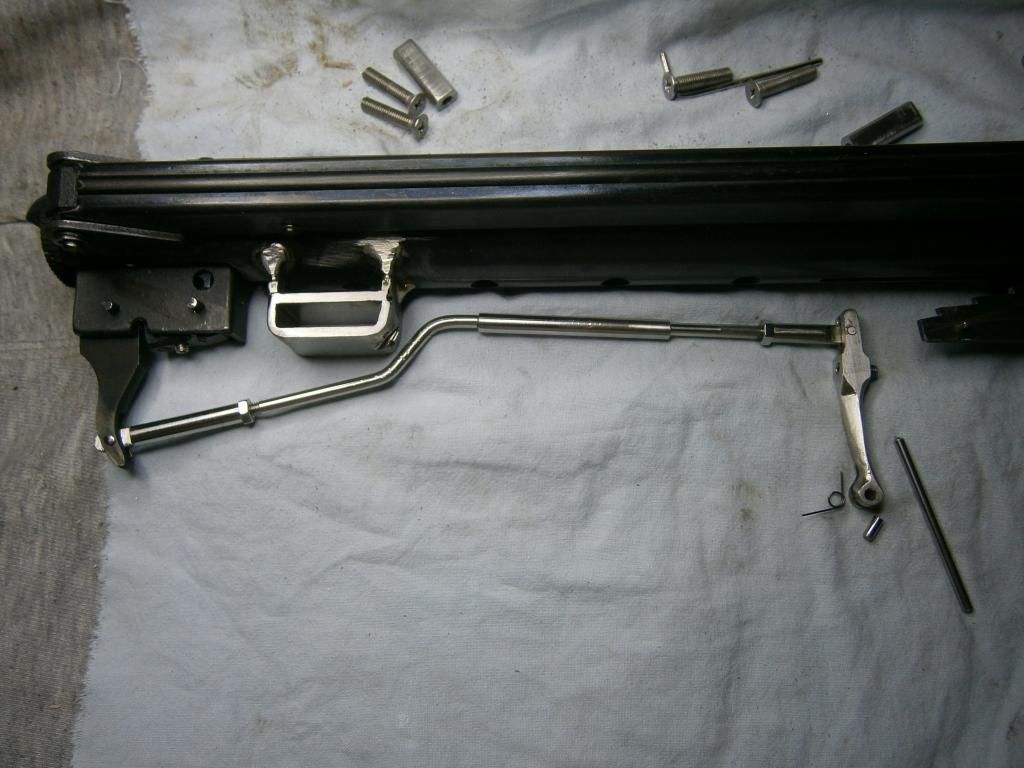
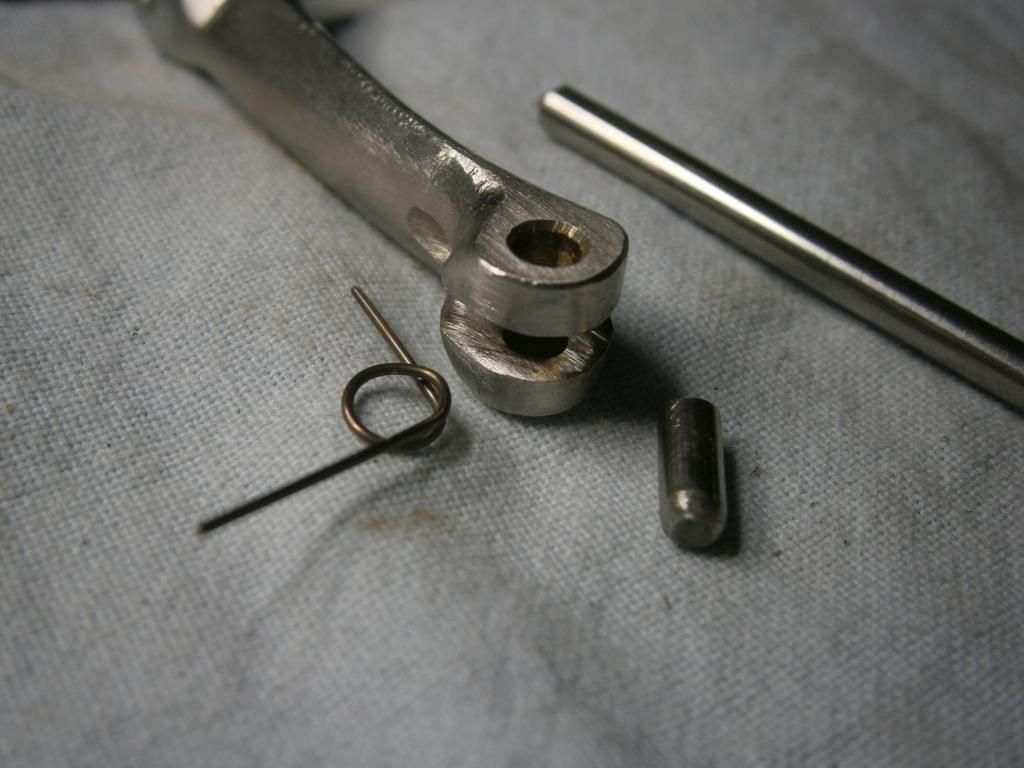
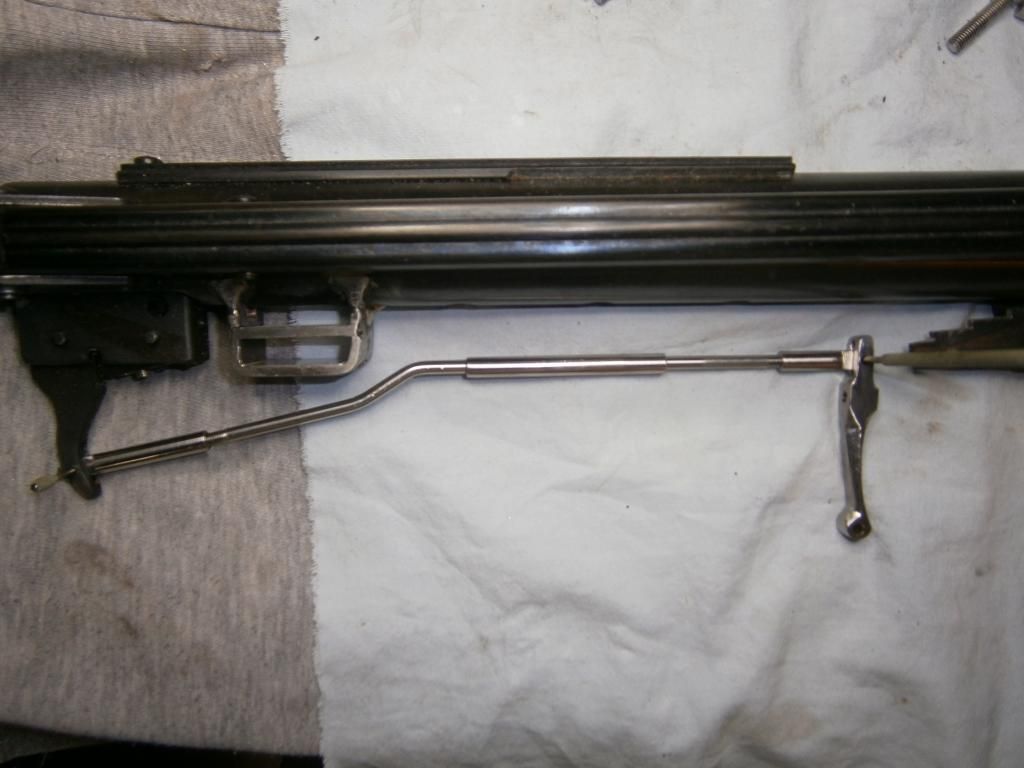
The trigger link bar conveying the command from our finger to the trigger mechanism and it's actual function are things to observe closely. The adjustable trigger bar comprises of two separate sections, the longer one which is bent and anchored in the mechanism blade and the short, straight front which is anchored in the blade touched by finger. The two parts are not connected but are made in such a way that the front one slides into the rear one, making a perfect length adjustment possible. Thus the fuzzy and unacceptable factory first trigger stage is cancelled (via proper adjustment, see trigger paragraph) in the trigger block and is "transferred" from the trigger block as a crisp, clean and totally adjustable stage, between the two said parts of the bar. The trigger bar is made of a suitably bent 4mm steel bar threaded on both ends, which interlock both triggers with the help of two home-made, 6mm stainless adjustable rods. The two bar parts have suitable "ears" to be connected on the block's blade and on the stainless blade which is activated by our finger:
During tests with an electrode for pin:
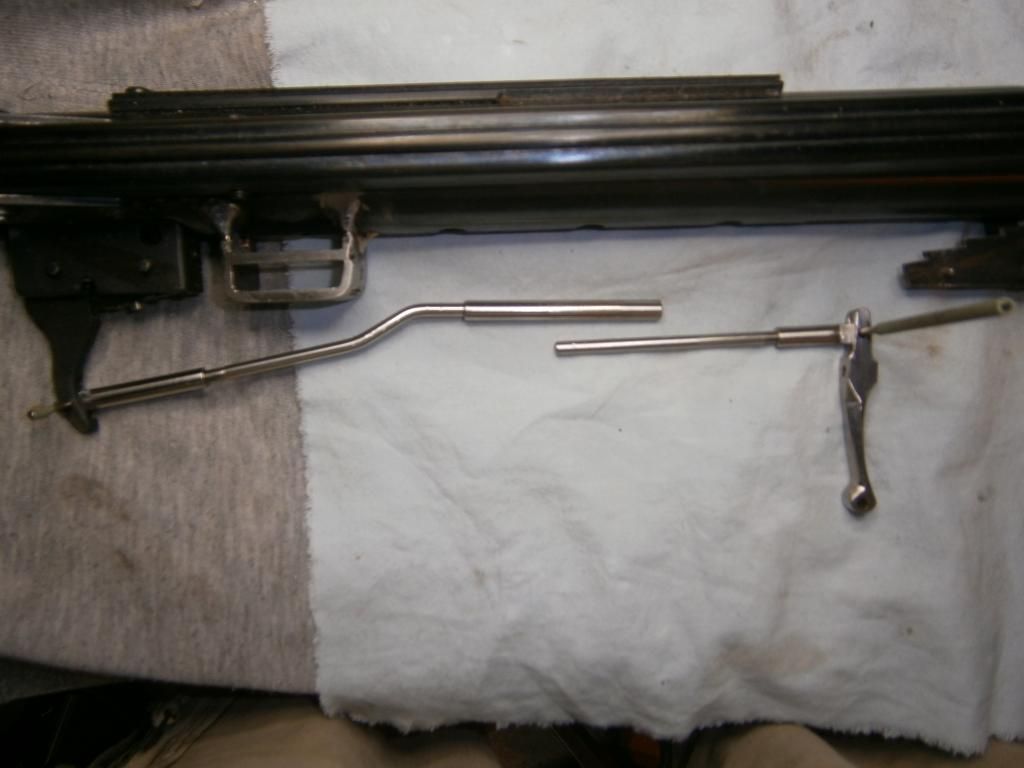
this is the sliding "link" of the two parts of the bar not able to find any similar over the Web, thus Panagis might be the first who had the idea and made it:
here is all trigger link bar system without hex nuts and before final adjustment:
This is to see how the front link bar part slide into the rear giving a crisp, clean and totally adjustable first stage:
The connection with the stainless trigger blade is in a slot and pivots around a 2 mm pin. Adjustable link bar with the lock nut:
Trigger link bar, final formwith thee lock nuts:
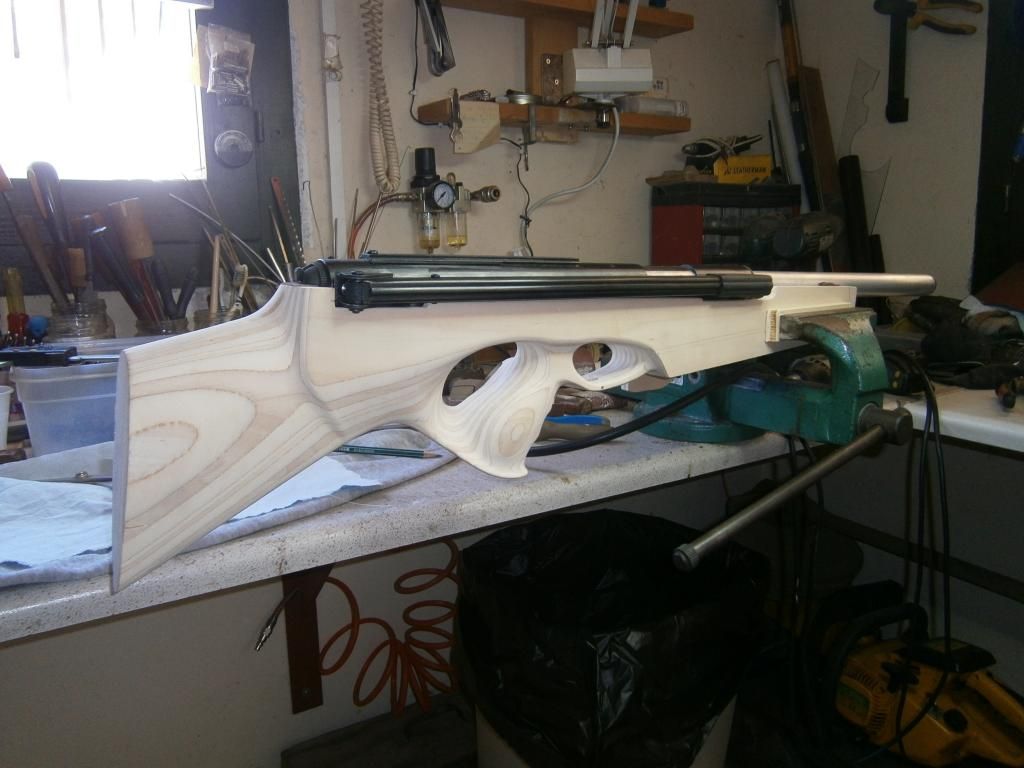
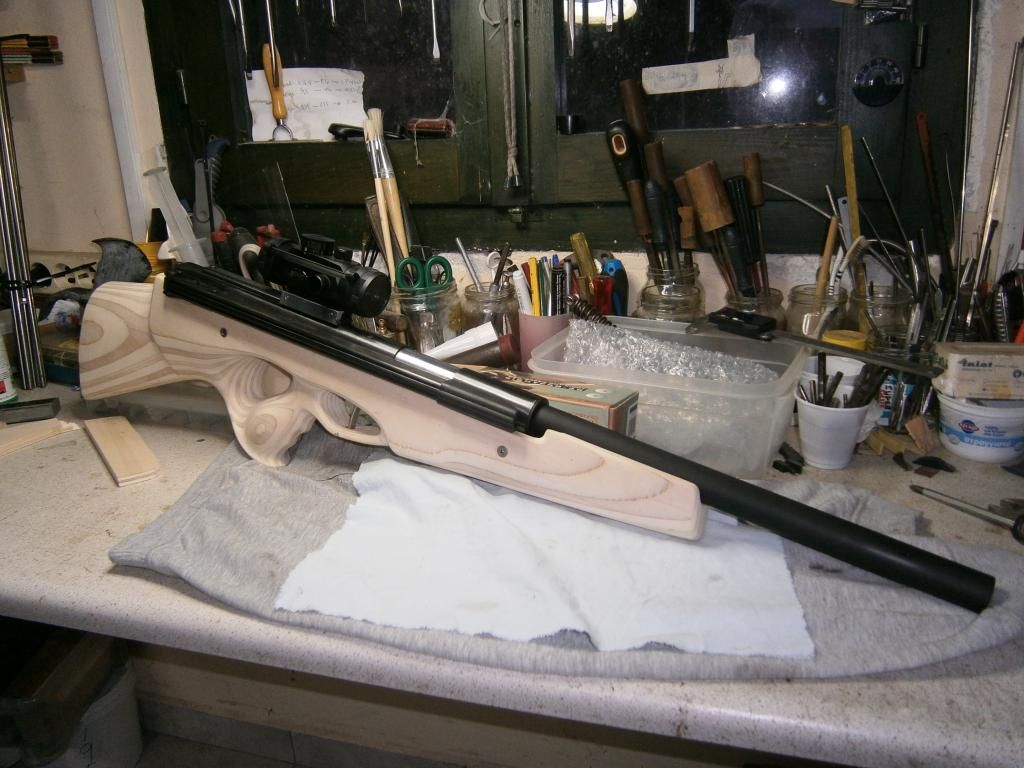
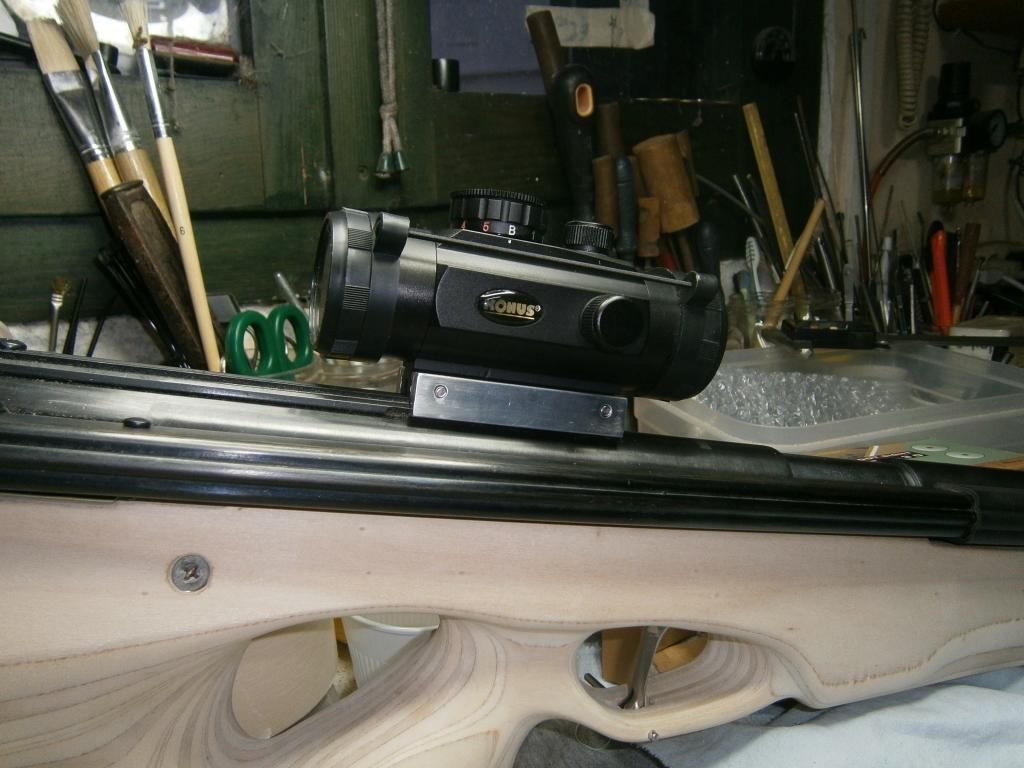
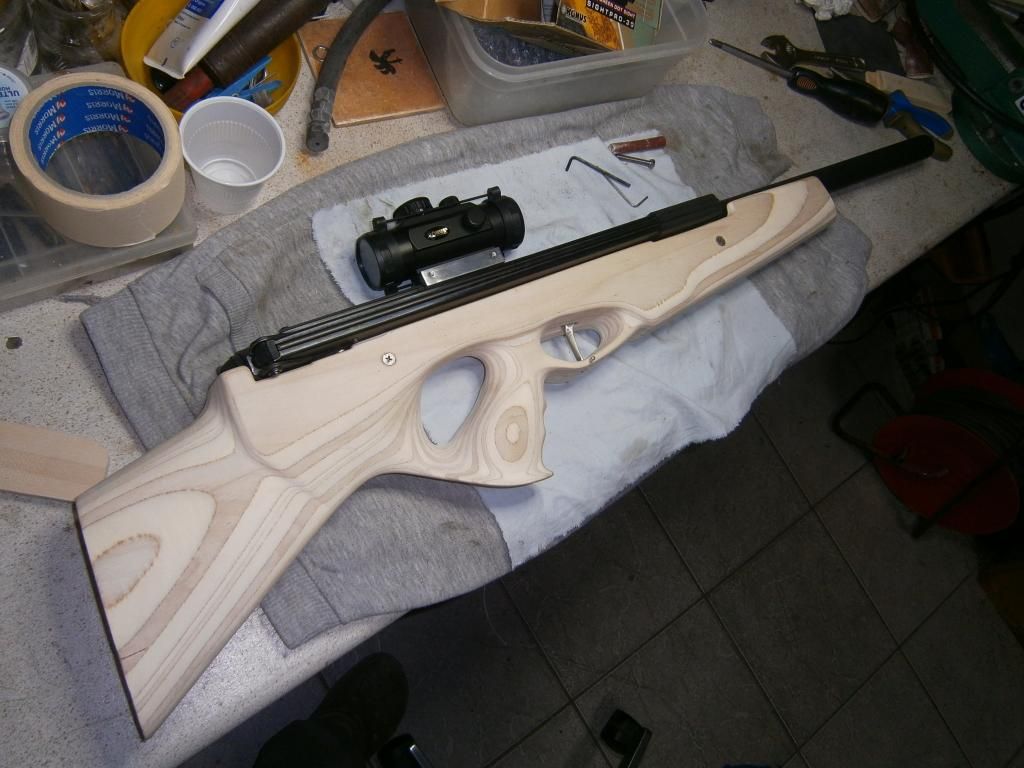
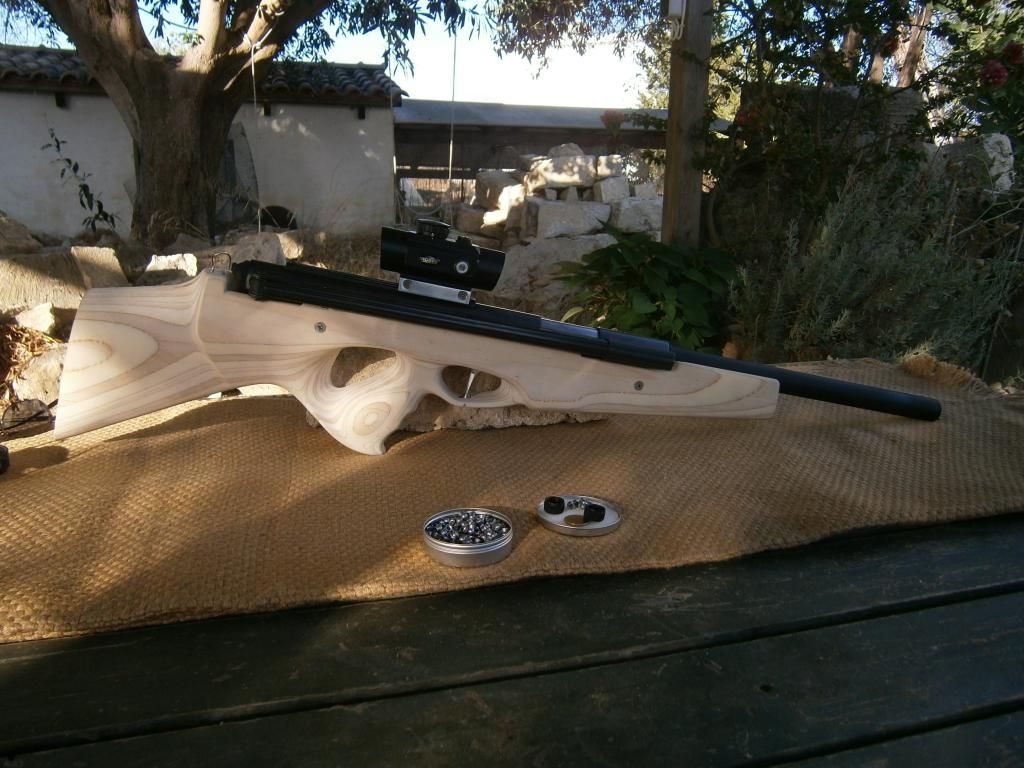
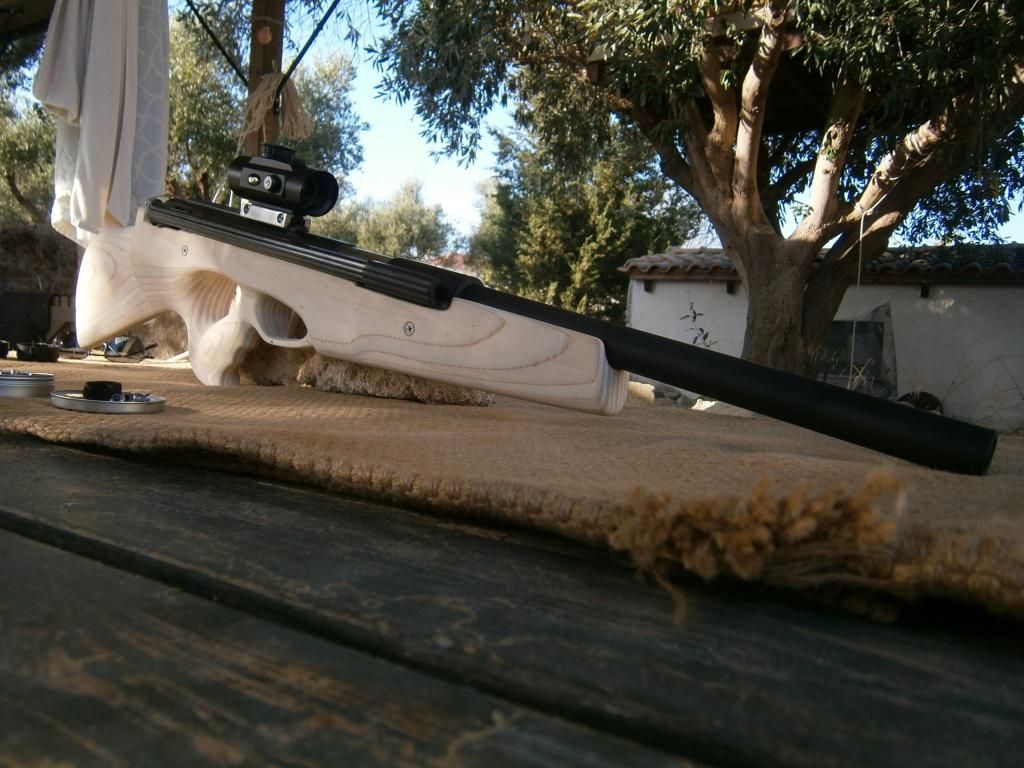
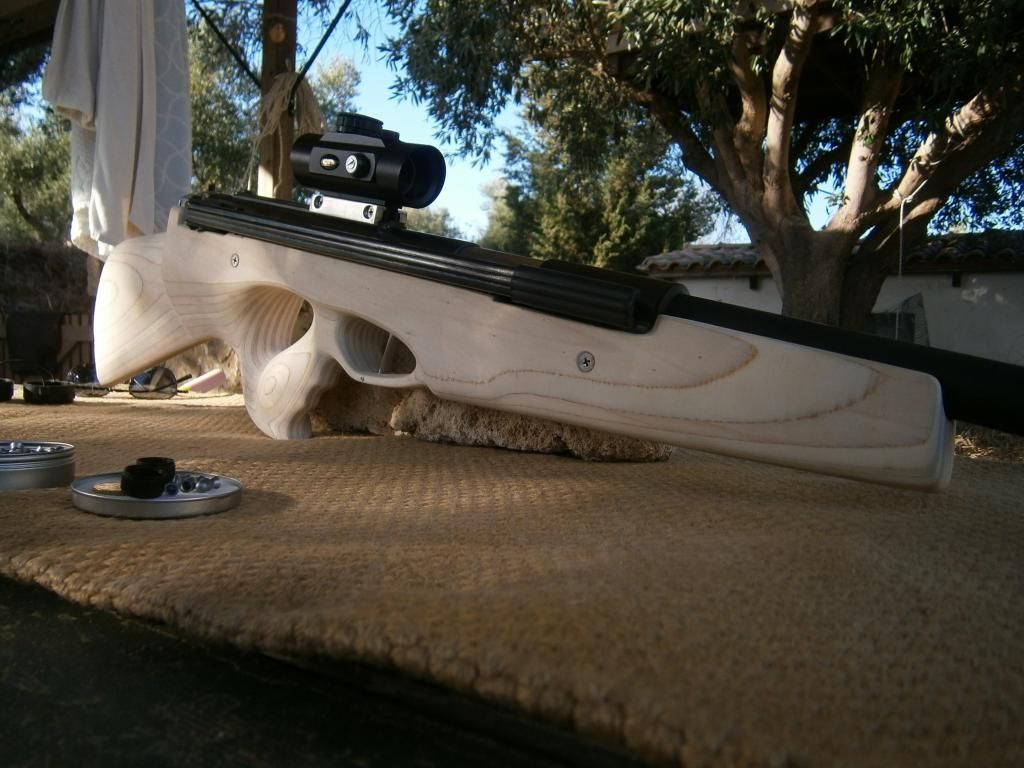
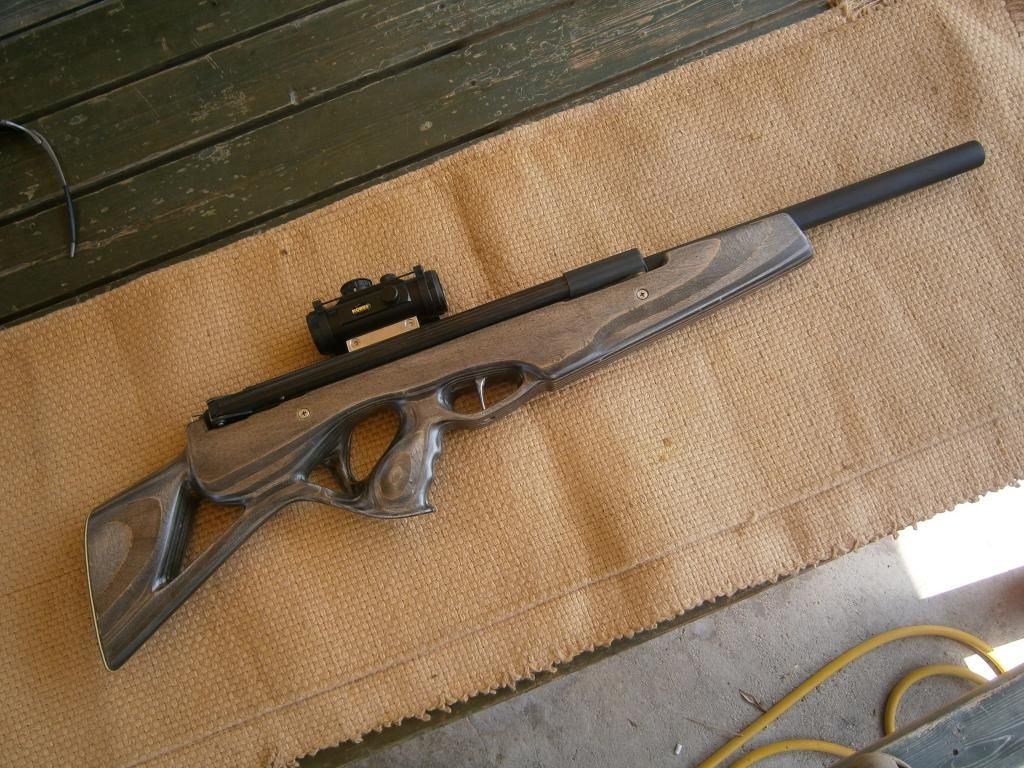
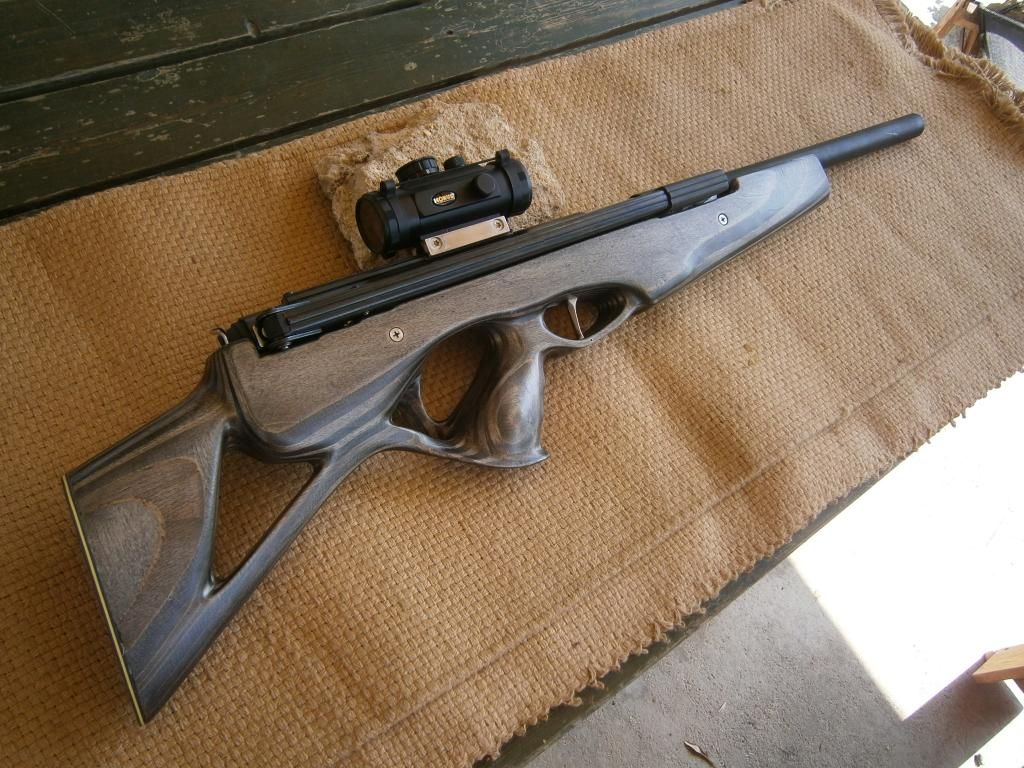
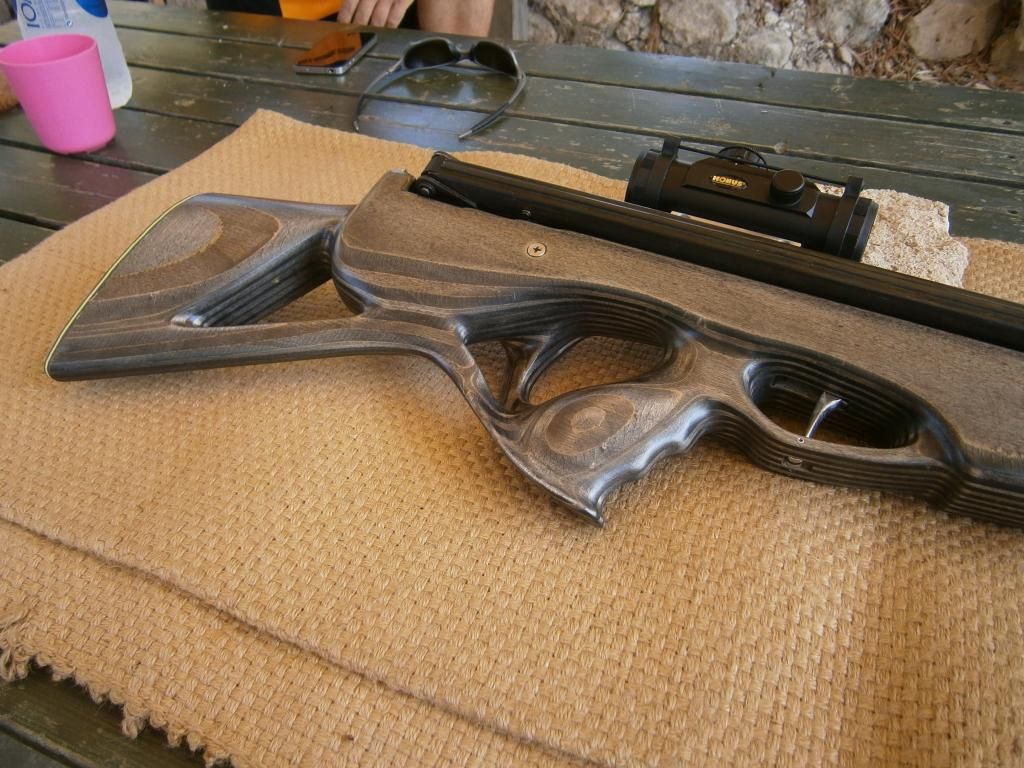
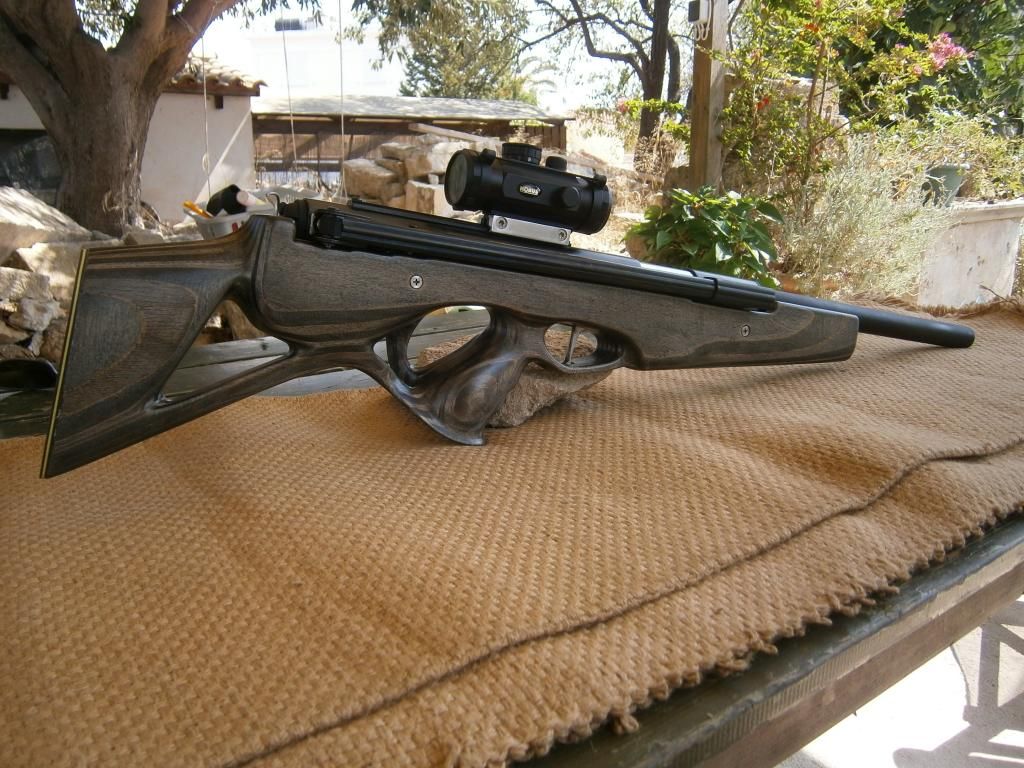
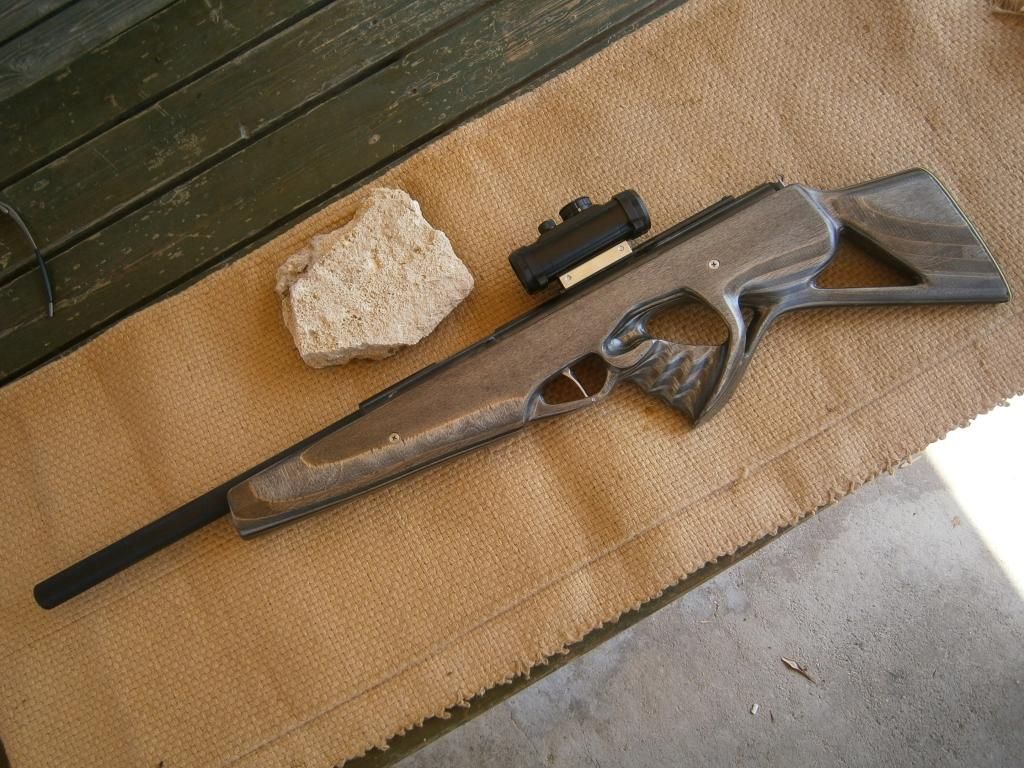
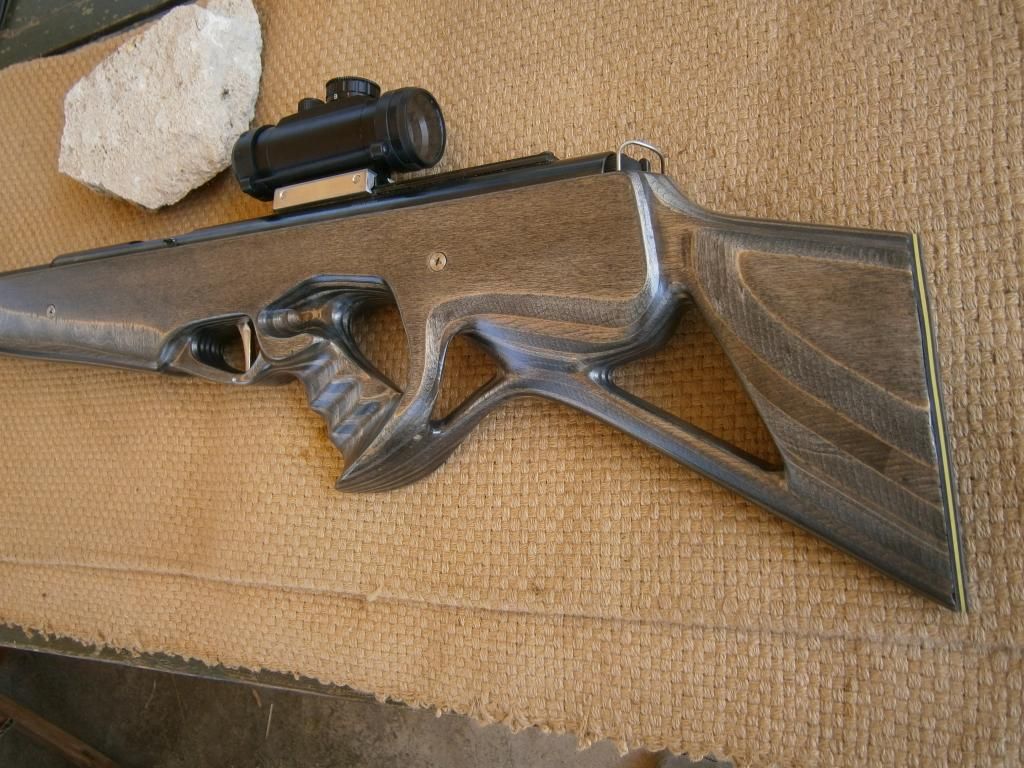
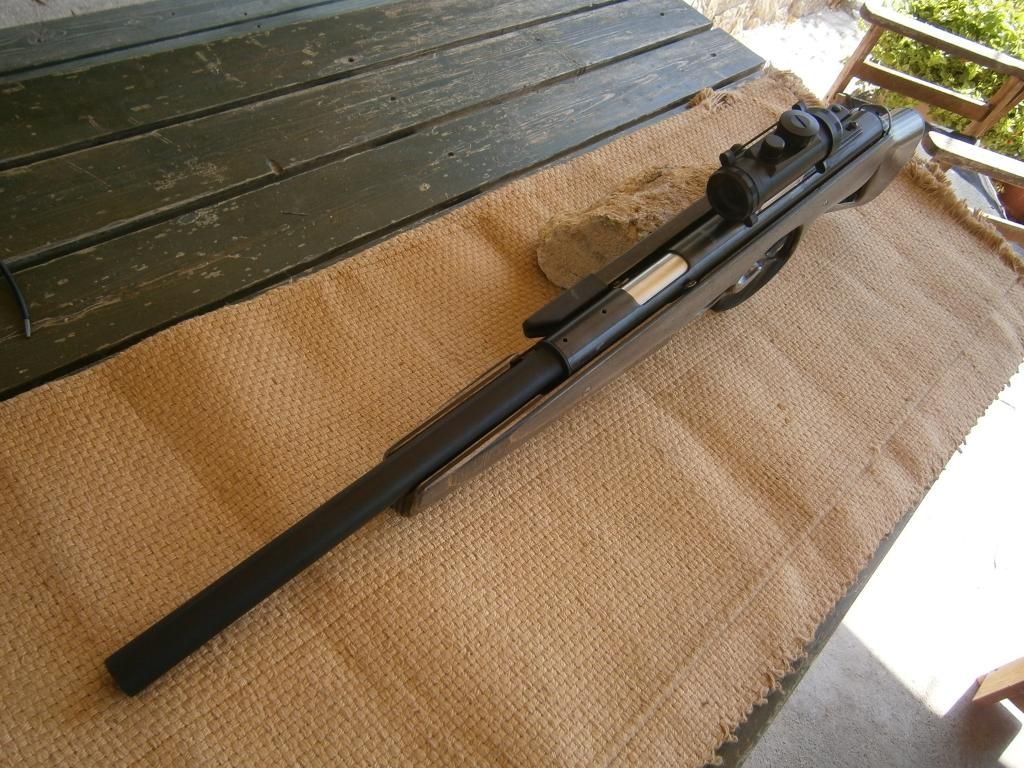
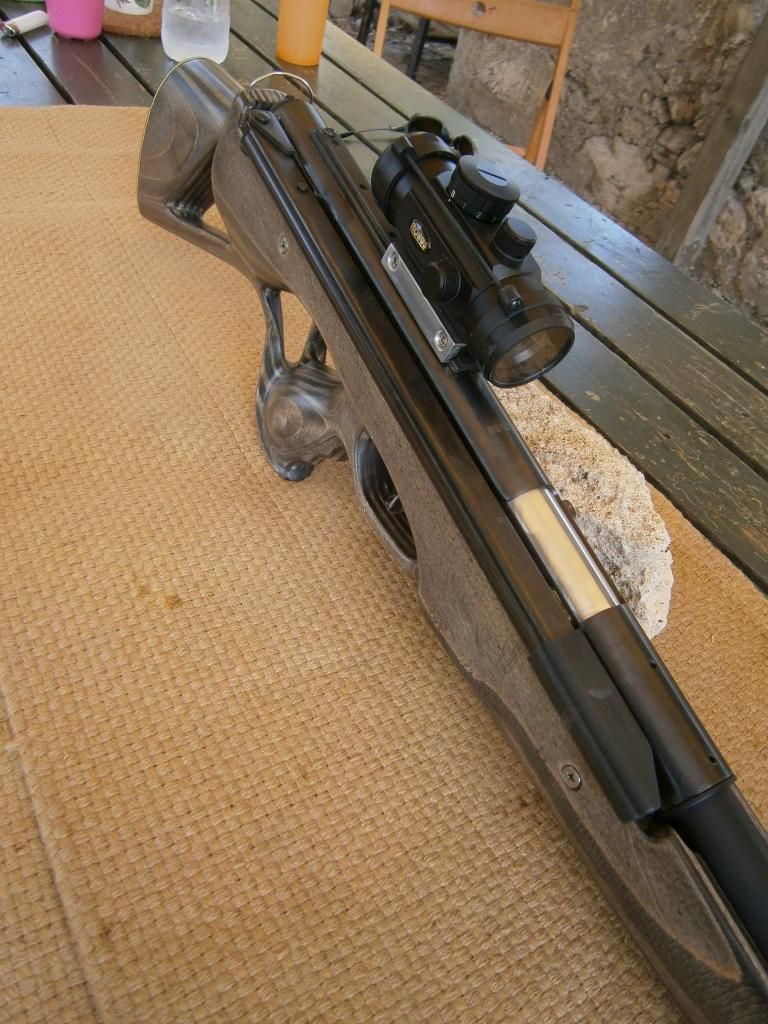
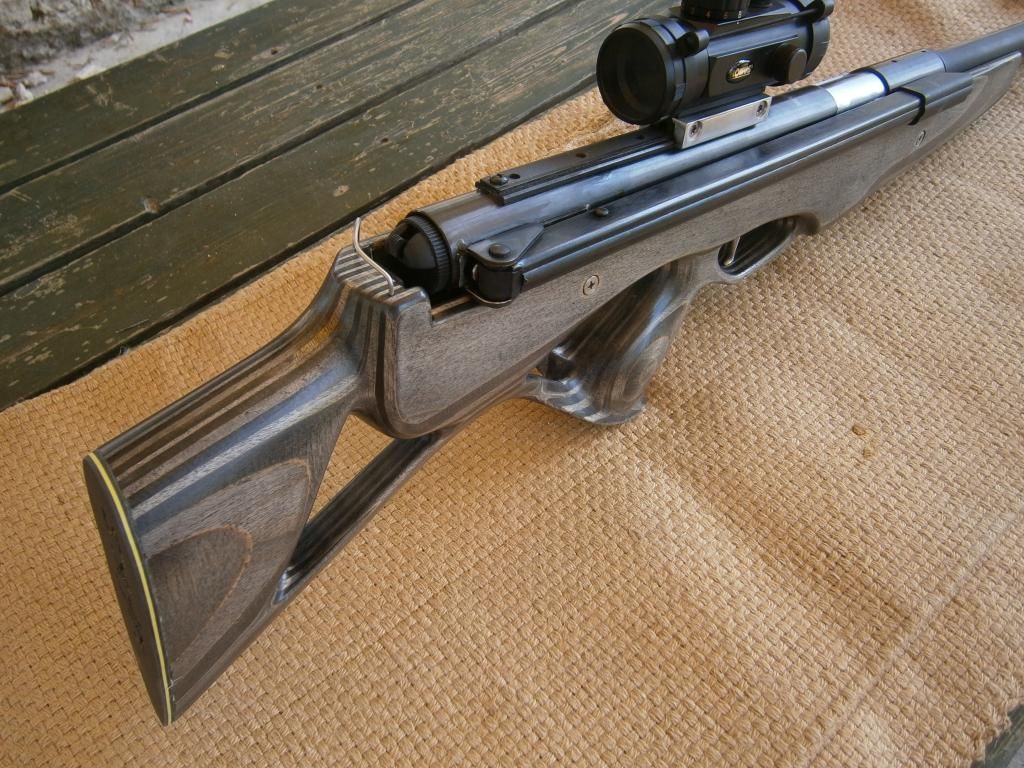
The red dot scope an older KONUS model, bought used from a member of our forum and matched perfectly on this "shorty" airgun:
For the peace of mind and to avoid being hit on the face by the safety button, a protecting 2 mm stainless rail has been wedged near the back left edge of the laminate stock thus securing the recoiling gun block from the shooter:
As soon as the red-dot has been put in position the gun appeared way better ...
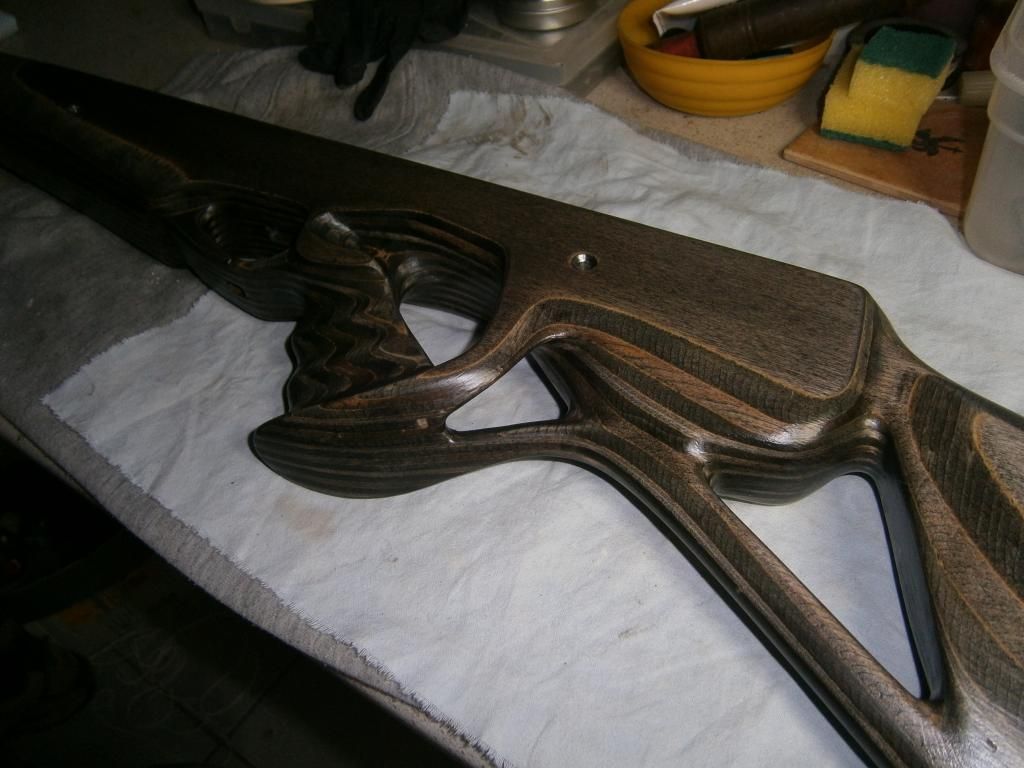
After the project was already finished and Panagis was extensively shooting with it unpainted yet, he was struck by lightning... Dremel, sandpaper, cylinder sanders etc on the hand and the stock turned to a strainer Way better this way...
Bullpup stock sanded up to a 240-gritι emery paper dry, applied a layer of black water stain with a sponge, lightly sanding again and then two layers of matte automotive varnish, applied with brush for a good filling effect. Then, again a light sanding and finally a quick cross-layer with a spray gun spraying the same varnish.
Here you see it with the first layers of varnish with brush. Artificial lighting is unfair for the real thing...

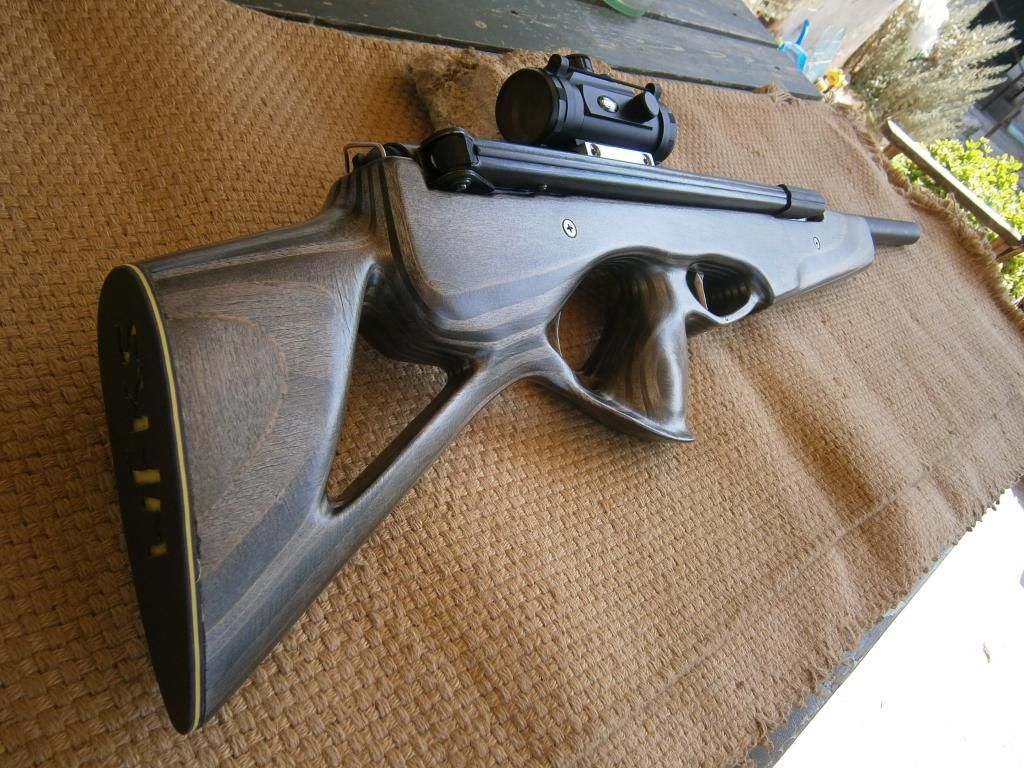
After the last varnish layer application, on the butt-stock there were glued two slices of bi-colored soft rubber 4 mm thick total with the known logo "negative cut":
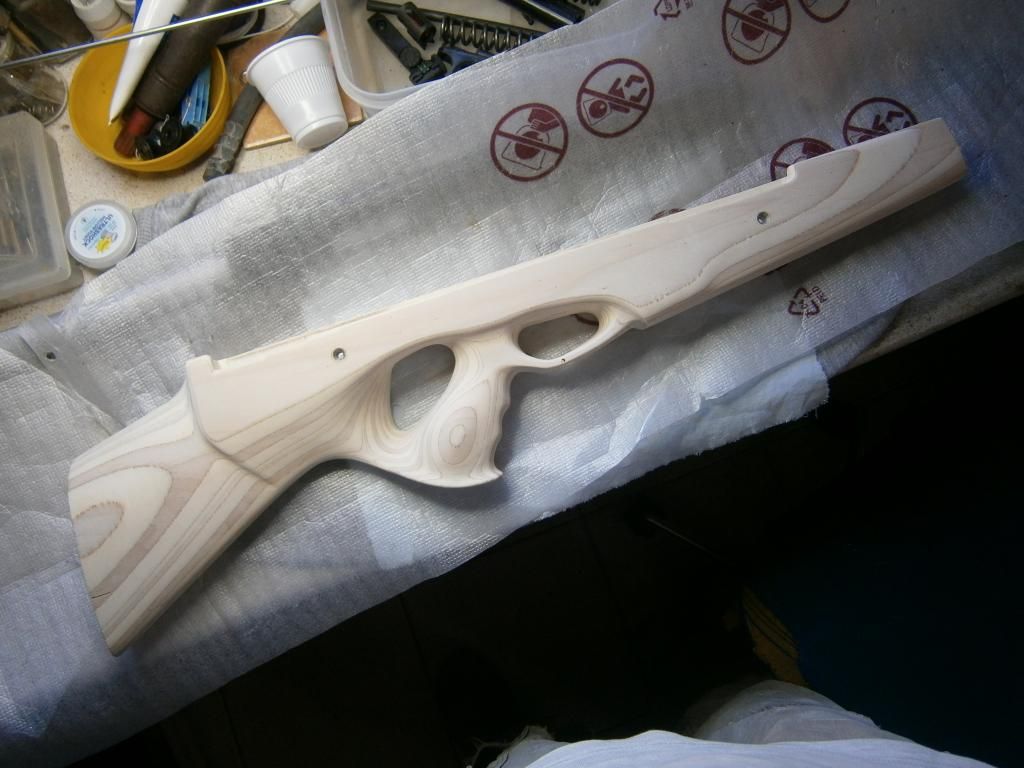
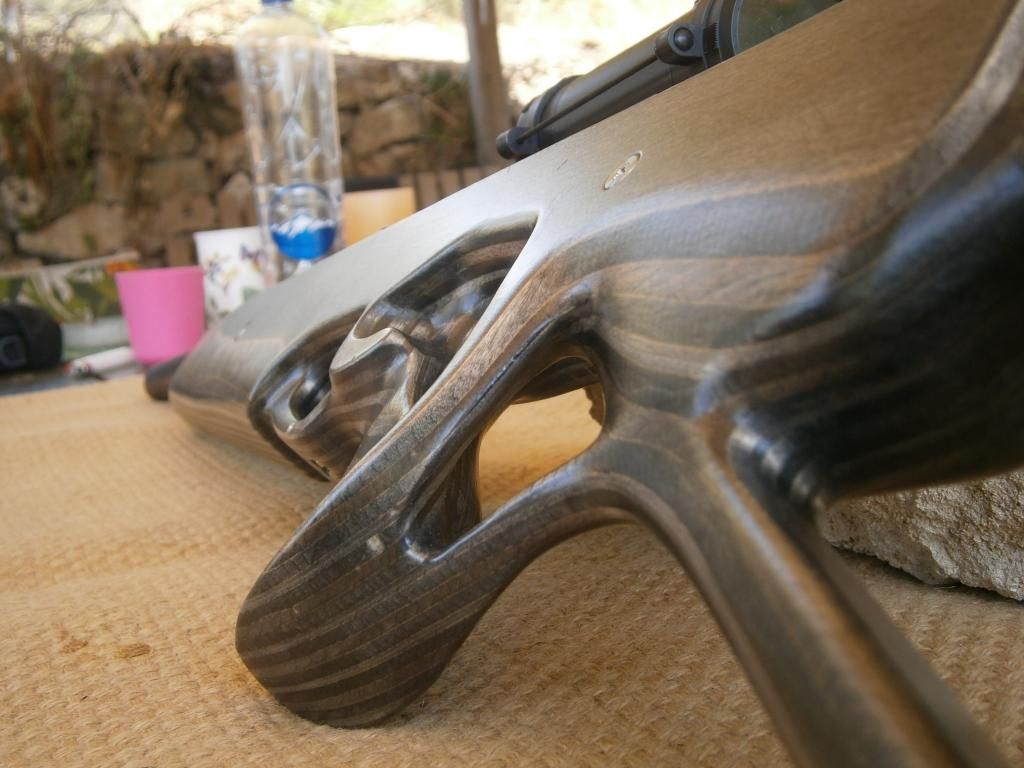
The (yet nameless) stub balances exactly on the tiny trigger-guard hole area, it has a total length of 87.5 centimeters, merely counts as a bull-pup and has a total weight of 4.02 kilos with the red-dot.
Gents, take a look to his first, yet un-named, recoilless springer airgun, with the interesting black transparent stain and we owe to you a video-clip with shooting, penetration and grouping tests


indelibly etched WFKS logo on the blade,
elsewhere too
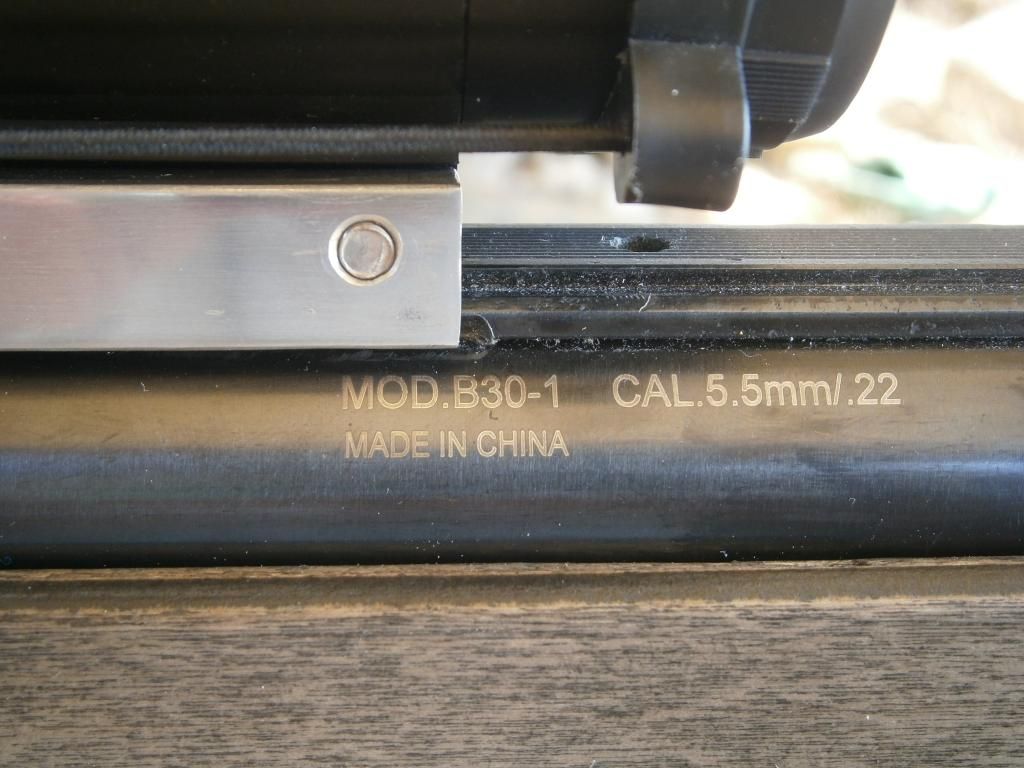
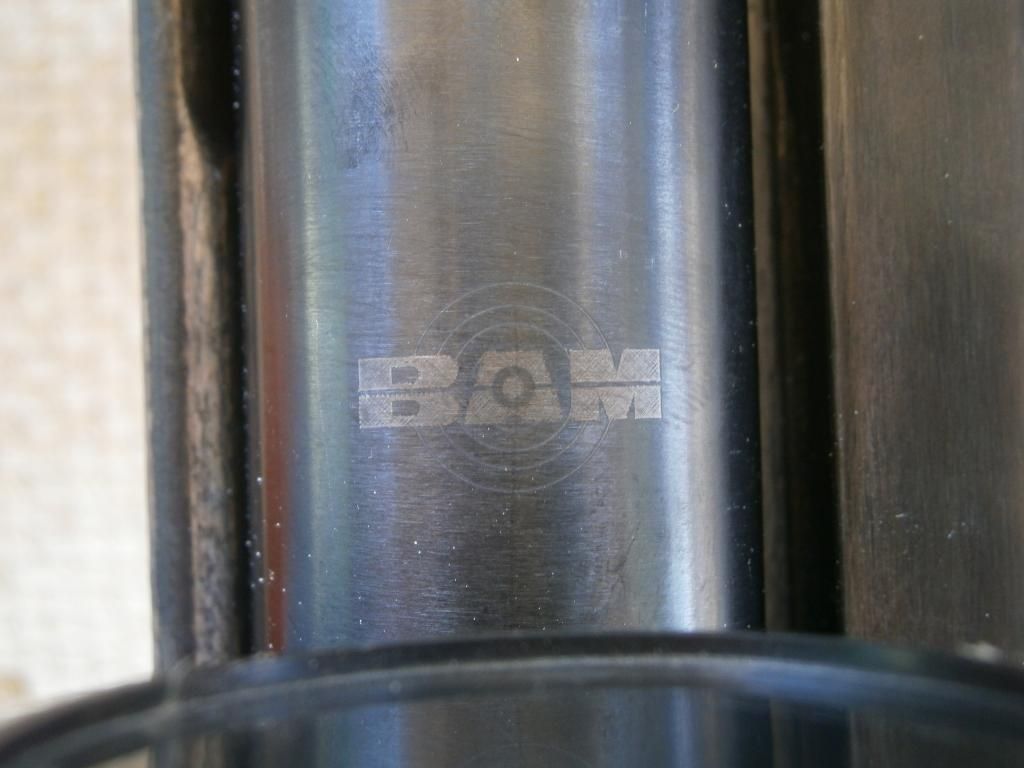
made in China, modified in Greece
You can clearly see the polished safety head activated by the cocking lever fully cocked:
In the following two photos is the thin neoprene sponge, on which the block stops while recoiling:
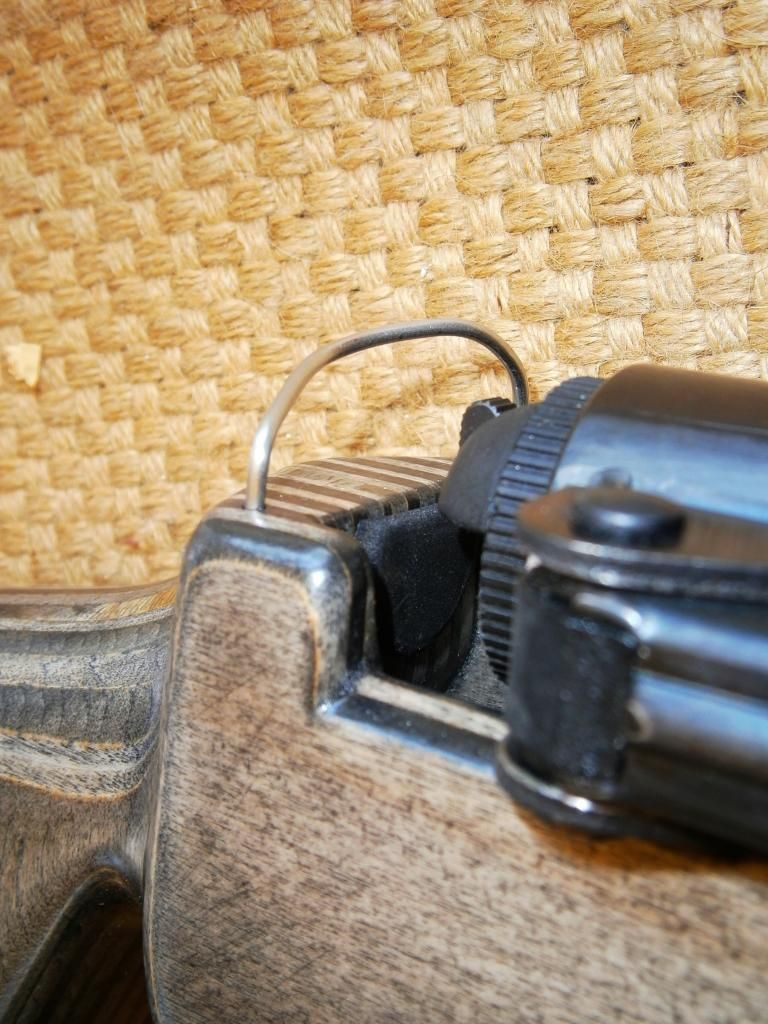
On the red dot changed the factory Μ4 screws with two counter-sunk torx Μ5 just for the aesthetics:
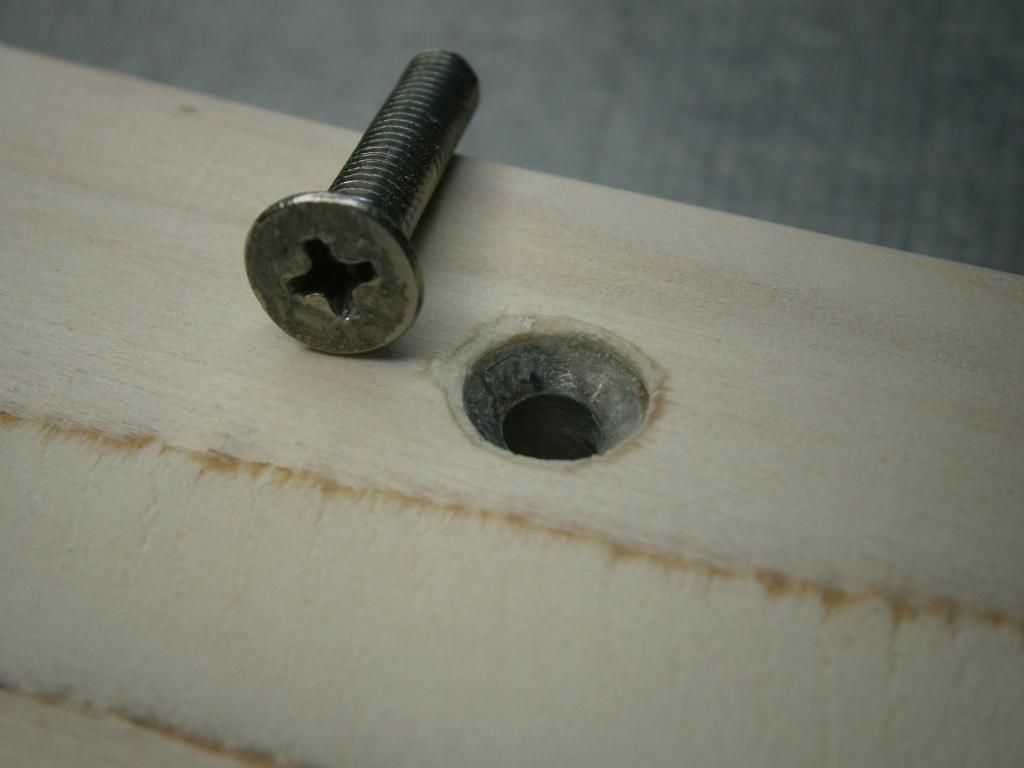
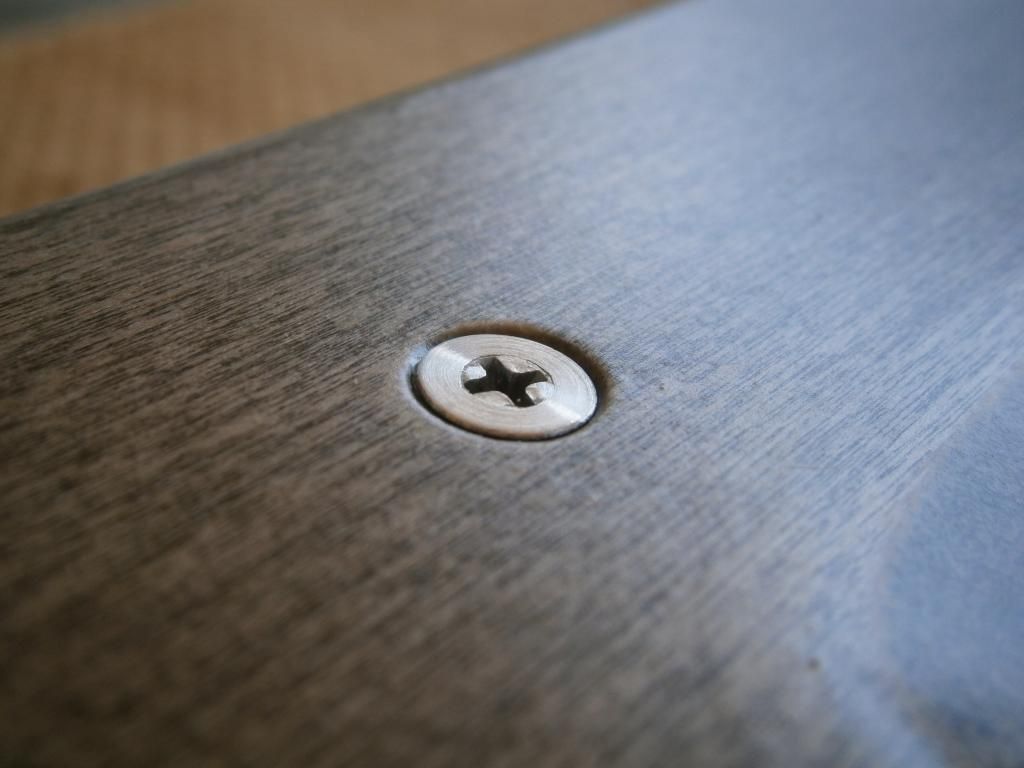
Two minutes on the lathe were enough to polish all four counter-sunk phillips screws securing the gun block on the slides/boxes:
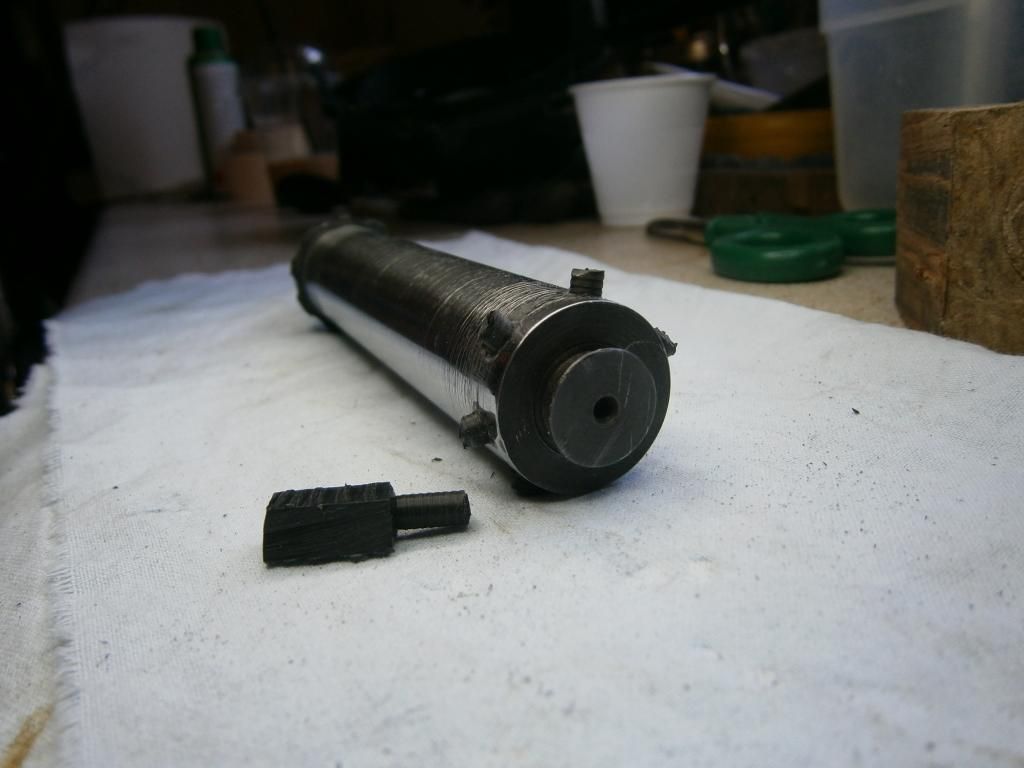
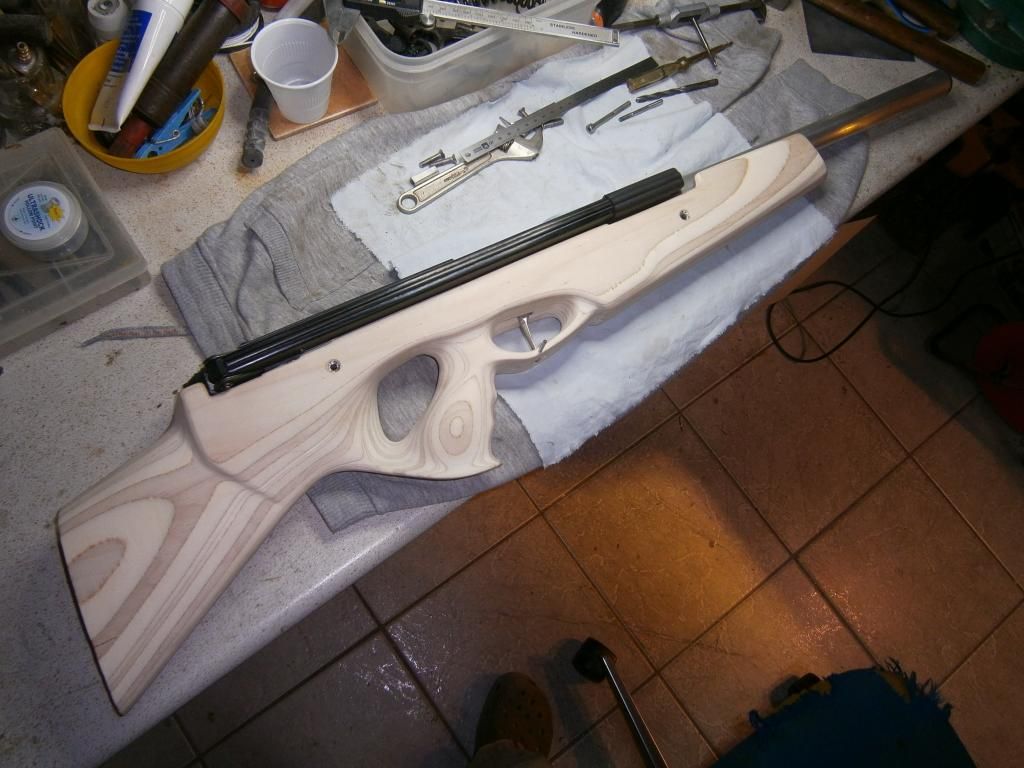
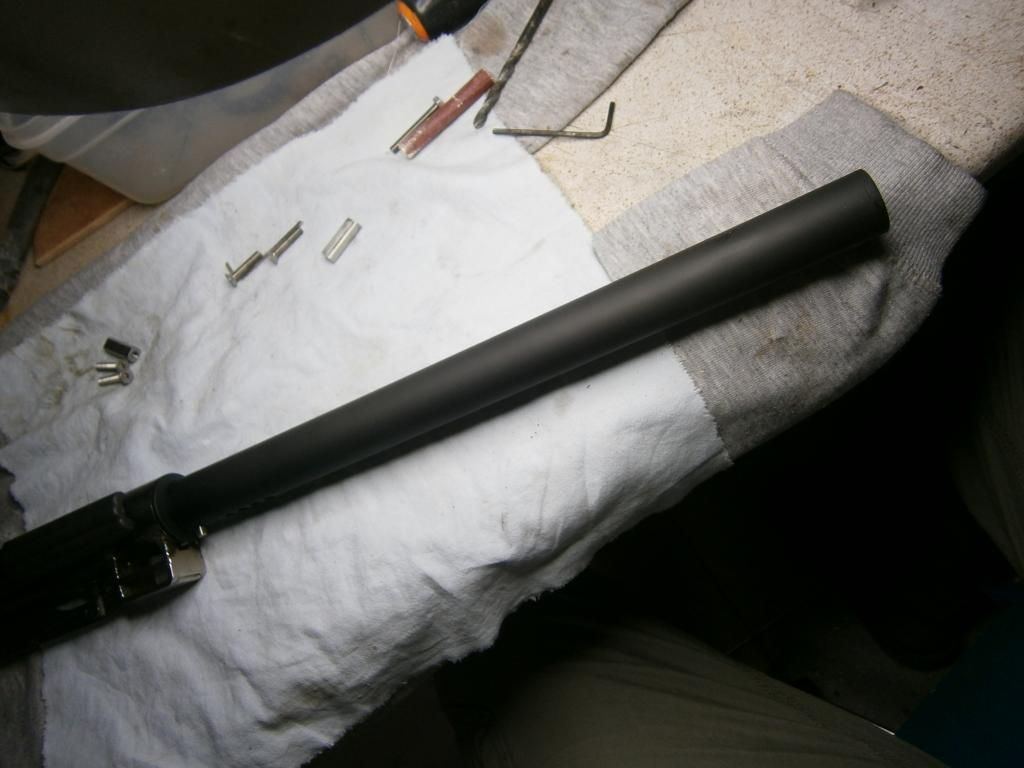
Trashed the horrible plastic factory tubing of the cocking bar leaving it naked, until a future substitution with a stainless one:

Full of curves and arches

Object still named BAM
Shroud to stock is only a millimeter gap all the way. Talking of patience on the job...